
Home Security System User Manual


15
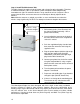
Step 1: Install The Main Control Unit
The Main Control Unit requires both AC power and a phone line to be plugged in. Therefore,
it should be located as close as possible to a power and phone outlet and preferably
mounted out of sight. For maximum wireless range, mount the unit at a height of 1.5m or
greater from the floor, and ensure there are no metal objects directly adjacent to the
antenna.
Note: Make the antenna as straight as possible, as even small bends can reduce the
wireless range significantly. DO NOT ever attempt to shorten or lengthen the antenna.
The Watchguard Digital has been designed with most single & two storey residential /
business premises in mind. In some instances however, (due to the construction of the
building) range may be diminished, and this may require you to locate either the main control
unit, the external siren, or the alarm detector closer to one another to achieve reliable
performance. Carrying out Auto Siren test (Refer Page 45) and Walk Test (Refer Page 43)
will ensure best operation.
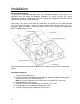
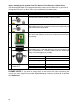
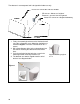
Installing the Main Control Unit
1. Drill mounting holes (7mm Diameter) into
the chosen location (preferably 1.5m or
greater from the floor).
2. Once installed, the antenna on the back of
the main control unit must be straightened
so that it is vertical.
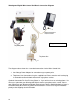
3. Push the supplied wall plugs into the holes
then mount the unit on the wall using the
supplied screws.
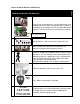
4. Plug the power adapter (with the right angle
plug) into your power point (leaving it
switched off), and connect the right angle
plug into the Main Control Unit.
5. Connect your phone line via the line socket
using the lead provided. If using a regular
phone from the same wall socket, connect it
to the phone socket.
6. Turn the power point on where the power
adapter is connected.
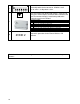
7. Prepare to select billing plan if you intend to
change the plan (Default: Home Plan)
8. If there is no change to the monitoring plan,
Turn the master key switch on the main
control unit to the on position.
Antenna
– Keep
vertical & straight