
Installation Manual


© 2017 IronRidge, Inc. All rights reserved. Visit www.ironridge.com or call 1-800-227-9523 for more information.
1
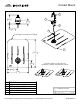
Installation
Tools Required: roong bar, caulking gun with approved sealant, drill with 7/16” socket.
Sizing: adjustable clamp ts conduit with diameters between 3/4” EMT - 1” EMT.
Slide ashing between 1st and 2nd course, so the
top is at least 3/4” above the edge of the 3rd course
and the bottom is above the edge of the 1st course.
FM-CM-MAN REV 1.0
2
Fill hole in dock with roong manufacturer’s
approved sealant. Insert screw with bonded washer
through hole. Tighten screw until fully seated.
3
Place Conduit Cap on dock and rotate 180 degrees
to secure.
4
Position Clamp over conduit and snap onto
Conduit Cap.
5
Adjust top bolt so saddle is snug on the conduit.
Tighten bolt on top of saddle to 40 in-lb [4.5 Nm].
1st course
2nd course
3rd course
Alternative Installation: The threaded holes on the Conduit Cap allow for the installation of strut channels, bridging,
or other components. Instead of the Clamp, install your component directly to the Conduit Cap using stainless steel
1/4”-20 bolts and tighten bolts to 40 in-lb [4.5 Nm]. Each of the threaded holes has a load rating of 40 lb [18 kg].
7/16” hex
UL 2239 Listed
Conduit Mount conforms to UL Standard 2239
“Hardware for the Support of Conduit, Tubing,
and Cable” requirements. Load rating: 40 lb
[18kg]; Temperature rating: -40ºF to 194ºF
[-40ºC to 90ºC]. Suitable for wet locations and
max 3.05m (10ft) support interval.
Water Seal Ratings
Water Sealing tested to UL Standard 441 Section 27 “Rain Test”
and TAS 100-95 “Wind Driven Rain Test” by Intertek. Ratings
applicable for composition shingle roofs having slopes between
2:12 and 12:12. Tested and evaluated without sealant. Any roong
manufacturer approved sealant is allowed.
#5007492
40 in-lbs [4.5 Nm]