
GripCap+ Install Manual

© 2020 IronRidge, Inc. All rights reserved. Visit www.ironridge.com or call 1-800-227-9523 for more information.
FV-GCP-01-YX-MAN REV 1.2
Insert Lag Bolt through Cap and flashing. Tighten
lag bolt until fully seated. FlashVue with GripCap+
is now installed and ready for IronRidge XR Rails.
Installation
Tools Required: FlashVue Flashing and Lag, tape measure, chalk, approved sealing materials, driver with 1/4”
bit and 7/16” hex socket
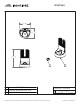
Locate rafters and snap vertical and horizontal lines
to mark locations of flashings. Drill 1/4” pilot holes,
then backfill with roofing manufacturer’s approved
sealant.
When installing Gripcap+ on roofs with undulations greater
than 1 inch, install GripCap+ in low points across the array as
required. If removing a GripCap to replace with GripCap+, it
may be required to loosen an already installed adjacent
GripCap. Be sure to replace washer with new provided
washer and refill pilot hole with sealant.
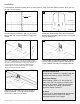
Slide flashing between 1st and 2nd course, so the top is
at least 3/4” above the edge of the 3rd course and the
bottom is above the edge of the 1st course. Line up pilot
hole with flashing hole.
1st course
2nd course
3rd course
2
Rafter
1
3
Attach rails to either side of the open slot using
bonding hardware. Level rail at desired height,
then torque to 250 in-lbs (21 ft-lbs).
4
Torque to
250 in-lbs
5
Structural Certification
Designed and Certified for Compliance with the
International Building Code & ASCE/SEI-7.
Water Seal Ratings
Water Sealing Tested to UL 441 Section 27
“Rain Test” and TAS 100(A)-95 “Wind Driven
Rain Test” by Intertek. Tested and evaluated
without sealant. Any roofing manufacturer
approved sealant is allowed.
UL 2703
Conforms to UL 2703 Mechanical and Bonding
requirements. See Ironridge Flush Mount
Installation Manual for full ratings.