
UFO Flush Mount Installation Manual


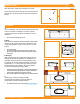
Table Of Contents

©
2022 IRONRIDGE, INC. VERSION 3.5 FLUSH MOUNT INSTALLATION MANUAL - 13
TILE
Remove tile and mark rafter, use Base Plate to mark two
holes on rafter. Drill two 7/32" pilot holes and back ll
with roong manufacturers' approved sealant. Use 1/2"
socket to drive lag into place. Slide hook into place and
adjust to desired position. Drive self-tapping screw using
a #3 Phillips bit to lock hook in place. Clean underlayment
and apply a bead of sealant compatible with roong
manufacturer, install ashing over mount. Fasten sub-
ashing to deck with one roong nail in each corner.
Waterproof at underlayment level according to roong
manufacturers' instructions and the Tile Roong Industry
Alliance guidelines. Cut clearance notch in the weather
guard of tile as needed or utilize QM Tile Replacement
Flashings. Attach rails to either side of slot using Bonding
Hardware and torque to 250 in-lbs (21-ft-lbs).
➢ Position arm near the center of valley for curved tiles.
➢ Position arm away from seam of joining at tiles.
➢ Ensure top of hook does not extend above rail.
➢ For additional details refer to the full QM Installation Manual.
QM QUICK HOOK
Remove tile and mark rafter. Position base over rafter,
adjust arm if necessary and torque hardware to 132 in-lbs
(11 ft-lbs). Use base as guide to drill 1/4" pilot holes, back
ll with roong manufacturer’s approved sealant, then
insert lag bolts and tighten until fully seated. Replace tiles
and notch as necessary to ensure proper t. Attach rails to
either side of slot using Bonding Hardware and torque to
250 in-lbs (21-ft-lbs).
➢ Position arm near the center of valley for curved tiles.
➢ Position arm away from seam of joining at tiles.
➢ Ensure top of hook does not extend above rail.
➢ Standalone All Tile Hook manual available on website.
Rafter
Torque to
132 in-lbs
Torque to
250 in-lbs
Tighten Until
Fully Seated
ALL TILE HOOK