
UFO Flush Mount Installation Manual


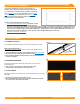


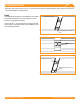

Table Of Contents

©
2022 IRONRIDGE, INC. VERSION 3.5 FLUSH MOUNT INSTALLATION MANUAL - 5
1. PLACE ATTACHMENTS
A. CONNECT SPLICES
Use BOSS(Bonded Structural Splice), as needed, to join multiple sections of Rail.
BOSS - Bonded Structual Splice
Insert BOSS into rst Rail up until the Stop Tab. Slide second Rail fully into place.
➢ Rows using BOSS and exceeding 100 feet of Rail must use Expansion Joints.
➢ Boss Splices may be installed in any location within a span.
➢ UFO and Bonding Hardware must be installed 1" away from the point where
two Rails join together.
B. PREPARE HARDWARE
Slide square-headed bolts into side-facing rail slot. Space out bolts to match
attachment spacing.
➢ Tape ends of rail, to keep bolts from sliding out while moving.
➢ If using T-
bolts, carry hardware onto roof and proceed.
C. ATTACH RAILS
Drop rail with hardware into roof attachment. Level rail at desired height, then torque to
250 in-lbs.
➢ Rail can face either upslope or downslope on roof.
➢ When using attachments with longer slots, do not install Rail lower than the
top of the L-Foot to avoid damage to modules.
2. PLACE RAILS
Tested or evaluated third-party roof attachments:
• S-5! Standing Seam Metal Roof Clamps - Certication of metal
roof clamps includes bonding to both painted and galvalume
metal roofs. Tighten S-5! and S-5! Mini set screws to 130-150 in-lbs (≥ 24 gauge) or 160-180 in-lbs (22 gauge) roofs. Tighten S-5! M10 bolt
to 240 in-lbs or S-5! Mini M8 bolt to 160 in-lbs. Use the following fastening guidelines for other S-5! roof clamps: ProteaBracket™ - rmly
seat roof screws and tighten hinge bolt to 225 in-lbs; RibBracket™ - rmly seat roof screws and tighten M8 bolt (M8-1.25 x 22mm sold
separately) to 160 in-lbs; and SolarFoot™ - rmly seat roof screws and tighten M8 ange nut to 160 in-lbs.
• EcoFasten Green Fasten GF-1 Anchors
The general installation method for attachments is to
locate a rafter, drill a pilot hole and install the attachment.
For composition roof attachments installation instructions
refer to page 10. For tile roof attachments refer to page
12. For low slope roof attachments refer to page 14.
When using approved third party attachments, refer to
manufacturer's install instructions.
C
Torque to
250 in-lbs
B
Preload and Space
Square Bolts
BOSS
Insert Rail untill fully seated
against Stop Tab
A