
Product Manual


Page 11 of 21
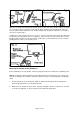
Tip: The eye shields are identical and will fit properly on either side of the grinder; however, it may be
necessary to loosen the center hex nut in order to slip the shield over the mounting rod. After you
have assembled and installed each eye shield mounting rod to the grinder, attach the eye shields to
the rods as shown in Fig. 5.
Install them in such a way that the three hex nuts on each eye shield are on the back side, away from
the operator, when the grinder is in use. Tighten the center hex nut so that the shield can be moved,
but will be tight enough to stay in place. Always position the eye shields between your eyes and the
grinding wheel or other accessory being used.
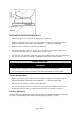
Mounting the Grinder to the Workbench
Before attempting to use this grinder, it must be properly mounted to a workbench or grinding stand.
Note: Bench grinders vibrate. Grinder movement during high-speed rotation may cause injury to the
operator or damage to the workpiece. Mount the grinder securely to a sturdy workbench or grinding
stand.
1. Position the grinder on the workbench. Mark the workbench through the two mounting holes
located in the grinder base (see illustration below).
2. Drill holes in the workbench at the marks. Using two long bolts, washers, lock-washers, and nuts,
as shown (not supplied), secure the grinder to the workbench (illustration).