M282790C.6 ITEM NUMBER: 282790 SERIAL NUMBER: _____________ Owner's Manual Instructions for Assembly, Testing, Operation, Servicing, and Storage Tow Behind Sprayers: For outdoor use with non-potable liquids such as agricultural pesticides and other water based liquids** WARNING READ and UNDERSTAND the Owner's Manual completely before using this sprayer. Assemble, test, and use only in accordance with the Owner's Manual instructions. READ and FOLLOW chemical label instructions.
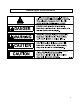
Hazard Signal Word Definitions 2
Table of Contents Intended Use ................................................................................................................................... 4 Summary of Important Safety Information..................................................................................... 5 Warning Label Location ................................................................................................................. 8 Unpacking .......................................................................
Intended Use The sprayer is intended for use in spraying agricultural pesticides and other nonflammable liquids. SPRAYING PESTICIDES: Pesticides are hazardous chemicals that must be handled with caution as directed throughout this manual and on the pesticide label. Pesticides are regulated by the United States Environmental Protection Agency (EPA) and defined as: Any substance or mixture of substances intended for preventing, destroying, repelling, or mitigating any pest.
Summary of Important Safety Information WARNING Read and understand this owner's manual completely before using the sprayer. Read each chemical label's instructions before handling the chemical. Improper use of the sprayer or handling of chemicals could result in serious injury or illness for the operator or nearby persons/animals, or cause damage to the environment. LISTED BELOW is a summary of safety information of particular importance. See individual sections of this owner's manual for more details.
Summary of Important Safety Information (cont’d) • • • • • • • • DO NOT EAT, DRINK, SMOKE, RUB YOUR EYES, or TOUCH YOUR BARE SKIN while handling chemicals and spraying. NEVER POINT THE SPRAY GUN at people or animals. EXERCISE EXTRA CAUTION when spraying near areas accessible to children and pets. CLEAN up spills immediately per instructions on the chemical label. TURN OFF vehicle and set brake or block wheels, TURN OFF power to sprayer, and RELIEVE system pressure before leaving sprayer unattended.
Summary of Important Safety Information (cont’d) Bodily chemical contact Personal contamination can occur when chemicals splash, spill, or spray directly onto a person. 1. Immediately follow First Aid instructions on chemical label. General procedures can include: a) Eyes – immediately flush with water. b) Skin – wash all contaminated skin surfaces with soap and water. c) Clothing – remove contaminated clothing. Dispose of heavily contaminated clothing per chemical label instructions. 2.
Warning Label Location WARNING READ and UNDERSTAND the Owner's Manual completely before using this sprayer. Assemble, test, and use only in accordance with the Owner's Manual instructions. READ and FOLLOW chemical label instructions. Pesticides are hazardous chemicals which must be handled carefully. KNOW emergency procedures BEFORE handling chemicals. Sprayer leaks, bodily chemical contact, poisoning, and spills require immediate response.
Unpacking Closely inspect all contents in the shipping carton. Note that some parts are shipped inside the tank. • If you have damaged components: Contact the freight company that delivered the unit and file a claim. • If you have missing components: Contact Ironton Product Support at 1-877-234-6869.
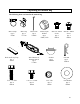
Unpacking the Manual Bag The following items are found in the manual bag.
Assembly Step 1 – Tow Bar Hitch Assembly Tools Needed • Insert bolts through hitch bracket holes. Secure with nuts until hand tight. • Ensure hitch pin holes are aligned and tighten bolts to 20 Ft.-Lbs.
Assembly (cont’d) Step 2 – Cart Assembly Tools Needed • Insert bolts through rear bracket holes and tow bar. • Ensure rear brackets top surface is flush with tow bar top surface. • Secure with nuts until hand tight.
Assembly (cont’d) Step 3 – Axle Assembly Tools Needed • Insert axle through rear brackets and tow bar. • Torque rear bracket bolts from Step 2 to 20 Ft.-Lbs. • 1/2” wrench • Torque wrench Torque bolts to 20 Ft.-Lbs.
Assembly (cont’d) Step 4 – Tank to Cart Assembly Tools Needed • Set tank on ground upside down. Align cart assembly with bottom of tank and secure with bolts. • Torque bolts to 5 Ft.-Lbs. • Note: if tank inserts do not align with cart, loosen cart bolts then insert bolts into tank inserts. Torque cart bolts to 20 Ft.Lbs • Thread drain cap on to tank until hand tight.
Assembly (cont’d) Step 5 – Wheel Assembly Tools Needed • • • • • Pliers • PSI Gauge Install wheels onto axle. Slide washers onto axle. Insert axle pins into holes in axle. Note: check that tires are inflated to 30 PSI.
Assembly (cont’d) Step 6 – Draw Tube Assembly Tools Needed • Remove cap from sprayer tank. • Insert draw tube through grommet. Note: wet draw tube with soapy water to ease installation. • Place strainer on end of draw tube. • Push draw tube into grommet until strainer reaches the bottom of the tank.
Assembly (cont’d) Step 7 – Hose Wrap Assembly Tools Needed • Install upper and lower hose wrap brackets. • Secure with bolts and torque to 5 Ft.-Lbs.
Assembly (cont’d) Step 8 – Pump Assembly Tools Needed • Place pump on top of tank and align the feet with the 4 threaded inserts. • Tighten (1) long screw through tether into front left rubber foot. • Tighten (3) short screws until pump is secure. Note: damage could occur to rubber pump feet if screws are overtightened.
Assembly (cont’d) Step 9 – Boom Hose Assembly Tools Needed • Align boom bracket assembly with threaded inserts on rear of tank. Secure with bolts and torque to 5 Ft.-Lbs. • Slide hose clamp over hose. • Slide hose over pump outlet hose barb. Tighten with hose clamp.
Assembly (cont’d) Step 10 – Draw Tube Hose Assembly Tools Needed • Slide hose clamps over ends of draw tube hose. • Slide one end of draw tube hose onto pump inlet hose barb. Slide other end of draw tube hose onto draw tube PVC. • Secure both ends with hose clamps and tighten.
Assembly (cont’d) Step 11 – Attach gun hose to spot spray gun Tools Needed • Install hose clamp on hose • Slide hose clamp over the end of the hose • Push the hose onto the hose barb • Slide the hose clamp over the hose barb • Tighten the hose clamp • Flat head screwdriver • Torque screwdriver Fastener Needed from Owner’s Manual Bag: Hose Clamp Qty 1 30746 Hose Barb Spot spray gun Hose clamp Gun hose 21
Assembly (cont’d) Step 12 – Gun Hose Assembly Tools Needed • Route gun hose through hose clip and hose clamp. • Slide gun hose over hose barb tee from boom hose assembly. • Tighten hose clamp. • Secure hose clip to tank with bolt and torque to 5 Ft.-Lbs.
Assembly (cont’d) Step 13 – Sprayer to Tow Vehicle Assembly Tools Needed • Secure the sprayer to the tow vehicle with a hitch pin (not included, call 1-877-234-6869 and order Item#27293 • Make sure boom nozzle is pointed straight down. If it is not, loosen the nozzle retaining nut, orient the opening of the boom nozzle to point straight down, then retighten the nozzle retaining nut.
Assembly (cont’d) Step Fourteen: Connect remote switch to vehicle battery WARNING Batteries are hazardous because they contain caustic acid, can emit explosive gases, and can cause electric shock. Caution must be exercised when making connections to a battery to avoid shock and contact with the acid, and to prevent any sparking that could lead to an explosion. ALWAYS follow the safety instructions and steps listed below in exact sequence when connecting the sprayer's remote switch to the battery terminals.
Assembly (cont’d) 4. Verify connection Verify a complete connection has been made by checking with a DC voltmeter, or by briefly turning the remote switch to the ON position and listening for pump activation. 5. Attach remote switch to vehicle Using supplied hook and loop pad, affix remote switch to vehicle in a position that is easily reached from the driver's seat. 6.
Assembly (cont’d) 2. Test with water Test the system for leaks with water: a) Fill the tank with water. b) Connect the remote switch to the pump power cord and turn the remote switch ON. The pump is an "on demand" pump. When turned on, the pump will prime itself, and then turn off. When the gun trigger is squeezed, the pump will automatically start. c) Operate the spray gun by squeezing the gun trigger. d) Check for leaks throughout the system.
Machine Components 1. Hitch Bracket: The hitch mount connects the vehicle hitch to the sprayer. 2. Hose Wrap: The built-in hose wrap provides a storage location for the gun hose on the tank. 3. Gun Clip: Use the gun clips to store the spray gun. 4. Spot Spray Gun: Use the spray gun to apply chemical to specific areas. 5. Gun Hose: The 11-foot gun hose transfers chemical from the pump to the spray gun. 6. Fill Cap: The fill cap has a vent to allow air to enter the tank as the chemical is dispensed. 7.
Operation – Important Safety Information Now that you have completed and tested your assembly, there is some important safety and health information you need to know with regard to handling and spraying chemicals, as well as vehicle handling with the sprayer attached. WARNING Carefully read and make sure you understand the following safety information before using the sprayer. General Chemical Safety: WARNING Pesticides are hazardous chemicals.
Operation – Important Safety Information (cont’d) Chemical Application Safety: WARNING Caution must be used when spraying chemicals to avoid unsafe exposure to humans and the environment. Heed the warnings below and follow all instructions carefully. • • • • • • • • • • • • • • • • • Before Spraying Sprayer prep. ALWAYS inspect and prepare the sprayer before use according to the directions provided in this manual. Keep sprayer off.
Operation – Important Safety Information (cont’d) Towing/hauling Safety: WARNING The filled sprayer is very heavy. It can crush and cause serious injury if it rolls out of control or tips over. Follow the instructions below for safely towing the sprayer. • • • • • • • • • • • Read vehicle instructions. Review towing safety instructions in your towing/hauling vehicle manual. Driver age. You must be 16 years of age or older to operate the towing/hauling vehicle with the sprayer attached.
Operation – Important Safety Information (cont’d) Chemical accident procedures: WARNING Before you fill the sprayer, review the following information with regard to handling accidents. Chemical spills, sprayer leaks, personal contamination, and poisoning are accident situations which you may encounter. All require an immediate response – See instructions below.
Operation – Important Safety Information (cont’d) Chemical spills Chemical spills must be quickly contained and properly cleaned up. Refer to the chemical label for any specific clean-up instructions with regard to the chemical spilled. General procedures include: 1. Control the spill by stopping the source of the spill. If the source of the spill is a container leak, place the leaking container in a larger, watertight container. Keep unprotected people away from the spill site. 2.
Operation – Preparing the Sprayer for Each Use If the sprayer has been used previously, it must be prepared BEFORE EACH SUBSEQUENT USE. WARNING Read instructions below carefully for inspecting and preparing the sprayer. Damaged or clogged equipment could result in leaks or uncontrolled spray. Leaks could result in injury to the operator or bystanders from chemical exposure, or cause damage to the environment. Important safety rules: • • • Power off.
Operation – Using the Sprayer Step One: Assess wind conditions and clear work area. Before you decide to spray, you must determine whether wind conditions are suitable. You must also restrict access to the work area to ensure the safety of bystanders. WARNING Do not spray if wind speeds are greater than 4 MPH or if there are bystanders in the intended spray area. 1. Assess wind speed Assess weather conditions to ensure that it is not too windy to spray. DO NOT SPRAY if wind speeds are greater than 4 MPH.
Operation - Using the Sprayer (cont’d) Step Two: Fill the sprayer. WARNING ALWAYS wear personal protective equipment as directed on the chemical label when handling pesticides. Long pants and sleeves, chemical resistant gloves, and eye protection are strongly recommended. Additional protective gear may be required depending on the particular pesticide. Fill the sprayer using the following steps: 1. Review safety information 2. Choose safe mixing/ loading area 3. Wear personal protective equipment 4.
Operation - Using the Sprayer (cont’d) 7. Check drain cap Before filling tank, ensure drain cap is securely tightened. Drain cap 8. Fill tank Add pesticide to tank through fill cap: a) Confirm the chemical/water dilution ratios specified on the chemical label. b) Determine chemical and water volumes needed for the planned application, taking into consideration that maximum tank capacity is 13 gallons.
Operation - Using the Sprayer (continued) Step 3: Operate the sprayer. WARNING ALWAYS wear personal protective equipment as directed on the chemical label when spraying. Long pants and sleeves, chemical-resistant gloves, and eye protection are strongly recommended. Additional protective gear may be required depending on the particular pesticide. 1.
Operation - Using the Sprayer (continued) 5. Squeeze trigger & adjust nozzle To spray, squeeze the gun trigger. - Twist the spray nozzle to adjust from a straight stream to hollow cone spray pattern, as recommended on the chemical label for proper delivery rate. Note: It is not unusual for the operator to be exposed to chemical drips while adjusting the nozzle – gloves should be chemical resistant. Retaining nut Spray nozzle 6. Operate broadcast boom A.
Operation - Using the Sprayer (continued) B. Ensure correct spray pattern Make sure the boom nozzle is pointed straight down. If it is not, loosen the nozzle retaining nut, orient the opening of the boom nozzle to point straight down, then retighten the nozzle retaining nut. Nozzle retaining nut Boom nozzle IMPORTANT: Make sure broadcast nozzle is oriented to spray straight back, parallel with the ground, before you start. An incorrectly positioned broadcast nozzle may spray chemicals on you or others.
Operation - Using the Sprayer (continued) C. Ensure uniform coverage To ensure proper coverage, the height of the boom nozzle should be about 20" from the ground. The sprayer must be level with the ground to get this height. The overall spray width is 80", but 1/2 or 40" of the overall spray pattern must be overlapped to get equal coverage throughout the spray area. Use the tables in Appendix A to determine what speed to drive your vehicle for the desired application rate. 21” 40” 7.
Operation - Using the Sprayer (continued) Step 4: Clean sprayer and decontaminate after use. When done using the sprayer, it is important to clean the sprayer and decontaminate yourself. Do not store the sprayer with chemicals in the tank, as it is unsafe and could also result in damage to the equipment. WARNING Clean-up and decontamination procedures must be followed after each use.
Storage When not in use, store the sprayer indoors. For long term or winter storage, prepare the sprayer by running RV antifreeze through the system. This will keep internal parts lubricated, protect against corrosion, and keep the unit from freezing. CAUTION The sprayer will be damaged if it freezes. Protect the sprayer from freezing during storage by following the instructions below. Preparing for storage: 1. Add antifreeze Pour 1 gallon of RV antifreeze into the tank.
Troubleshooting WARNING Before troubleshooting or attempting to service, read the following safety rules to avoid accidental exposure to chemical and also risk of electric shock. Note: A reserve, clean container capable of holding at least 13 gallons should be kept for use when the sprayer tank needs to be emptied temporarily for repairs. It is advisable to purchase a reserve tank suitable for pesticide storage from Northern Tool + Equipment for use in these circumstances.
Specifications Electrical System Requirements Electrical connection Amp draw from pump 12 VDC 3.0 Amps Sprayer Specifications Maximum GPM Maximum Pressure 1.0 GPM (3.8 Liters/min.) 40 PSI (2.76 Bar) Tank Maximum Capacity 13 Gallons (45.4 Liters) Overall Dimensions 40" x 20.9" x 22" (101.6cm x 53.1cm x 55.9cm) Dry Weight / Weight full of water 27 lbs./ 131 lbs. (12.2kg / 59.4kg) Tongue Weight (full of water) 19 lbs. (8.6kg) Broadcast Nozzle Specifications Spray Width ………………...…… 80 in. (152.
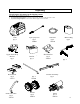
Exploded View – 282790 – Rev C.
Exploded View – 282790 – Rev C.
Appendix A –Broadcast Spray Calibration Tables Below are some guidelines to help you calibrate your tow behind broadcast sprayer. This is a very important step in operating the tow behind broadcast sprayer such that too much or too little chemical may be applied. 1. Using Table 1, find a table that corresponds with the chemical manufacturer's suggested application rate (gallons per acre, gallons per 1000 sq. ft., or gallons per 100 sq. ft.). 2.
Limited Warranty Dear Valued Customer: Use this product properly and enjoy the benefits from its high performance. By purchasing an Ironton product, you show a desire for quality and durability. Like all mechanical equipment this unit requires a due amount of care. Treat this unit like the high quality piece of machinery it is. Neglect and improper handling may impair its performance. Please thoroughly read the instructions and understand the operation before using your product.
This page left intentionally blank.
Northern Tool + Equipment Co., Inc. Burnsville, MN 55306 NorthernTool.