STRU CTI ONS Z BARNI NDOOR INSTAL L ATI ON Assembly Instructions RH ••••••••••••••••••••••••••••••••••••••••• 12.13.
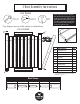
ls aL HZ To A Ba N rnoAG s sE eamR bnl ydH I nP sO t ru crttiE osnS s I N S TA L L AT I O N I N S T RU C T I O N S Tools N eeded Rubber Mallet Drill with Phillips bit Ratchet with 7/16” socket Lay all parts out on a flat surface as shown here. If any of the stiles, slats or rails have been damaged during shipping, call us at 800-891-8312 and we will expedite a replacement. Lay out your Door parts according to the illustration shown below to accurately identify which part needs to be replaced, if any.
m n HZ A Ba N rnD AiG s sE eemR bls yH IinosO tnrusL c t iE o nS s I N S TA L L AT I O N I N S T RU C T I O N S 5” 5” Door bottom with mortise NOTE: If you are installing a Floor Mount Door Guide, your door will have a mortise (a groove that runs along the bottom of your door). Make sure this mortise is facing down towards your floor and that you install the Door Hangers on the other end.
HZsA N Ab G E R H O L E S A s e m l y I n s t r u c t i o ns Ba rn s s e m b l y I n s t ru c t i o n I N S T A L L A T I O N I N S T R U C T Is O N S A ss embling Your D o o r 1. We recommend a dry assembly. It is recommended you not use glue or adhesive of any kind. Lay out A1L, A2, A3 And A1R with the grooves facing inward. B1’s tongue faces right. All B2 slats will have their grooves to the left and tongues to the right. B3’s groove will face to the left. 2.
Hs A N Gslsy E R H O L E S A s e m b I n s t r u c t i o ns Z Ba rn A e m b l y I n s t ru c t i o n I N S T A L L A T I O N I N S T R U C T Is O N S 6. Use the 6” Lag Bolts to fasten A1 L, A1 R, and A2 and A3 together. Use your fingers and a wrench to fasten the Lag Bolts, straight in, avoid going in at an angle. Have someone help keep the rails square as you install the Lag Bolts. 7. Lay C1 over the top of all B slats. Use a drill with a Phillips bit to attach to your door with Grabber Screws. 8.