IROX-XL P User manual 1
TABLE OF CONTENTS 1. INTRODUCTION………………………………………………………. 2. BASIC OPERATION OF BUTTONS………………………………… 3. MODE CHANGE OPERATION……………………………………… 4. TIME MODE……………………………………………………………. 5. COMPASS MODE…………………………………………………….. 6. BAROMETER MODE…………………………………………………. 7. ALTIMETER MODE…………………………………………………… 8. ALTIMETER DATA MODE…………………………………………… 9. CHRONOGRAPH / HEART RATE MODE…………………………... 10. ALARM MODE……………………………………………………….. 11.
1. INTRODUCTION This device is a digital product that provides altimeter, barometer, compass, altimeter data, dual time, chronograph, chronograph data and alarm functions. Features: Altimeter - 1 meter (or foot) resolution and with working range from -700 meters (-2296 feet) to 9000 meters (29520 feet). - Graphical expression of changes provided. - Unit in meters or feet selectable. - 20 memories with date, time and altitude reading.
2.
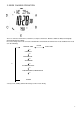
3. MODE CHANGE OPERATION There are 9 modes: Normal Time, Dual Time, Compass, Barometer, Altimeter, Altimeter Data, Chronograph, Chronograph Data and Alarm. Press C to change from mode to mode, hold down B to switch between Normal Time mode and Dual Time mode as in the following: NORMAL TIME Hold B DUAL TIME C COMPASS C BAROMETER C ALTIMETER C C ALTIMETER DATA C CHRONOGRAPH / HEART RATE C ALARM * At any mode, holding down C will change to Time mode directly.
4. TIME MODE Use C to enter Time mode. * Mode prompt “TIME” is displayed first. - There are 2 time modes, Normal Time (indicated by T1) and Dual Time (indicated by T2), and they count up individually with the same second. - There are 3 displays for time. They are Time, Time with Barometer and Time with Weather. - There is an auto-calendar from 2000 to 2049.
To set time 1. Hold down D until the hour digits start to flash on the display, which indicates the setting screen. 2. Use A (+) and B (-) to change the setting. Holding down either button scrolls the setting at high speed. 3. Press C to advance to the next setting as in the following: HOUR C C 12/24H MINUTE C C DAY SECOND C C MONTH YEAR C * When second digits are flashing, press A or B to reset the digits to 00.
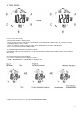
Importance 1. The compass should be calibrated before use. 2. The compass must be kept in a level position when in use. 3. Compass readings are easily affected by disturbing sources of magnetism, so the compass should always be used in the open air. To calibrate the compass 1. Hold down D until “CAL” is shown on the display, which indicates the calibration screen. 2. Rotate the product slowly for 2 complete rotations. * Each rotation must last for at least 15 seconds. 3.
6. BAROMETER MODE Use C to enter Barometer mode. * Mode prompt “BARO” is displayed first. - Barometer mode indicator is shown. - The barometer is of 1 hPa resolution and with working range from 300 hpa to 1100 hpa. - Both sea level pressure and absolute pressure can be shown. - Graph showing the changes in sea level pressure is provided. * Graph will be cleared only after battery replacement or reset. - Weather forecast (indicated by the weather indicators) for the coming 24-48 hours is provided.
Reading the graph of sea level pressure The graph shows the relative changes in sea level pressure in the past with the current pressure represented on the right. Each horizontal point represents one hour while each vertical point represents the relative reading of pressure in that time. * It is not possible to get the exact reading from the graph. User can only get the trend of changes from the graph. To switch between °F and °C 1. Use A or E to switch to the barometer display with temperature. 2.
7. ALTIMETER MODE Use C to enter Altimeter mode. * Mode prompt “ALTI” is displayed first. - Altimeter mode indicator is shown. - The altimeter is of 1 meter (or foot) resolution and with working range from -700 meters (-2296 feet) to 9000 meters (29520 feet). - Altitude reading in meters or feet selectable. - Graph showing the changes in altitude is provided. * Graph will be cleared only after battery replacement or reset. - Maximum 20 altitude data can be stored.
8. ALTIMETER DATA MODE Use C to enter Altimeter Data mode. * Mode prompt “ALTI DATA” is displayed first. - Data number, time, date and altitude reading can be retrieved. * Altitude data are shown in 2 different displays. To retrieve the altitude data 1. Use A (+) and B (-) to select the altitude data to be retrieved. 2. Press E to switch between the 2 displays of data. * If no button is pressed, the 2 displays will be shown for 3 seconds alternately.
- For the first hour, the chronograph shows minutes, seconds and 1/100-seconds, then it shows hours, minutes and seconds. * Leading zeros will not be shown in the display. - One split time may be measured. * When you take the split time, the display will be frozen for approx. 4 secs to show the split time. After this, the display changes back to the running chronograph automatically. To measure elapsed time 1. Press A to start the chronograph. 2. Press B to stop the chronograph.
HR ZONE = GENDER = WEIGHT UNIT = WEIGHT = AGE = MAX HR = Vo2MAX = Trainingzone on / off MALE or FEMALE Unit how you wish to enter your body weight (KG or LBS) Enter your body weight Enter your age your max. pulse (the watch suggests a max BPM value "220-your age", you may change it ! Please consult your doctor or coach for your personal max. heart rate ! Maximum intake of Oxygen.
- In a dry and cold climate it may take a while for the transmitted values to become stable. This problem will resolve itself as soon as you begin to sweat from physical activity.
HOUR C MINUTE C REFER TO T1/T2 C CHIME ON/OFF * When TIME 1 or TIME 2 is flashing, press A or B to switch between setting the alarm to refer to Normal Time (TIME 1) and Dual Time (TIME 2). * When ON or OFF is flashing, press A or B to turn the chime on (indicated by ON) and off (indicated by OFF). If chime is turned on, the chime on indicator will be shown after exiting setting screen. 4. Press D to exit the setting screen.