
Owner Manual


Cover
Screw
Handle
Base
Shower Head
Fitting
Inlet Port
Gasket
Hose
Connection
Cover
Setscrew
Handle
INSTRUCTIONS
Before you begin, please check to ensure you have all the parts. Read ALL directions before beginning.
Connection Fitting
1
Elbow Fitting
2
Shower Head
3
Teflon Tape
4
Base Hardware
5
6
Handle
7
Hose Connector
1
1
1
1
1
1
1
4
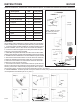
No. Qty.
Description
Installation
In order to get the most satisfaction and pleasure from your shower,
please pay attention to the following details:
1. The solar shower must be installed on the portable base to make
sure it is stable and safe for user.
2. The solar shower includes a base plate. This has 4 prefabricated
holes for attaching the main shower body.
3. Assemble two of the base plates together, do the same with
the other two, and then put these two assemblies together to form
the whole base before attaching main shower body.
4. Install the solar shower in a location with optimal sunshine.
5. Connect the inlet of the solar shower to your home’s water system
using a standard garden hose.
6. Make sure you have a valve installed before the inlet of the solar
shower for turning the water on and off.
7. To prevent being scalded by hot water, ALWAYS make sure the
shower valve is in the cold water position (blue) before turning on
the shower, then turn the valve on and gradually adjust the water toward the hot water position (red), until reaching the
desired temperature.
8. WARNING! When exposed to very strong sun rays, the water temperature coming from the solar shower may reach
temperatures as high as 140˚ F (60˚ C).
8
Base
NUP10231
Part No.
NUP1001
NUP1002
NUP1003
NUP1004
NUP1005
NUP1006
NUP1007
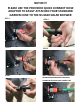
Step 1 Step 2 Step 3
Step 6Step 5Step 4
NU1630
3. Connection Fitting
Coupler 2
1. Shower Head
2. Elbow Fitting
Main
Shower
Body
Washer 1
Washer 2
Coupler 1
4. Handle
Washer 3
Setscrew
Cover
5. Hose Connector
Ground
8. Base
NOTE: Use Teflon tape (6)
on all threaded fittings.
10. Foot Faucet
9. Connection Fitting
Connection Fitting
9 1
1
10
Faucet
NUP1002
NUP10241
7. Base Hardware
12/19
See last page
for connection
instructions