
Installation Guide


Wellmade®
HDPC® Rigid Core Vinyl - Installation Guide
Wellmade® HDPC® is a rigid waterproof High Density Plastic Composite flooring with patent pending technology that uses no
adhesive to bond the vinyl layers together and features the patented Uniclic and Unipush systems and is installed as a glueless
floating floor. The interlocking planks lock together to provide a tight water resistant seam, can be installed over most floor surfaces,
and is suitable for both residential and light commercial interior applications. For technical information or questions, you can email:
tech@wellmadefloors.com , or call 866.582.0848 (US only); outside the US, call 503.582.084.
General Information
1. Flooring should be transported and stored in a neatly stacked fashion on a smooth flat surface. Be sure to
Inspect the run numbers/production dates on the boxes as different runs may be slightly different, once installed it
becomes the installers responsibility. Purchase enough material to do at least 105% of the covered area.
2. Maintain a constant temperature between 60° and 85°F (18.33° and 29.44°C) before, during, and after installation.
3. Acclimation is ideal, but not required; flooring should be stored in the areas that it is going to be installed in for a minimal
24 hours to assure equilibrium.
4. HDPC Vinyl Planks should only be installed after other trades have finished and the jobsite has been cleaned and cleared of
debris that could potentially damage a finished installation.
5. No additional padding is required as there is an attached padding to the back of the planks.
6. Inspect flooring for damage, defects, or shading issues before installation; claims for visual defects will not be accepted
after cutting and/or installed.
7. Mix and install planks from several different cartons during installation to ensure a random appearance.
8. Leave 1/4 inch gap for expansion around the entire perimeter of the flooring.
9. T moldings are recommended at all doorways to prevent separation or buckling issues due to adjoining rooms.
10. Flooring should be protected from direct exposure to UV light by using shades or blinds when necessary.
11. All flooring will scratch, please be cautious when moving or transporting items across your floor as scratches are not a
warranted issue.
Pre-Installation
Subfloors:
Planks can be installed over a variety of subfloor surfaces including concrete on all grade levels, wood and many other existing hard
surface floors. The subfloors must be clean, smooth, flat, solid (no movement), and dry. Do not install planks over floors that are
sloped for drainage. Any uneven areas greater than 3/16” in a 10 foot radius should be leveled with a Portland cement based
patching compound. Wellmade Vinyl Plank is impervious to water damage but they do not prevent the transmission of moisture.
Care should be taken to keep moisture from collecting on either side of the flooring to prevent the growth of unhealthy mold and
mildew.
Concrete Subfloors:
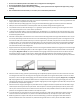
Planks can be installed over concrete on all grade levels; a moisture barrier is recommended but not required, and should consist of
at least a 6 mil polyethylene film with the sheets overlapping 6” and taped to prevent moisture migrating to the flooring. Moisture
vapor emissions should not exceed 5 lbs./24 hour per 1,000 sq. when tested with the Anhydrous Calcium Chloride Test in
accordance with ASTM F 1869 or 85% RH in accordance with ASTM F 2170 “Standard Test Method for Determining Relative
Humidity in Concrete Slabs using in situ Probes. Any uneven areas greater than 3/16” in a 10 foot radius should be leveled with a
Portland cement based patching compound. Holes and cracks in the cement should be patched, and expansion joints should be filled
with a latex patching compound. Newly poured concrete floors must cure for a minimum of 90 days. Please note it is the person
installing the floor and/or the homeowner’s responsibility to ensure a smooth substrate and that any moisture or alkalinity issues
are resolved prior to installing the floor. Once installed, it becomes the installer’s responsibility.