
Installation Guide

• Do not secure individual planks to the subfloor as it is designed to be a floating floor.
• Do not install cabinets on top of Vinyl Plank flooring.
• It is recommended to separate all rooms using T molding, and to separate all rooms larger than 40’ (W) x 40’ (L) using T
molding.
• Not recommended to install outdoors, in sun rooms, or in travel trailers/motorhomes.
Installation
1. Remove wall base and undercut door jambs, this can be accomplished by turning a scrap piece of flooring upside down and
using a “jamb saw” or equivalent to cut the jambs.
2. Level the substrate by sanding high spots or using a concrete based leveling agent to reduce any other floor deviations.
3. Sweep or vacuum the substrate to remove any debris that may transfer through the flooring after time.
4. First, determine how you want the flooring to run. Typically for plank products, the flooring runs the length of the room.
There may be exceptions since it is all a matter of preference.
5. To avoid narrow plank widths or short plank lengths near the walls/doors, it is important to do some pre-planning. Using
the width of the room, calculate how many full boards will fit into the area and how much space remains that will need to
be covered by partial planks.
6. Start with a whole plank in the left hand corner of the room with the tongue side and tongue end toward the wall. Lay the
first row of planks along a chalk line and trim to fit to the wall allowing a 1/4 inch expansion space. If starting the first row
with a whole width plank it will be necessary to trim the tongues next to the wall, then place the cut ends next to the wall.
To trim the planks, use a utility knife and a straight edge to score the top surface of the plank, and then bend it downward
to separate the pieces, you can also use a VCT (Vinyl Composition Tile) cutter for end cuts only; a table saw or saber saw
also works well for both end and length cuts.
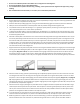
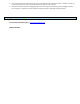
7. Align and attach the end joints of the planks in the first row using the fold down method. For length joints insert the tongue
into the groove while holding the plank at a 20° to 30° angle to the floor. Apply pressure inward and down until the planks
lock together (Diagrams 1a & 1b). Use spacers between the long edge and end of the planks next to the wall to maintain
the expansion space. For each row the use of a rubber mallet with tapping block on sides and with pull bar on ends is
recommended, when needed, to ensure all joints are tightly assembled in each row. Do not hit flooring directly with mallet.
Diagram 1a Diagram 1b
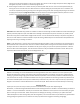
8. Start the second row using 1/3rd of a plank allowing 1/4 inch (6.35mm) expansion space at the start of the row. Place the
cut end against the wall. Insert the tongue on the long side of the plank into the groove of the plank in the first row. Hold
the plank in a 20° to 30° angle while applying pressure inward and down until they lock together (diagram 1a) and (diagram
1b). A tapping block may be needed for additional force. Complete the second row by inserting the length joints first, and
overlapping the end joints. Tap the length joint together using light taps to fully engage the joint when flat, and tap the end
joint down firmly as explained in segment 7.
9. Start the third row using a 2/3rd length of a plank with the cut end against the wall. Complete each row thereafter using a
random layout with end joints off-set by at least 8”. Plan the layout to avoid using small planks (less than 6”) at the walls.
The cut piece at the end of the row can often be used to start the next row provided it achieves a random layout. Always
place the cut end against the wall and allow for the expansion space.
10. To cut the last row, lay your planks on top of the existing row and use a small scrap the width of the plank and score or
mark the material to show where to cut, make sure to add the additional 1/4" for expansion space. Insert normally.
11. HDPC Vinyl planks are unique in that they can also be installed using a pull bar or tapping block and rubber mallet or
hammer in difficult areas such as the last row, and when fitting under door trim. Use a pull bar and rubber mallet or