
Installation Guide

hammer to lock the joints together in the last row. Always use a pull bar on the cut edge of the plank. Factory edges can be
damaged if the pull bar or hammer is used directly against them.
12. When fitting around door trim it will be necessary to slide the plank under the trim. This can be accomplished easily by
starting the row on the side of the room with the door trim and then sliding the plank into place once it is attached. The
row can be completed by inserting the tongue onto the groove or the groove under the tongue depending on the direction.
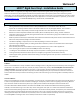
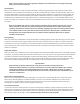
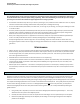
A tapping block and pull bar (Diagrams 2a & 2b) can also be used to lock the joints together while the planks are in a flat
position. Use a series of light taps until the joint is gradually locked together.
Diagram 2a Diagram 2b
Bathrooms: When Wellmade Vinyl planks are installed in a bathroom the flooring should be installed around the toilet leaving a
1/8 inch (3.175mm) expansion space. Use 100% silicone caulking to fill the expansion space at the toilet, tub, shower, and all
wet areas to help prevent surface water seepage under the floor. You can install the toilet directly on top of the vinyl planks if
there are no other cabinets or fixtures installed on top of the flooring, additionally the room would need to be separated from
adjoining rooms using a T molding or transition.
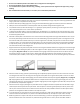
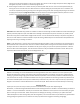
Pipes: In rows where there is a pipe or other vertical object through the subfloor, make sure the object lines up exactly where
two boards will meet on the short ends. Take care to measure carefully before cutting so the two boards end at the middle of
the object. Use a drill or hole bit that is the diameter of the pipe or object, plus 1/2 inch for expansion/contraction. Place the
two short sides of the boards together, then drill the hole centered on the joint between the boards as shown. Now you can
separate the two boards and install as normal. See Diagrams 6A – 6C.
Transitions, moldings, and wall base
Reducer and T moldings are recommended when transitioning between other hard surface floors to cover expansion space
between the two flooring products. All transition pieces should be attached to the subfloor using the track supplied with the
molding, or glue down using a high grade contractor adhesive, dependent on the transition purchased. If adhered directly, be
sure the transition sits firmly in the adhesive and take care not to get any adhesive on the flooring. Remove any adhesive from
the surface immediately with mineral spirits and buff off any residue with a dry soft cloth. It may be necessary to place heavy
weights on the transition until the adhesive dries to ensure it will lay flat. Never attach the transitions directly to the flooring.
Finishing The Job:
Inspect your work, as it will cost you more if you have to come back to do a repair later. Replace original
baseboards, or install matching hardwood baseboard. Install matching transitions as needed or recommended by your dealer or
installer. It is not recommended or necessary to seal this floor after installation. Protect your floor from scratches by using felt
pads on chair legs or furniture feet. Plastic rollers/castors can damage your flooring; if necessary try to replace with softer
rubber wheels/castors. When moving heavy items like refrigerators, use at least two sheets of 1/4" Masonite or plywood while
moving (sliding the appliance from one sheet to the next) to protect the flooring against scratching and gouging.