
Installation Guide

Congratulations!
You have just installed a beautiful, and elegant vinyl Floor!
Care and Maintenance
Care and maintenance of your new Luxury Vinyl Floor is essential for long term performance and appearance. Because this is
a low maintenance floor, it will not require waxing or polishing. Please read the following to ensure that your floor will give
you many years of service and maintain its original appearance for as long as possible.
• Use doormats outside the entry doors to your home to prevent grit, sand, and dirt and other substances such as oil, asphalt,
and other contaminates from being tracked indoors and possibly stain or damage the flooring.
• Do not use rubber-backed, latex-backed, coco fiber mats, or area rugs on your flooring, as some types of backings can stain
or scratch the floor.
• Use floor protectors (felt pads recommended) under heavy furniture to spread the weight and help to prevent scratches
and dents. Chairs and other moveable furniture with castors should have at least 2 inches (5.01 cm) flat rolling surface.
When furniture or chairs have metal caps, be sure to remove and use felt floor protectors.
• Never push or drag heavy furniture or appliances across the floor; always use strips of wood or Masonite (hardboard) to
serve as a runway underneath the rollers or wheels (including dolly’s) to avoid damage to the floor.
• Avoid prolonged exposure to direct sunlight as it can cause swelling, and/or the surface to fade or discolor over time.
During peak exposure times to direct sunlight, we strongly recommend the use of drapes or blinds on windows and sliding
glass doors.
Maintenance
• Sweep, dust mop, or vacuum regularly; please be aware that vacuum beater bars can sometimes cause damage to the floor.
• When necessary, damp mop the floor with a standard no-wax vinyl floor cleaner; do not use waxes or polishes as they will
increase the gloss level, turn yellow, decrease slip resistance, or build up over time. This will turn your low-maintenance
floor into a high maintenance floor.
• Wellmade does not recommend the use of steam cleaners on our vinyl flooring.
• This flooring has excellent resistance to common household stains, and will not be affected by most household spills. Help
prevent stains by wiping up spills with a clean damp cloth immediately; the longer the stain sits, the more likely it will
create a permanent stain.
• Difficult spills can be soaked for 5 – 15 minutes in a heavy duty vinyl cleaner or mineral spirits; carefully scrape up excess
with a dull knife, remove the rest of the residue with soft nylon pad or soft bristle brush, then rinse and wipe with a clean
white cloth.
Repairs
Scratches can easily be repaired by using scratch repair kits designed for vinyl flooring, or by using a colored marker that will
blend the scratch into the rest of the plank. In the unlikely event that a plank is damaged for whatever reason, the simplest
method is to disconnect the planks carefully (protecting the tongue and groove edges) until the damaged plank can be removed.
Then replace the damaged plank with a new one and re-assemble the disconnected planks. This typically works for planks that
are close to the two long perimeters of a room. For damaged planks that are not close to the perimeter, you may have to
remove the damaged planks and insert new planks without removing entire rows, this is easily achievable by following the
guideline below.
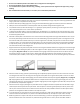
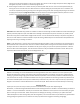
1. Using a utility saw or equivalent, cut out the center of the damaged plank and leave approximately a 1 - 2 inch strip
attached to the inner portion of the adjacent planks.
2. Carefully cut back from the four corners of the plank to the inside edges, this is the space left by the cut out plank.
3. Remove the plank edges carefully from the adjacent planks making sure the tongues and grooves of the adjacent
planks are not damaged.