
Installation Guide


Important Notes:
Before removing any existing resilient flooring or tiles, please consult with a flooring professional to
determine if asbestos abatement is necessary to avoid exposure. See current edition of the Resilient
Floor Covering Institute (RFCI) publication “Recommended Work Practices for Removal of Resilient
Floor Coverings” for detailed information and instructions on removing all resilient covered structures.
Moisture Barrier and Underlayment Padding:
While it is not necessarily difficult to install a floating floor, you may want to consider having it done
by a professional installer. Bare concrete floors should have a moisture barrier of at least 6 mil polyethylene film
with the sheets overlapping 6” and taped to prevent moisture migrating to the flooring. If using a padding, use
1/8” foam padding (or other underlayment) over the moisture barrier as recommended by your dealer. You may
choose to use a 2 in 1 type underlayment (moisture & padding). You can also install over sound deadening
underlayment’s (3 in 1) with this method.
Pre-installation inspection:
It is the duty of the person installing the floor to inspect all flooring before installation. If during inspection the
installer or buyer feels the floors is the wrong color, improperly manufactured, is off-grade or is the wrong gloss
level, he/she should NOT install the flooring. Please immediately contact the retailer from which the flooring was
purchased. No claims will the accepted for flooring which is visibly wrong if such flooring is installed. Installed
flooring is deemed to be visibly acceptable.
General Tips
Remove wall base and undercut door jambs.
Do not secure individual planks to the subfloor as it is designed to be a floating floor.
Do not install cabinets on top of a floating floor.
It is recommended to separate all rooms using T molding, for separations in larger rooms call for
recommendations.
Installation
Pre-installation inspection:
It is the duty of the person installing the floor to inspect all flooring before installation. If during inspection the
installer or buyer feels the floors is the wrong color, improperly manufactured, is off-grade or is the wrong gloss
level, he/she should NOT install the flooring. Please immediately contact the retailer from which the flooring was
purchased. No claims will the accepted for flooring which is visibly wrong if such flooring is installed. Installed
flooring is deemed to be visibly acceptable.
1. First, determine how you want the flooring to run. Typically for plank products the flooring runs the
length of the room. There may be exceptions since it is all a matter of preference.
2. To avoid narrow plank widths or short plank lengths near the walls/doors, it is important to do some pre-
planning. Using the width of the room, calculate how many full boards will fit into the area and how
much space remains that will need to be covered by partial planks.
3. Start with a whole plank in the left hand corner of the room with the tongue side and end toward the wall.
Lay the first row of planks along a chalk line and trim to fit to the wall allowing a 3/8 inch (6.35mm)
expansion space. If starting the first row with a whole width plank it will be necessary to trim the tongues
next to the wall, then place the cut ends next to the wall. To trim the planks, a table saw works well for
both end and length cuts.
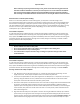
4. Align and attach the end joints of the planks in the first row using the fold down method, tap to lock the
joints securely. For length joints insert the tongue into the groove while holding the plank at a 20° to 30°
angle to the floor. Apply pressure inward and down until the planks lock together (Diagrams 1a & 1b). Use
spacers between the long edge and end of the planks next to the wall to maintain the expansion space.