
Owner's Manual


c:
~
~
~--------
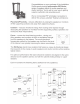
1.
Select either the long
or
short tubes to get the appropriate height for the
speaker to achieve optimal audio performance.
2.
Fit the inserts
in
either the front tubes to tilt the speaker upwards or
in
the back
tubes for a downward tilt, if necessary. Some examples are illustrated below:
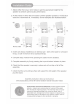
(a)8
3. Inserts are always installed as an identical
pair-
both at the back for a forward
tilt (a), or both
in
the front for a backward tilt (b).
4.
Complete step 3 before firmly pressing the tubes into the isolators.
5.
Complete assembly by firmly pressing the top and bottom isolators
in
place.
6.
Check that the speaker is securely
in
place and will not slip
or
fall off the
assembly.
7.
Check that the surrounding surface will support the full weight
of
the speaker
plus the stand.
Assembly instruction video
can
be
found
at:
www.isoacoustics.com/iso-18r-series-isolation-stands-instruction-video/
lsoAcoustics
warrants
the
ISO·Series products against evident
defects
in
material and workmanship for a period
of
two years
from the date
of
original purchase. This warranty does not cover
mechanical damage resulting from misuse or abuse, lack of
reasonable care, damage due to force majeure or natural forces.
lsoAcoustics shall not be liable for any special, indirect,
di
rect or
consequential damages to other products or property.