
Owner manual


Speaker Installation
The CS650 is designed to be used with the supplied tile bridge and backcan.
CAUTION: Be certain that there are no electrical wires, water pipes or
heating ducts in the planned installation area before you start drilling or
cutting into the ceiling.
The CS650 is designed to be installed in the ceiling between the studs or if mounting
the CS650 in a drop ceiling the supplied tile bridge and backcan must be used.
The CS650 requires a cutout hole of 7 1/8 inches for proper clearance. Check the
speaker opening by placing one of the speakers in the hole. The speaker should easily
fit in the opening. Remove the grill on the CS560 with a paper clip or other small tool
that will insert into the small grill holes and pull the grill off. You can also turn the
clamps on the back side of the speaker and push downward on the plastic clamp to pop
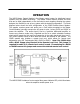
the front grill off the CS650. Connect the Cat5 input cable and Cat5 output cable if
series connecting multiple speakers. Make sure to feed the cable through the supplied
Backcan and tile bridge before connection to the CS650. If using the remote level port
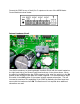
on the CS650 connect the Cat5 cable to this port at this time. Insert the CS650 into the
opening with the plastic clamps turned in as shown below.