
Installation Guide


Installation
CAUTION:Improperlyinstalledsystemscouldresultinwaterdamageduetoleaksorflooding.Proper
installationofthissystemrequiresfamiliaritywithstandardsinkplumbingandproperuseofcommonhand
andpowertools.Ifyouarenotfamiliarwithstandardsinkplumbingandproperuseofcommonhandand
powertoolsorhaveanydifficultywiththeinstallationofthissystem,pleaseconsultalicensedprofessional,
suchasacontractororplumber.
1.Preparation
①Location:Thiswaterfiltercanbeinstalledanywherewithpropercoldwatersupply,suchasunderthe
kitchensink,behindtherefrigerator,nexttoyouraquarium,insidetheRV,etc.
②Toolsneeded
1. 3/8inchand1/4inchwrenchesoradjustablewrench
2. Phillipsandflatheadscrewdrivers
3. Scissorsorutilityknife
4. Bucketandtoweltocatchwaterdrip
5. Variablespeedpowerdrillwith1/2inchsteelormarbleholesawbitifaholeoncounteristobe
drilled
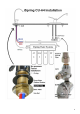
2.Stepsforinstallingunderthekitchensink(otherlocationsmayvary)
① InstallFeedWaterAdapter
1.1TurnoffInletWaterValve(COLD),openkitchenfaucettoreleaseremainingwater/pressure)
1.2Withatowelorbucketunderneath,disconnectFaucetwaterhosefromInletWaterValveusingthe
3/8inchwrench,andinstalltheFeedWaterAdapter(AFW)betweenthem.Makesuretherubber
washersarestillinplace.ItisusuallynotnecessarytouseTeflontapehere.Handtightenthehex
nutandusethewrenchforthefinal¼½turn.Donotovertighten.
1.3Installthe1/4inchWHITEtubingontheFeedWaterAdapterusingthe1/4inchwrench.Hand
tightenitthentightenuphalftooneturnusingthewrench.Ifyoureceivedthefeedwateradapter
withquickfitting,simplyinsertthetubing½inchdeepintothefitting.Itwilllockautomatically.
② Installthedrinkingfaucet
2.1Ifyourkitchensinkdoesnothaveaspare½”hole,youwillneedtodrillone.(RefertoQuickTipsfor
DrillingaHoleinSinkorCountertop).Wipecleananddrythearea.
2.2IfthereisablueprotectionfilmontheFrontPlate,removeit.Slipthefrontplatewithblackrubber
washerontothefaucetstem.Insertthefaucetstemintotheholeonthecounter.Optionally,plumber
glueorsealercouldbeused.
2.3Underthesink,slipontheBackPlate,andtightentheHexNut.
③Installtheunitandfiltercartridges
3.1Matchthestagelabelsandtwistfiltercartridgesclockwiseontothemachineheadinorder.
3.2Onthecabinetwall,markthetwoholesofbracket,installtwo#8x1”roundheadscrewstohang
theunit.
4