
Install Instructions
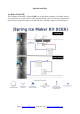

Step 2: Installing the RO Faucet
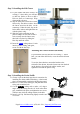
2.1 If your kitchen sink does not have an
existing ½” faucet hole, you will have
to drill one.
(Refer to How to drill a
Hole on Sink or Counter-
top). Wipe
clean and dry the area.
2.2
Slip the front plate on the faucet stem,
followed by the rubber washer. Insert
the faucet stem into the hole on the
countertop. Under the sink, slip on the
back rubber washer,
and tighten the nut
with the plastic wing.
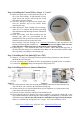
2.3 Slide the quick connecting up the
push-in adapter on the base so that it
seats securely into the faucet stem,
then lock it in place by sliding the
blue clip under the collet.
2.5 Insert the BLUE
tubing about 1/2 inch
into the push-in fitting, and again,
secure it with the blue clip.
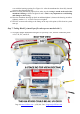
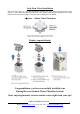
Step 3: Installing the Drain Saddle
3.1
Choose a spot on the drain pipe that is convenient for
installing the drain saddle and tubi
ng. A horizontal
pipe is recommended to minimize the dripping sound.
3.2
Drill a 1 /4” hole in the drain pipe, and paste the black
sticky pad around the hole.
3.3 Cut the BLACK tubing end to make a 45 degree
angle. Insert the tubing into the 1/4” hole in the drain
pipe, install the back plate, and tighten the two screws
with hex nuts while the tubing remains in the hole.
3.4
Insert Lock Clip. Pull the tubing lightly to make sure
it is secure.
Page 8www.123filter.com | (678) 261-7611 | Support@123Filter.com
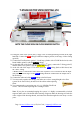
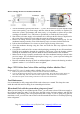
If your kitchen sink does not have an existing ½’’ faucet
hole, you can either drill a hole, or use the enclosed faucet
bracket.
To use the faucet bracket, mount the bracket to the
sidewall of the cabinet, insert the faucet stem into the hole
on the bracket, slip on the back rubber washer, and
tighten the nut with the plastic wing.
Installing the Faucet Bracket (included)