
Install Instructions


Installation Tips
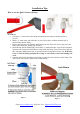
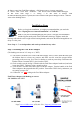
How to use the Quick-Connect fittings
Figure 1
To connect:
1.
See Figure 1. Check and cut the tubing end squarely and cleanly with utility knife or
scissors.
Make a ⅝” mark at the end of the tube so you will be able to confirm when the tube is
inserted fully into the fitting.
Remove the blue lock clip from the fitting with your nail. If the lock sleeve pops out of the
fitting when doing this, simply pop it back in.
Insert the tube into the fitting until you reach the ⅝” mark on the tube. You will feel resistance
when the tube reaches the small rubber O ring inside the fitting. You
will need to wiggle the
tube and apply additional pressure to get it passed this O ring and create the seal.
If the tube
is not ⅝” into the fitting and past the O ring, no seal will be created and leaking will
occur.
Once the tube is fully inserted
into the fitting, pop the blue lock clip back on the fitting. This
will lock the tube in place and prevent it from moving.
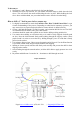
2.
3.
4.
5.
Figure 2
Figure 3
Page 5www.123filter.com | (678) 261-7611 | Support@123Filter.com