iSpring Reverse Osmosis Water Filtration Systems INSTALLATION INSTRUCTIONS & OWNER’S MANUAL Ver. 02/2020 Copyright ©2005-2020 ISPRING WATER SYSTEMS, LLC. All rights reserved.
We stand behind our products iSpring has been dedicated to providing high quality drinking water to families across the United States since 2005. From various residential water filtration systems that purify your water in everyday life, to drinking water faucets that deliver pure, healthy, and tasty water to you and your family, iSpring strives for high standard products and aims to make excellent drinking water accessible for all households.
ATTENTION! Please pay attention to the following installation and safety recommendations: Installation and use MUST comply with all state and local plumbing codes. Read the Installation Manual before installing this system. Install the system at a location with adequate drainage. This water system unit is for INDOOR use ONLY. Do not install on hotwater supply lines, and protect against sudden temperature changes.
Table of Contents System Installation Prior to Installation ................................................................................................. 3 Component Identification ....................................................................................... 4 Installation Tips ...................................................................................................... 5 Installation Steps................................................................................................
System Installation Prior to Installation Inspect the package Open the box and remove all of the components. Inspect them to ensure nothing was damaged during shipping. If any part is cracked or broken, please immediately contact iSpring Customer Support for a replacement. Identify and get familiar with the components.
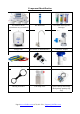
Component Identification RO Machine Head * (membrane not yet installed) RO Membrane 3 Pre-Filter Housings and Cartridges Storage Tank RO Faucet w/ Installation Kit Feed Water Adapter 4-Color Tubing Set Drain Saddle ¼” Tank Valve Housing Wrenches Leak Stop Valve Spare O-Rings and Fittings (Real package quantity may vary) Page 4www.123filter.com | (678) 261-7611 | Support@123Filter.
Installation Tips How to use the Quick-Connect fittings Figure 1 To connect: 1. See Figure 1. Check and cut the tubing end squarely and cleanly with utility knife or scissors. 2. Make a ⅝” mark at the end of the tube so you will be able to confirm when the tube is inserted fully into the fitting. 3. Remove the blue lock clip from the fitting with your nail. If the lock sleeve pops out of the fitting when doing this, simply pop it back in. 4.
To disconnect: 1. See Figures 2 and 3. Remove the blue lock clip from the fitting. 2. With the blue lock clip removed, use your thumb and index finger to hold down the lock sleeve. This will release the metal teeth holding the tube in place. While holding the lock sleeve down with that hand, use your other hand to remove the tube from the fitting. How to drill a ½” hole in your sink or counter-top 1.
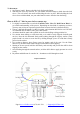
A. Source water from Feed Water Adapter → B. Source water to 1st stage water inlet C. Waste water from Flow Restrictor →D. Waste water to Drain Saddle/drain pipe E. RO water from stage 5 “T” fitting → F. RO water to Storage Tank F. When the drinking faucet is opened, RO water from the tank passes through E and G → H. RO water to the drinking faucet Installation Steps Before you begin the installation, it is highly recommended that you watch the video “iSpring Reverse Osmosis Installation” on YouTube.
Step 2: Installing the RO Faucet 2.1 If your kitchen sink does not have an existing ½” faucet hole, you will have to drill one. (Refer to How to drill a Hole on Sink or Counter-top). Wipe clean and dry the area. 2.2 Slip the front plate on the faucet stem, followed by the rubber washer. Insert the faucet stem into the hole on the countertop. Under the sink, slip on the back rubber washer, and tighten the nut with the plastic wing. 2.
Step 4: Installing the Vertical Filters: Stages 1, 2, and 3 4.1 Make sure the O-ring is seated inside the groove on top of the filter housing. A light amount of foodgrade silicon jelly may be used to help the O-ring seal better, but is not required. 4.2 The filter cartridges are preserved in shrink wrap. Note the direction sign on the sticker before removing the wrap. 4.
even with the housing opening. See Figure 8-9. After the membrane has been fully inserted you may then disregard the bag. 6.5 Before twisting the housing cap back on, make sure the O-ring is seated at the end of the membrane housing as shown in figures 8 and 9. This is very important to avoid leaking and damage to the O-ring. 6.6 Place the membrane housing cap back on and hand tighten it, then use the housing wrench to tighten it another ¼-½” of a turn. Do not over tighten. 6.
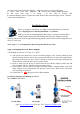
7.2 Facing the front of the system, the 1st stage is the see through housing located on the right hand side. Connect the RED tubing Feed Water Adapter (point A) to the stage 1 elbow fitting (point B). 7.3 Connect the Flow Restrictor (point C, 3-inch long cylinder with a FLOW labeled on it) to the Drain Saddle (point D) with the BLACK tubing. 7.4 On the right side of the Post Carbon Filter (FT15, 5th stage), connect the T-fitting (point E) and the Tank Valve (point F) with the YELLOW tubing. 7.
Step 8: System Start Up (model specific sub-steps are marked with a *) 8.1 Make sure no tubings are kinked. Turn the Tank Shut-off Valve OFF (perpendicular to the yellow tube). Place a towel under the system to catch any possible water leaks. 8.2 To prevent any residual carbon from the carbon pre filters from getting into the RO membrane, you previously left the tubing to the inlet of the RO membrane housing cap disconnected.
Leak Stop Valve Installation The Leak Stop Valve is a reusable mechanical leakage protector. When the pulp detects water leakage, it will expand and shut down the feed water. Before connecting the tubing into the fitting, make sure the end of the tubing is cut square and not damaged or scratched.
OWNER’S MANUAL Please read this manual for useful reverse osmosis system maintenance information. Section 1: iSpring RO System Maintenance All iSpring RO systems are designed with ease of use and low maintenance in mind. If the filter cartridges are changed on schedule as suggested, the system will work properly for years to come. See the chart below for the filter pack model numbers for your system. The filter packs can be found on 123filter.com, Amazon, or HomeDepot.com.
Note: Stages 6 and/or 7 only exist on certain models. Stage 1 – 3 Pre-Filters Replace every 6 months or sooner if you notice a decrease in water flow or quality. The replacement frequency depends on your water usage and source water quality. To protect the RO membrane from chlorine and other damaging contaminants, it is important to change the pre-filters according to schedule. How to change the stage 1 – 3 pre-filters: 1.
How to Change the Reverse Osmosis Membrane 1. The RO membrane typically lasts about 2 – 3 years. The membrane life span depends on the source water quality, your water usage, and how often the three pre-filters are replaced. To ensure the system’s performance and water purity, it is important to replace the pre-filter cartridges on schedule. Use a TDS meter to periodically to check the RO water purity. 2.
Optional Add-Ons Ice Maker Kit (ICEK) The Ice Maker Kit (model#: iSpring ICEK) can be purchased separately to feed RO water to your refrigerator for crystal clear ice cubes and great tasting water. If you choose to hook up the system to your refrigerator output, it can take the place of primary output over the RO faucet. Page 17www.123filter.com | (678) 261-7611 | Support@123Filter.
Section 2: Troubleshooting Guide for Newly Installed Systems 1) Zero output water from RO faucet a) Water supply is closed. Open the water supply to the system so the valve is in line with the red tubing. b) Incorrect installation. Verify all tubing connections. c) A tubing is crimped, blocking the water flow. Check all tubings and uncrimp any crimped tubings. 2) Tank not filling after several hours a) Incoming water pressure is below the minimum required level of 45 PSI.
5) Low water flow (trickle) at RO faucet a) Tank has not been given the chance to fill. Allow approximately two hours for the tank to fill. b) Incoming water pressure is below 45 PSI. If this is the case, the system will need a booster 6) 7) 8) 9) pump or permeate pump to raise the input water pressure going to the membrane. In this scenario the tank would only fill a little or not at all. High TDS in RO water a) The system will provide a 90%+ TDS rejection rate when working properly.
10) Water from the system tastes the same as tap water a) Incorrect installation. Verify all connections on the system. b) The RO membrane is not installed in the membrane housing. Ensure that the membrane has been installed. Section 3: Glossary and Terms to Know Add-On Kit (#ACL1): Filter add on kit for adding additional in line filters to an existing system. Comes with quick-connect elbow fittings, filter clamps, and additional tubing Alkaline Remineralization Filter* (#FA15): 6th stage.
Pressurized Holding Tank (#T32M): 3.2g capacity pressurized water holding tank. The air bladder forces the water to the drinking faucet when the faucet is opened. Tank comes pre-pressurized and should read 7-10 PSI when empty PSI: Pounds Per Square Inch, a unit used to measure water pressure Quick Connect Fitting: A secure, easy to connect and disconnect type of fitting used on the system.
Warranty This Limited Warranty extends to the original purchaser of the system only. This warranty covers all Manufacturersupplied items only that prove to be defective in material, workmanship, or factory preparation. This warranty covers parts only; all labor is excluded from this warranty, including, but not limited to, services related to the removal, replacement, installation, adjustment, maintenance, and/or repair of the unit or its components items.
Warranty Registration To register your product for the warranty, please visit our website at 123filter.com and go to “Warranty Registration” tab. We provide a 30-day money back guarantee, a 1 year manufacturer warranty, and lifetime tech support for all of our products. However, we do not have the order information from websites other than 123Filter.com (Amazon, Home Depot, etc.), so please be sure to fill in that information upon registration of your system.
3020 Trotters Parkway Alpharetta, GA 30004, USA iSpringFilter.com For questions, comments, or technical support, please contact us at: support@123Filter.com (678) 261-7611 Monday-Friday 8:30 a.m. - 5:30 p.m.