iSpring Reverse Osmosis Water Filter Systems COMMERCIAL REVERSE OSMOSIS SYSTEM INSTALLATION INSTRUCTION RCS5T Ver 2015-10 Copyright ©2005-2015 ISPRING WATER SYSTEMS, LLC. All rights reserved.
Please keep this owner’s manual for future reference. It includes the information on how to properly operate and maintain your iSpring Reverse Osmosis water filtration system. TABLE OF CONTENT BEFORE INSTALLATION..................................................................................................................... 2 Inspect the package............................................................................................................................... 2 Recommended tools list.........
BEFORE INSTALLATION Inspect the package Please open the box, and take all the components and tool kit out. Inspect them to ensure that nothing is damaged during shipping. If any part is cracked or broken, please immediately contact iSpring Customer Support for replacement. Identify and get familiar with the components.
Components Identification Pre-assembled RO system (membrane not yet installed, filter cartridges are still wrapped) RO membrane, Installation tool kit, and spare parts Page 3
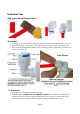
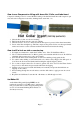
Installation Tips How to use Quick-Connect fitting Figure 1 To connect: 1. See Figure 1. Check and cut the tubing end squarely and cleanly with utility knife or scissors. 2. Make a mark at the end of tubing. The lengh is about ½ inch, the depth of the fitting body. 3. Fully insert the tubing until the mark is about to disappear. This ensures that it is sealed by the O-ring near the bottom. Figure 2 Figure 3 To disconnect: 1. See Figure 2 and 3. Remove the blue Lock Clip. 2.
How to use Compression fitting with brass Nut, Collar, and tube Insert Compression fitting is used to connect the PVC tubing to the threaded metal inlet with a tapered open end, such as the refrigerator water inlet, drinking faucet water inlet, etc. Figure 4 1. 2. 3. 4. Slide the Nut, Collar onto the end of tubing Fully insert the Insert into the open end of tubing Slide the Collar to be close to Insert and fit into the tapered open end of the thread matal inlet. Screw on the Nut and tight it up.
Installation Steps Before you begin installation, it is highly recommended that you watch the video “iSpring reverse osmosis installation” on YouTube. Note: Steps 1 – 7 are independent, and can be performed in any order. Step 1: Install Feed Water Adapter (AFW) 1.1 See Figures above. Turn off the Cold Water Line via the cold Water Supply Valve (WSV) under the sink. Open the kitchen faucet to release pressure and make sure water has stopped before proceeding to the next step.
Step 2: Install Drinking Water Faucet 2.1 If your kitchen sink does not have an existing ½” hole, you will have to drill one. (Refer to How to drill a Hole on Sink or Counter-top). Wipe clean and dry the area. (Contact us for larger front plate and washer if the hole is too big to cover). 2.2 Remove blue protection film from the front plate, slip it on the faucet thread, and slip on the black rubber washer. Insert the faucet thread portion into the hole. Optional plumber glue or sealer could be used. 2.
Step 4: Install the Vertical Filters: Stages 1, 2, and 3 4.1 Make sure that the O-ring is seated inside the groove on top of the filter housing. Food-grade silicon jelly may be used to help the O-ring stay in place and seal better. 4.2 Filter cartridges are preserved in shrink wrap. Note the direction sign on the sticker before removing the wrap (GAC stage). 4.
Step 7: Tubing Hook up (optional sub-steps are marked with * ) 7.1 Facing the iSpring logo up front, the pre-filter 1st stage is located on the right hand side. Connect the 3/8” tubing between Feed Water Adapter (AFW) and point A. 7.2 Connect the Flow Restrictor (point C) , which is a 3-inch long cylinder with a FLOW sign laying beside the membrane housing, to the black Drain Saddle with ¼” tubing. 7.3 Connect the Post Carbon Filter FT15 5th stage (point B) to the RO faucet with ¼” tubing. 7.
8.5 Turn on RO faucet. Within 5 minutes, RO water should start dripping. Let it run for at least 10 minutes. This flushes the system. Water could be black due to fine carbon dust from new carbon filters (step 8.2 could be taken to expedite the flush). It will turn clear with some air bubble. Shut off the RO Faucet. (Optional: turn on the Tank Shut-off Valve and wait for the tank to be filled up). 8.
SYSTEM MAINTENANCE For replacement filter cartridges, visit 123Filter.com or Google “Model replacement filter” online, in which “Model” is the model number of the system, e.g. RCS5T. Stages 1 – 3 pre-filters: Replace every 6 – 12 months, depending on source water quality and clean water usage. The frequency depends on the source water quality and clean water usage. They could last longer in city water, and shorter in well water. Different areas have good or bad water.
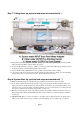
Stage 4 RO membrane: Replace every 2 – 3 years or sooner if TDS level starts increasing. Check the TDS level at least once a month to monitor the system performance. The rejection rate should be above 90% (NSF/ASIN STANDARD 58 for RO water filter). How to change reverse osmosis membrane 1. Reverse osmosis membrane usually last about 2 – 3 years, depending on the source water quality, clean water usage and the replacement frequency of the three pre-filters. 2.
Extra Installation UV Lamp (part# iSpring UVB11) and Ice maker kit (part# iSrping ICEK) Figure 5 Flow Sensor Switch for UV lamp The models with a UV stage have a “U” letter in model number, such as RCC7U, RCCAK-UV, RCC1UP-AK. The UV module comes pre-installed on the models with UV. It should function out of the box. The images above are for a better understanding about how the components are assembled and work together.