
Instructions / Assembly


Page 10
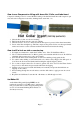
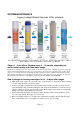
8.5 Turn on RO faucet. Within 5 minutes, RO water should start dripping. Let it run for at least 10 minutes. This
flushes the system. Water could be black due to fine carbon dust from new carbon filters (step 8.2 could be
taken to expedite the flush). It will turn clear with some air bubble. Shut off the RO Faucet. (Optional: turn
on the Tank Shut-off Valve and wait for the tank to be filled up).
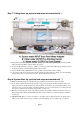
8.6 * If you have installed an iSpring UV stage, plug in the UV power and observe if the RO faucet turns the UV
on/off through the Flow Sensor Switch.
8.7 The reverse osmosis membrane is the key part for the effective reduction of total dissolved solids (TDS) and
that product water shall be tested periodically to verify that the system is performing properly. If the TDS of
the source water is 100ppm, the RO water should be less than 10ppm (Rejection rate >90%).
8.8 Check for leaks daily for the first two weeks after installation. Furthermore, a tray can be put under the
system in case of any leaks, and a Flood Alarm can be used together for better protection.
Congratulations! You have successfully installed the
iSpring Reverse Osmosis Water Filtration System!
Start enjoying the cleanest water right from your tap!