
Instructions / Assembly
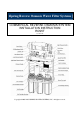


Page 7
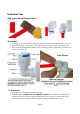
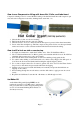
Step 2: Install Drinking Water Faucet
2.1 If your kitchen sink does not have an existing ½” hole, you will have to drill one. (Refer to How to drill a
Hole on Sink or Counter-top). Wipe clean and dry the area.
(Contact us for larger front plate and
washer if the hole is too big to cover).
2.2 Remove blue protection film from the front plate, slip it on the faucet thread, and slip on the black rubber
washer. Insert the faucet thread portion into the hole. Optional plumber glue or sealer could be used.
2.3 Under the sink, tighten the back rubber washer, lock washer with nut.
2.4 (Refer to How to use compression fitting). Slip the compression fitting nut and collar on the tubing, push the
insert into the tubing, insert it into the faucet end, and tighten up the nut. Pull the tubing to check if it is
secure.
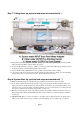
Step 3: Install Drain Saddle
3.1 Choose a spot on the drain pipe that is convenient for installing the drain saddle and tubing. Horizontal pipe
is recommended to minimize the dripping sound.
3.2 Drill a 1/4” hole on the drain pipe; paste the black sticky pad around the hole.
3.3 Cut the 1/4” tubing end a bit to make a 45 degree angle. Slip the plastic nut and front plate on the tubing.
Insert the tubing into the 1/4” hole on the drain pipe, install the back plate and tighten two screws with hex
nuts while the tubing remains in the hole.
3.4 Tighten the nut on the Drain Saddle by hand. Pull the tubing to check if it is secure.