
Instructions / Assembly


Page 8
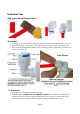
Step 4: Install the Vertical Filters: Stages 1, 2, and 3
4.1 Make sure that the O-ring is seated inside the groove
on top of the filter housing. Food-grade silicon jelly
may be used to help the O-ring stay in place and seal
better.
4.2 Filter cartridges are preserved in shrink wrap. Note
the direction sign on the sticker before removing the
wrap (GAC stage).
4.3 When placing the filter cartridge into its housing,
make sure it is centered and the knob protruding from
the bottom of the housing fits in the central hole of
the filter.
4.4 Screw the housing, with filters attached, onto the
housing caps (caps are pre-assembled on the machine
head). The cap also has a center knob which should
be inserted into the center hole of the filter cartridge.
Twist the housing on in a clockwise
direction by hand,
and then use a housing wrench to tighten it up for
about 1/4 – 1/2 turn. Do not over tighten. This can cause leaks and make it difficult to unscrew the
housing when replacing filters.
4.5
Follow the steps 1.1 – 1.4 to install the GAC and CTO filters. *Note* the second stage GAC is
the only filter that must go in a certain direction. Make sure that the end with the rubber washer
faces up, thereby attaching to the housing cap.
Step 5: Install Tank Shut-off Valve (Optional)
5.1 Optionally this RO system can be used with a 20 – 200 gallons storage tank. A tank helps meet the impulsive
high volume demand and build a commercial or whole house Reverse Osmosis solution.
5.2 Wrap 10 - 15 turns of Teflon tape clockwise (looking from top) onto the metal thread at the top of the tank.
5.3 Screw (clockwise) the Tank Shut-off Valve on and tighten up by hand. Do not over tighten.
5.4
An extra Tee fitting is needed for connecting the 5stage, tank and filtered water faucet.
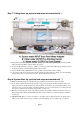
Step 6: Install Reverse Osmosis Membrane
6.1 Open the membrane housing cap. A thick rubber band can be slipped on the housing body for better grip.
6.2 Find the inner end with 4 O-rings, cut open the end of sealed bag and use it to hold RO membrane to avoid
contamination, and firmly insert the membrane into the housing until the outer end with only 2 O-rings is
completely inside the housing. See Figure above.
6.3 Before twisting the housing cap back on, check that the O-ring is evenly snagged on the membrane
housing (cap does NOT have O-ring). Hang tight and tighten up for about 1 /4 – 1 /2 turns using a small
plastic housing wrench, but do not over tighten. DO NOT reconnect the tubing to inlet on cap at this point
(will do it in system start up).