WCS45KG Whole House Central Softener INSTALLATION INSTRUCTIONS & OPERATING MANUAL Ver. 02/2021 Copyright ©2005-2021 ISPRING WATER SYSTEMS, LLC. All rights reserved.
We stand behind our products Since 2005, iSpring has been dedicated to providing high-quality drinking water to families across the United States.We provide various residential faucets and water filtration systems that purify your water in everyday life and deliver pure, healthy, and tasty water to you and your family. At iSpring, we strive to develop products to the highest of standards and aim to make excellent drinking water accessible for all households.
Prior to Installation Read this instruction manual carefully prior to installation. Keep this manual readily available for future reference. Table of Contents User Information& Guidelines...................................................................................... 3 Dimensions .................................................................................................................... 4 Product Operation & Specifications ......................................................................
User Information& Guidelines Users must adhere to the installation specifications described in this Product Installation and Operation Manual (hereinafter referred to as the “instruction manual”). iSpring is not responsible for damage, loss, or injury resulting from neglect, improper maintenance, or unauthorized modification of products. ● The unit should be placed only on flat surfaces. Do not mount on a wall. ● This product is designed for residential use only.
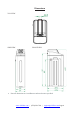
Dimensions TOP VIEW SIDEVIEW • FRONTVIEW Note:all dimensions are in millimeters unless otherwise specified. www.123filter.com | (678) 261-7611 | support@123filter.
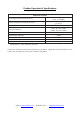
Product Operation & Specifications SPECIFICATIONS Working PressureLimits (min./max.) Water Temperature Limits (min./max.) Required Riser Pipe Diameter Electrical Adapter Pressure Tank Thread Inlet/Outlet Connector Rated Service Flow Rate Peak Flow Rate Capacity 20~50 psi (0.14 ~ 0.35 MPa) 33.8~102.2 °F (1~39 °C) 1.050 inch(26.7mm) Input: AC120V, 60Hz Output: AC12V~650mA 2.5″ NPSM 1″ NPT 8 GPM (30 L/min.) 26 GPM 45000 grain *Independent 3rd party laboratory test data.
Before You Start Warning This system can only be used with 120V/60Hz unidirectional AC power. Do not place objects on top of the power cord and set the unit in an area where the power cord will not be stepped on or tripped over. Electric shock hazard: do not overload sockets or extension cords. If there is smoke, abnormal odor, or abnormal noise coming from the machine, immediately unplug the system’s powerto avoid fire or electric shock.
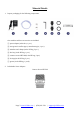
Material Details 1. Inspect packaging for the following components: One machine and these accessories are included: ① power adapter (white box, 1 pcs.) ② sewage and overflow pipe (a translucent pipe, 1 pcs.) ③ stainless steel clamps (in the PE bag, 2 pcs.) ④ hex key (in the PE bag, 1 pcs.) ⑤ connect screws NPT1M (in the PE bag, 2 pcs.) ⑥ O-rings (in the PE bag, 2 pcs.) 2. ⑦ grease (in the PE bag, 1 pack) Inlet/Outlet Screw Adaptor: Connect Screw NPT1M Page 7 www.123filter.
3. Inlet/Outlet Connections Types: 4. Bypass Assembly: www.123filter.com | (678) 261-7611 | support@123filter.
Installation Requirements Equipment Installation Conditions The installation location should be well-ventilated and protected against wind and rain. Avoid direct sunlight and radiation from any heat sources. This equipment is required to be installed indoors. If it needs to be installed outdoors, heat preservation measures must be taken for the body and pipes, including frost-proof, sun-proof, and waterproofing measures and insulation.
inlet pressure is lower than 20 psi, a booster pump must be installed at the water inlet pipe of the water purifier to ensure the working pressure meets technical requirements. Before connecting the water inlet pipe, remove any remaining impurities and dust in the pipe and close the main water supply before connecting it. While connecting pipes, keep the pipes as close to the wall as possible. The routing of the pipes should be straight, and the corners should be clear.
Installation Instructions (1) General Bypass Installation i. Hold the knob or use a bypass tool to rotate the knobs. The water supply will be bypassed when the knobs are horizontal.The bypass is in service when knobs are oriented vertically.When the bypass is in service, users can take raw water and filter water samples for testing at the water taking port on either side of the bypass. ii. Mount the meter sensor into the meter sensor mounting hole.
v. Rotate the Water Hardness Adjustment Nut in a clockwise direction. The bigger the rotation angle, the higher the water hardness. (2) Precautions Before Commissioning • Verify the water inlet pipe and sewage pipe are connected as required. All piping connections must comply with relevant national standards. • Attach the sewage and overflow hoses onto the sewer pipe, but do not insert them directly into the sewer pipe. A gap of 100 mm shall be maintained with the bottom of the sewer pipe.
Step 9. Connect the equipment sewage pipe and clamp it to ensure a secure connection. Connect the equipment overflow pipe and clamp it to provide a secure connection as well. The sewage and overflow outlet is then inserted into the tubes, and the stainless steel clamp is locked and firmly attached outside to prevent high water pressure during sewage discharge. This could cause the sewage hose to break loose and leak sewage. Step 10.
All keys will lock after 3 minutes during standby. Press and hold the “MENU” key for 3 seconds to unlock. Step 18. a. To perform the regeneration processes,press and hold the "↑" / "↓" keys for 3 seconds in the unlocked state to enter the user menu settings. Step 18. b. Press and hold the "SET/REGEN" button for 3 seconds to enter the manual regeneration mode, then choose immediate regeneration. Step 19. Return the bypass to the service position. Step 20.
Programming the Central Softener System (1) Button Configuration • MENU: This function is used to enter the basic setup information required at the time of installation. • SET/REGEN: This function is used to initiate an immediate or delayed manual regeneration. • DOWN/UP: These buttons are used to increase or decrease the value of the settings while in programming mode. (2) Key Functions "MENU" • Press and hold for 3 seconds to unlock the device while in standby mode.
• In the user menu display, press this button once to delay regeneration. • In the user menu setting, press this to confirm the parameter setting and switch to the next option. “UP/DOWN” • When the display lists any menu options, these keys can be used to adjust the value or option. (3) Notes (a) Key Combinations • In the unlocked state, press and hold"↑" and "↓"at the same time for 3 seconds, then press "SET/REGEN" tothe regeneration cycle setting (backwash, rinse, lock/unlock value).
(4) Press and hold "MENU" for 3 seconds to enter the following user menu settings: TIME OF DAY, YEAR, MONTH, DAY: Time of day is for normal operation and the scheduling of the regeneration time. The date is used in adiagnostic function to track the last time the system regenerated. SET HARDNESS: This value is the maximum compensated water hardness of the raw water supply in grains per gallon. It isused to calculate the system capacity. If Ferrous Ironis present, add 4 gpG for every 1 ppm of Ferrous Iron.
(5) Press and hold "MENU" and "SET/REGEN" at the same time for 3 seconds to enter the following user menu settings: SYSTEM LANGUAGE: Choose the system language. UNITS: Choose the system’s unit of measurement: metric or gallons. EFFICIENCY & CAPACITY SETTINGS: There are 3 settings to choose from: High Efficiency,Standard Capacity, and Iron & Manganese.The values for these settings are set in the Factory Options and are used to calculate the system capacity and refill time.
(6) Press and hold "↑" and "↓"at the same time for 3 seconds, then press "SET/REGEN" to enter the following user menu settings: UNIT SIZE: The “RESIN VOL.”is the amount of ion exchange media used in the system. CYCLE SETTINGS (BACKWASH, BRINE, RINSE): The system has pre-engineered default settings for every valvemode, unit size, and salt setting. The settings are optimized to maximize salt and water use efficiency. The settings can be manually adjusted.
WCS45KG Whole House Central Softener Operation (1) Product Functions and Features iSpring’swhole house central softeners not only providefeatures such as large water output, optimal water softening, and stable performance, but they can also be fully automatic and intelligent in operation, automatic regeneration, and dynamic salt dissolution. In addition, these softeners not only meet the needs of household bathing, laundry, cleaning, water heaters, water heaters, etc.
(2) Structure Automatic control valve • Polyphenylene ether (PPE) + glass fiber • Hygienic, reliable, and durable • Corrosion-resistant • Rust-free Softening materials • Ion exchange resin Fiberglass Tank • Polyethylene (PE) liner • Corrosion-resistant • Rust-free (3) Valve The valve is controlled using a simple, user-friendly electronic display on a large LCD screen. The main page displays the current date and time while also showing key information such as system usage.
• Intelligent (mandatory) fast regeneration function:When this function is turned on and the remaining water consumption in the regeneration cycle is less than 3%, the system will automatically perform a quick temporary regeneration to quickly restore the water treatment function of some resin and avoid affecting the effluent water quality.
Caring for Your Central Softener If you have not read and truly understood this manual, do not operate this equipment. The effluent during the regeneration process is not softened, and the water used during the regeneration of the softener will affect its regeneration effect. It is not recommended to use the water at this time. The product can be used frequently after installation and commissioning has been completed.
The service life of the cation exchange resin is two years. After two years, the resin in the water softener needs to be cleaned and treated, and new cation exchange resin will be added. Check the condition of the water softener regularly.Users should inspect: a) Whether there is any leakage in the pipeline.If so, contact iSpring. b) Whether the overflow pipe is blocked.If so,clear it in time. c) Whether the brine tank is vertical. If so, straighten it in time.
Troubleshooting ISSUE POSSIBLE CAUSE POSSIBLE SOLUTION The transformer is not plugged in Connect the power supply. Socket failure Repair or replace the socket. Power failure Wait for power to be restored. Transformer failure Replace the transformer. Incorrect regeneration time Power failure or loose power plug Recalibrate the time according to the instructions. Leaking water Loose connection Tighten the connection or reconnect.
high hardness Incorrect regeneration cycle setting Reset the regeneration cycle according to the manual. The water hardness adjustment nut is Close the water hardness leaking or opened too far adjustment nut or readjust the flow of the water hardness adjustment nut. Bypass leaking Replace the gasket. Brine tank overflow Replenishment time is exceedingly high The machine is leaking Reset the replenishment time. Turn off the machine and contact iSpring.
Warranty Registration To register your product for the warranty, visit our website at 123filter.com and go to the “Warranty” tab. We provide a 30-day money-back guarantee, a 1-year manufacturer warranty, and lifetime tech support for all of our products. However, we do not have the order information from websites other than 123Filter.com (Amazon, Home Depot, etc.), so please be sure to fill in that information upon registration of your system.
Atlanta, GA USA iSpringFilter.com For questions, comments, or technical support, contact us at: support@123Filter.com (678) 261-7611 Monday-Friday 8:30 a.m. - 5:30 p.m.