® PRO User Guide Remember to save your PIN in a safe place. If lost or forgotten, there is no way to access the drive. If you are having difficulty please refer to the complete user’s manual which is loaded on your diskAshur PRO drive and is also available at iStorage’s website: www.istorage-uk.
Table of Contents About the diskAshur PRO 4 4 diskAshur PRO - Connections 5 5 5 6 diskAshur PRO Keypad Panel 7 First Time Use 7 Locking the Drive 8 Unlocking the Drive 8 Admin Mode 8 Changing the Admin PIN 8 Adding a new User PIN 9 Deleting the User PINs 9 Changing the User PIN 9 Package contents Before you begin Connecting diskAshur PRO Connecting with the USB Y-Cable Setting the Unattended Auto Lock Feature 10 diskAshur PRO Brute Force Protection
Copyright © iStorage Limited, Inc 2013. All rights reserved. Windows is a registered trademark of Microsoft Corporation. All other trademarks and copyrights referred to are the property of their respective owners. Distribution of modified versions of this document is prohibited without the explicit permission of the copyright holder.
About the diskAshur PRO Looking for the highest level of security for your data while utilizing the fastest USB 3.0 speeds? Look no further than the diskAshur PRO 140-2 Validated Drive, certified and tested to NIST FIPS 140-2 Level 2 requirements and with the fastest speeds of iStorage’s Secure Drive line.
diskAshur PRO - Connections Before you begin Be sure to review the following information before you begin to use diskAshur PRO. Attention: Use only the included cables with your diskAshur PRO. You might damage the drive if you use a cable not included with the diskAshur PRO. diskAshur PRO is designed for portable use without an AC power adapter and in most cases will be able to power on a single USB port.
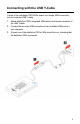
Connecting with the USB Y-Cable If none of the diskAshur PRO LEDs power on a single USB connection, use the included USB Y-cable. 1. Attach diskAshur PRO’s integrated USB cable to the female connector of the USB Y-cable. 2. Connect the two male USB connectors to two available USB ports on your computer. 3. At least one of the diskAshur PRO’s LEDs should turn on, indicating that the diskAshur PRO is powered.
diskAshur PRO Keypad Panel TM 4 1 SHIFT button 2 UNLOCK button 3 LOCK button 4 3 2 1 ® PRO LED Indicator lights When you first plug in the FIPS diskAshur PRO drive, the unit will do a self-test to verify all security components are working properly. The LEDs will go through 3 test stages RED, GREEN, and BLUE. This will be followed by three GREEN flashes on a successful test. Any test failure will leave the unit in an interoperable state with the RED LED flashing.
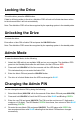
Locking the Drive To lock the drive, press the LOCK button. If data is still being written to the drive, diskAshur PRO will wait until all data has been written to the drive and then it will lock automatically. Note: The diskAshur PRO will not be recognized by the operating system in the standby state. Unlocking the Drive To unlock the drive: Enter either a User PIN or Admin PIN and press the UNLOCK button. Note: The diskAshur PRO cannot be recognized by the operating system in the standby state.
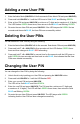
Adding a new User PIN 1. Enter the Admin Mode (UNLOCK + 0 for five seconds. Enter Admin PIN and press UNLOCK). 2. Press and hold UNLOCK + 1 until the LED turns to Solid BLUE and Blinking GREEN. 3. Enter a User PIN and press UNLOCK (a minimum of 7 digits and a maximum of 16 digits). The LED flashes GREEN three times, then returns to Solid BLUE and Blinking GREEN. 4. Re-enter the new User PIN and press UNLOCK.
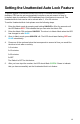
Setting the Unattended Auto Lock Feature To protect against unauthorized access if the drive is unlocked and unattended, diskAshur PRO can be set to automatically lock after a pre-set amount of time. In its default state, the diskAshur PROUnattended Auto Lock feature is turned off. The Unattended Auto Lock can be set to activate after 5, 10 or 20 minutes. To set the Unattended Auto Lock please uses the following steps: 1.
diskAshur PRO Brute Force Protection What is Brute Force Attack? A brute force attack is a method of defeating a cryptographic scheme by systematically trying a large number of possibilities; for example, a large number of the possible keys in a key space in order to decrypt a message. In most schemes, the theoretical possibility of a brute force attack is recognized, but it is set up in such a way that it would be computationally infeasible to carry out.
Setting a Self-Destruct PIN 1. Enter the Admin mode by pressing and holding UNLOCK + 0 for five seconds until the LED flashes RED. This indicates that you can enter the Admin PIN. 2. Enter the Admin PIN and press UNLOCK. The drive is in Admin Mode when the LED has changed to BLUE. 3. Once in Admin mode, press UNLOCK + 3. LED will be alternating BLUE / RED. 4. Input in the PIN that you would like to use as the Self Destruct PIN and press UNLOCK. 5.
Initializing and formatting the diskAshur PRO after a complete reset A complete reset of the diskAshur PRO will erase all information and partition settings. You will need to initialize and format the diskAshur PRO. To initialize your diskAshur PRO, do the following: 1. After a complete reset, attach the diskAshur PRO to the computer. 2. Press UNLOCK + 9. The LED will change to Solid BLUE / Blinking GREEN. 3. Enter the new Admin PIN and press UNLOCK key.
Hibernating, Suspending, or Logging off from the Operating System Be sure to save and close all the files on your diskAshur PRO before hibernating, suspending, or logging off from the Windows operating system. It is recommended that you lock the diskAshur PRO manually before hibernating, suspending, or logging off from your system. To log off the diskAshur PRO, double-click Safely Remove Hardware on the Windows desktop and remove the diskAshur PRO from your computer.
diskAshur PRO Setup for Mac OS ® Your diskAshur PRO is preformatted in NTFS for Windows. To reformat the drive to a Mac compatible format please read the below. Once the drive is unlocked, open Disk Utility from Applications/Utilities/ Disk Utilities. To format the diskAshur PRO: 1. Select diskAshur PRO from the list of drives and volumes. Each drive in the list will display its capacity, manufacturer, and product name, such as 232.9 diskAshur PRO. 2. Click the ‘Erase’ tab. 3. Enter a name for the drive.
Troubleshooting This section contains troubleshooting information for the diskAshur PRO. If you encounter any of the following problems when using diskAshur PRO, refer to the corresponding answers. Q: What can I do if I forget the User PIN? A: Use your Admin PIN to enter Admin Mode, and then create another User PIN in Admin Mode. Q: What can I do if I forget the Admin PIN? A: There is no other way to retrieve the Admin PIN except a complete reset of diskAshur PRO.
Q: Why do the LEDs blink Blue, Red and Green after I plug the drive in? A: When you first plug the drive in, it does a self-test on the encryption components of the drive. If any component fails the test, the LED will stop on RED and the drive will not function. Q: What is FIPS 140-2? A: This is a government standard to accredit cryptographic modules. The government regulates certain industries that collect, store and/or transfer sensitive data to use security that meets this standard.
Technical Support iStorage provides the following helpful resources for you: 1. iStorage’s Website (http://www.istorage-uk.com) This gives you the ability to check for up-to-date information 2. E-mail us at support@istorage-uk.com 3. Or call the Technical Support Department +44 (0)20 8991 6265 iStorage’s Technical Support Specialists are available from 9:00 a.m. to 5:30 p.m.
© iStorage Limited, Inc. 2013. All rights reserved. iStorage Limited, iStorage House, 13 Alperton Lane, Perivale, Middlesex, UB6 8DH +44 (0)20 8991 6260 www.istorage-uk.