
Workshop Manual


6E–65
6VE1 3.5L ENGINE DRIVEABILITY AND EMISSIONS
A/C Clutch Control Circuit Diagnosis (Cont'd)
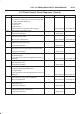
Step NoYesValue(s)Action
7 Temporarily substitute the A/C compressor relay in
place of the A/C thermostat relay, then repeat Step 5.
Did the “A/C Request” display indicate “Yes”?
— Go to
Step 8
Go to
Step 9
8 Replace the original A/C thermostat relay.
Is the action complete?
— Verify repair —
9 Does the blower operate? — Go to
Step 10
Go to
Step 11
10 Repair the blower.
Is the action complete?
— Verify repair —
11 Check for a faulty 10A A/C fuse in the underdash fuse
panel.
Was the 10A fuse OK?
— Go to
Step 13
Go to
Step 12
12 Check for short circuit and make repairs if necessary.
Replace the 10A A/C fuse.
Is the action complete?
— Verify repair —
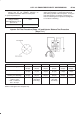
13 1. Remove the glove box to gain access to the A/C
thermostat.
2. Disconnect the thermostat connector.
3. Attach a fused jumper between ground and the
thermostat wire.
4. A/C “ON”.
5. Blower “ON”.
Dose A/C request indicate “YES” on the Tech 2?
— Go to
Step 14
Go to
Step 17
14 1. Ignition “ON”.
2. Use a DVM to check voltage at the electronic A/C
thermostat.
Was voltage equal to the specified value?
B+ Go to
Step 17
Go to
Step 15
15 Check for open wire between the thermostat and the
A/C switch.
Was the wire open?
— Go to
Step 16
Go to
Step 17
16 Repair the open wire between the thermostat and the
A/C switch.
Is the action complete?
— Verify repair —
17 Check for an open circuit between A/C thermostat relay
and PCM A/C request terminal (F45).
Was there an open circuit?
— Go to
Step 18
Go to
Step 19
18 Repair the open circuit between the PCM and A/C
thermostat relay.
Is the action complete?
— Verify repair —
19 1. Ignition “ON”.
2. Use a DVM to check voltage at the A/C pressure
switch.
Was voltage equal to the specified value?
B+ Go to
Step 21
Go to
Step 20
20 Repair the open circuit between the 10A A/C fuse and
the pressure switch.
Is the action complete?
— Verify repair —