
Workshop Manual


6E–66
6VE1 3.5L ENGINE DRIVEABILITY AND EMISSIONS
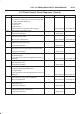
A/C Clutch Control Circuit Diagnosis (Cont'd)
Step NoYesValue(s)Action
21 Use an ohmmeter to check continuity between the
pressure switch and the A/C thermostat relay.
Was the circuit open?
— Go to
Step 22
Go to
Step 23
22 Repair the open circuit between the pressure switch
and the A/C thermostat relay.
Is the action complete?
— Verify repair —
23 Check for damaged pin or terminal at F45 of the PCM.
Was a damaged pin or terminal found?
— Go to
Step 24
Go to
Step 25
24 Repair the damaged pin or terminal.
Is the action complete?
— Verify repair —
25 Replace the PCM.
IMPORTANT: The replacement PCM must be
programmed. Refer to
On-Vehicle Service
in
Powertrain Control Module Sensors for procedures.
And also refer to latest Service Bulletin.
Check to see if the Latest software is released or not.
And then Down Load the LATEST PROGRAMMED
SOFTWARE to the replacement PCM.
Is the action complete?
— Verify repair —
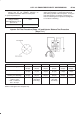
26 1. Remove the A/C compressor relay.
2. Ignition “ON”.
3. Use a DVM to check voltage at both of the wires at
the A/C compressor relay socket.
Is the voltage equal to the specified value?
B+ Go to
Step 28
Go to
Step 27
27 Repair the faulty wire between the A/C fuse and the
A/C compressor relay .
Is the action complete?
— Verify repair —
28 1. A/C compressor relay removed.
2. Engine idling.
3. A/C “ON”.
4. Blower “ON”.
5. Use a DVM to measure voltage between the wire at
the A/C compressor relay socket and battery±.
Did the DVM indicate the specified value?
B+ Go to
Step 32
Go to
Step 29
29 Check for an open wire between PCM terminal F4 and
the A/C compressor relay.
Was the wire open?
— Go to
Step 30
Go to
Step 31
30 Repair the open wire between the PCM and the A/C
compressor relay.
Is the action complete?
— Verify repair —
31 Check for a damaged pin or terminal at F4 of the PCM.
Was a damaged pin or a terminal found?
— Go to
Step 24
Go to
Step 25