
Workshop Manual


6E–417
6VE1 3.5L ENGINE DRIVEABILITY AND EMISSIONS
If connections and wiring are OK and DTC P1154
continues to set, replace the Bank 2 HO2S 1.
Reviewing the Failure Records vehicle mileage since the
diagnostic test last failed may help determine how often
the condition that caused the DTC to be set occurs. This
may assist in diagnosing the condition.
Test Description
Number(s) below refer to the step number(s) on the
Diagnostic Chart.
3. A condition that affects other heated oxygen sensors
indicates probable contamination. To avoid
damaging replacement sensors, correct the
condition which caused the contamination before
replacing the affected sensors.
5. This step checks for conditions which may cause the
heated oxygen sensor to appear faulty. Correct any
of the described conditions if present.
8. To avoid damaging replacement sensors, correct the
condition which caused the contamination before
replacing the affected sensors.
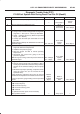
DTC P1154 – HO2S Transition Time Ratio Bank 2 Sensor 1
Step Action Value(s) Yes No
1 Was the “On-Board Diagnostic (OBD) System Check”
performed?
— Go to
Step 2
Go to
OBD
System
Check
2 IMPORTANT: If any other DTCs are set (except P1133
and/or P1134), refer to those DTCs before proceeding
with this diagnostic chart.
1. Idle the engine at operating temperature.
2. Operate the vehicle within parameters specified
under “Conditions for Setting the DTC” criteria
included in Diagnostic Support.
3. Using a Tech 2, monitor “DTC” info for DTC P1154
until the DTC P1154 test runs.
Note the test result.
Does Tech 2 indicate DTC failed this ignition?
— Go to
Step 3
Refer to
Diagnostic
Aids
3 Did the Tech 2 also indicate P1133, and/or P1134 test
failed?
— Go to
Step 17
Go to
Step 4
4 Check for leaks at the exhaust pipe joints.
Are the joints leaking?
— Go to
Step 5
Go to
Step 6
5 Tighten the U-bolt nuts at the leaking joints.
Is your action complete?
— Go to
Step 2
—
6 Check for gaskets that are damaged or improperly
installed.
Are there damaged or misaligned gaskets?
— Go to
Step 7
Go to
Step 8
7 1. Replace the damaged gaskets.
2. Align the connections.
3. Tighten the connections.
Is your action complete?
— Go to
Step 2
—
8 Check for loose exhaust flange connections.
Are the flange connections loose?
— Go to
Step 9
Go to
Step 10
9 Tighten the stud nuts or bolts to specifications.
Is your action complete?
— Go to
Step 2
—
10 Check for burned or corroded exhaust pipes.
Are the exhaust pipes burned or corroded?
— Go to
Step 11
Go to
Step 12
11 Replace the exhaust pipes, as required.
Is your action complete?
— Go to
Step 2
—