
Workshop Manual


6E–478
6VE1 3.5L ENGINE DRIVEABILITY AND EMISSIONS
Reviewing the Failure Records vehicle mileage since the
diagnostic test last failed may help determine how often
the condition that caused the DTC to be set occurs. This
may assist in diagnosing the condition.
Test Description
Number(s) below refer to the step number(s) on the
Diagnostic Chart.
3. Determines if the PCM is able to control the EVAP
purge solenoid valve.
4. Determines if the DTC will set under the conditions
present when the DTC was originally stored. If not,
the fault is intermittent.
5. Checks for a grounded EVAP purge solenoid driver
circuit, a faulty EVAP vacuum switch, or a leaking
EVAP purge solenoid valve.
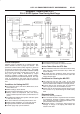
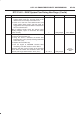
DTC P1441 – EVAP System Flow During Non-Purge
Step Action Value(s) Yes No
1 Was the “On-Board Diagnostic (OBD) System Check”
performed?
— Go to
Step 2
Go to
OBD
System
Check
2 1. Ignition “OFF”.
2. Remove the fuel filler cap.
3. Ignition “ON”.
4. Observe “Fuel Tank Pressure” on the Tech 2.
Is “Fuel Tank Pressure” at the specified value?
1.51V Go to
Step 3
Go to
DTC
P0452 or
P0453
3 1. Re-install the fuel filler cap.
2. Using the Tech 2, command the EVAP Vent
Solenoid Valve “ON” (Closed).
3. Disconnect the canister side rubber hose end that
hose is connected between the Purge Solenoid
Valve and Canister.
IMPORTANT: Before continuing with the diagnosis,
zero the EVAP pressure/purge cart J41413 (refer to the
tool operating instructions).
And them monitor the fuel tank inner pressure using the
Tech 2.
Does the fuel tank pressure remain the specified
value?
1.52 - 1.60V Go to
Step 4
Go to
Step 6
4 1. Disconnect the EVAP pressure/purge cart J41413,
and then plug the hose end.
2. Disconnect the rubber hose end of engine vacuum
source side, (the hose connected between Purge
Solenoid Valve and engine).
3. Connect the vacuum hand pump to this rubber hose
end.
4. Then apply the -15 in H2O vacuum by the vacuum
pump.
5. Monitor the fuel tank inner pressure using the Tech
2.
Does the fuel tank inner pressure hold the specified
value?
1.47 - 1.51V Go to
Step 6
Go to
Step 5
5 Replace the Purge Solenoid Valve.
— Verify Repair —