
Workshop Manual


6G–7
ENGINE LUBRICATION (6VE1 3.5L)
Oil Pan and Crankcase
Removal
1.Disconnect battery ground cable.
2.Lift vehicle by supporting the frame.
3.Remove under cover.
4.Drain engine oil.
5.Remove front wheels.
6.Remove oil level dipstick from level gauge tube.
7.Remove radiator under fan shroud.
8.Remove shift on the fly from axle housing.
9.Remove suspension cross member fixing bolts, 2 pcs
each per side and remove suspension cross member.
10.Remove axle housing assembly four fixing bolts from
housing isolator side and mounting bolts from wheel
side. At this time support the axle with a garage jack
and remove axle housing assembly. (for 4×4)
11.Remove the steering unit assembly.
12.Remove starter fixing bolts.
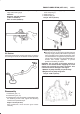
13.Remove oil pan fixing bolts.
14.Remove oil pan, using J-37228 sealer cutter, remove
oil pan.
013RS003
15.Remove crankcase fixing bolts.
16.Remove crankcase, using J-37228 sealer cutter,
remove crankcase.
NOTE: Do not deform or damage the flange of oil pan and
crankcase.
Replace the oil pan and/or crankcase if deformed or dam-
aged.
013RS003
Installation
1.Install crankcase.
A. Remove residual sealant, lubricant and moisture
from mounting surface, then dry thoroughly.
B. Properly apply a 4.5 mm (0.7 in) wide bead of
sealant (TB-1207C or equivalent) to mounting
surface of crankcase.
Sealant bead must be continuous.
B The crankcase must be installed within 5 minutes
after sealant application to prevent premature
hardening of sealant.
013RW010