
Workshop Manual


7A–75
AUTOMATIC TRANSMISSION (4L30–E)
Third Clutch And Sprag Unit
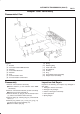
Disassembled View
248RW001
Legend
(1) Retaining Ring
(2) Input Sun Gear and Sprag Unit Assembly
(3) Retaining Washer
(4) Bearing
(5) Thrust Washer
(6) Clutch Plates
(7) Third Clutch Spring Cushion Plate
(8) Third Clutch Drum Assembly
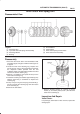
Disassembly
1.Place the third clutch drum and intermediate shaft
assembly upright, using the overdrive internal gear as
a support.
2.Locate the ends of the retaining ring. Depress one
end of the ring using a small screwdriver instead of
the depressor handle provided with the tool
J-38450-A. Slide one blade down between the third
clutch drum and the retaining ring.
3.Remove a screwdriver and repeat this step for the
other end of retaining ring.
4.Install the remaining four blades approximately (five)
notches apart using a screwdriver to depress the
retaining ring.
5.Pull up on input sun gear and sprag unit assembly (1
and 2) to release the retaining ring from third clutch
drum assembly (8).
6.Remove the tool blades.
248RX001
7.Remove retaining washer (3), bearing (4), thrust
washer (5), and clutch plates (6 and 7) from the third
clutch drum assembly (8).
Inspection And Repair
Visual Check:
If any damage, deformation or wear is found, replace the
damaged part.