
Workshop Manual


7A–77
AUTOMATIC TRANSMISSION (4L30–E)
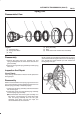
Third Clutch
Disassembled View
248RS006
Legend
(1) Retaining Ring
(2) Spring Seat
(3) Springs
(4) Piston Assembly
(5) Third Clutch Drum
Disassemble
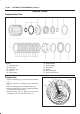
1.Compress spring seat using the J–23075 spring
compressor and J–23075–12 adapter tool.
NOTE: Do not over–stress the springs and seat. This will
cause damage to the spring seat.
B Remove the tool.
B Remove retaining ring (1).
248RS007
2.Release the spring seat (2).
NOTE: Do not let the spring seat catch in the ring groove.
B Remove spring seat (2) and springs (3).
3.Remove piston assembly (4) from third clutch drum
(5).
Inspection And Repair
Visual check:
If any damage, deformation or wear is found, replace the
damaged part.
Operation check:
Shake the piston and listen for check ball movement
indicates proper check ball operation. Replace the piston
if the check ball is missing or falls out.
Reassembly
1.The lip of the piston seal must point toward the front of
the transmission. Lubricate the seal lip with
transmission fluid.
B Install piston assembly (4) into the third clutch drum
(5). Use the J–23084 third clutch piston installer to
protect the outer seal during installation.
B Remove the seal installer.