
Workshop Manual


ENTERTAINMENT
8C–15
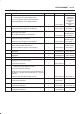
Audio Self-Diagnosis
Step Action Value(s) Yes No
1 1. Simultaneously press and hold the RESET key and
the CLOCK key (on the display panel).
2. Turn the ignition switch to the ON position.
Does DIAG appear on the display screen?
— Go to
Step 2
Check power
supply and
component
connections.
Start
self-diagnosis
again.
2 Press and release the SERVICE key (1 time only).
Does DIAG AUDIO appear on the display?
— Go to
Step 3
Go to Step 11
3 Press and release the SERVICE key (1 time only) to
check tape connections.
Does TAPE OK appear on the display?
— Go to
Step 4
On NG display,
Go to
Step 11
4 Press and release the SERVICE key (1 time only) to
check CD changer connections.
Does CD CHG OK appear on the display?
— Go to
Step 5
On NG display,
Go to
Step 11
5 Press and release the SERVICE key (1 time only) to
check communication with A/C unit.
Does A/C DATA OK appear on the display?
— Go to
Step 9
On NG display,
Go to
Step 6
6 Is A/C DATA ERR1(abnormal display data line)
displayed?
—
Refer to
A/C
self-diagnosis
Go to
Step 7
7 Is A/C DATA ERR2 (abnormal CLOCK data line)
displayed?
—
Refer to
A/C
self-diagnosis
Go to
Step 8
8 Is A/C DATA ER3 (abnormal SW data line) displayed? — Go to
Step 11
—
9 Press and release the SERVICE key (1 time only) to
display the A/C unit error history.
Is the action complete?
— Go to
Step 10
—
10 1. Press and release the SERVICE key (1 time only) to
change to the key diagnosis mode.
2. Press and release each key.
NOTE: As a key is pressed, its name should appear on
the display. The A/C LED should blink at 1–second
intervals.
Did the events described in Step 2 occur?
— Go to
Step 12
Go to
Step 11
11 Replace the audio unit.
Is the action complete?
— Go to
Step 1
—
12 Press and release the ON/OFF key.
Is the action complete?
— Go to
Step 1
Go to
Step 13
13 Press and release the SERVICE key (1 time only).
Is the action complete?
— Go to
Step 3
—