SUN 3G Mobile Phone User Guide 1
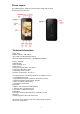
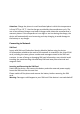
Phone Layout The following figure shows the phone layout along with the keys and parts for your reference. Technical Information Model: SUN Weight: 109gram(with battery) Size Length: 112.8mmx62mmx12.1mm Networks: GSM 850/1900 MHz WCDMA 850/1900MHz Battery: 1200mAh Lithium Battery Nominal voltage: 3.7v Nominal: 4.
Table of Content PREFACE ............................................................................. 5 FOR YOUR SAFETY .................................................................... 5 SECURITY REQUIREMENTS .............................................................. 6 MAINTENANCE ....................................................................... 6 KEYS AND PARTS ...................................................................... 7 GETTING STARTED ...........................................
5.3 USING GOOGLE MAPS..........................................................29 5.4 USING GOOGLE LATITUDE (AVAILABLE BY COUNTRY) ...............................30 6 SETTINGS ....................................................................... 30 6.1 6.2 6.3 6.4 6.5 6.6 6.7 6.8 6.9 6.10 6.11 6.12 6.13 6.14 6.15 6.16 6.17 WIRELESS &NETWORKS.........................................................30 CALL SETTINGS.................................................................34 AUDIO PROFILES ..........
PREFACE Thank you very much for choosing this product! This user manual has been specially designed to guide you through the functions and features of your phone. The policies and procedures are provided in this user manual to guide you for a better use. Attention and Precautions Please read the contents carefully to ensure safety and correct use. For Your Safety Obey all instructions in restricted areas where the usage of wireless phone is prohibited.
Read carefully the user guide when connecting your device with other product to ensure safe and correct usage. Connecting it to the incompatible products may cause damage to your phone and injury. Use only approved batteries and accessories. Avoid connecting it to the incompatible products. Security Requirements Obey all the rules and regulations of the local laws about the use of wireless mobile phones to ensure safety of practical use.
battery to the provider or recycle when possible. Do not dispose as household waste. Follow these guidelines to protect your products: Keep the products out of reach of small children. Keep your product dry. Do not expose it to liquid or moisture. Do not short‐circuit the battery, as this can cause excessive heat as it may explode. Do not expose your mobile phone to direct sunlight or in hot areas. High temperatures can shorten the life of electronic devices.
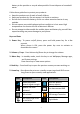
Icons Descriptions Icons Descriptions 3G network in use 2G network in use You have missed calls A clock alarm is active In call Bluetooth ON Getting Started Battery The battery which is initially 50% charged can be used immediately. Please fully charge/discharge the battery for the first three times to get maximum capacity. Charging the Battery During charging, the battery indicator on the phone is a thunder icon.
Attention: Charge the phone in a well ventilated place in which the temperature is from‐20oC to +55 oC. Use the charger provided by the manufacturer only. The use of unconfirmed charger may lead to dangers and violate the manufacturer's warranty clause. If the temperature is too high or too low during the charge, the device will automatically send a warning and stop charging to avoid damage to the battery or any danger.
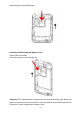
when taking out of the SIM card. Inserting and Removing the Memory Card Switch off the handset. Insert the memory card into the slot. Attention: This handset doesn't support the hot‐swap of memory card. When you want to remove the inserted memory card, you need to switch off the device first. Otherwise, it may damage your memory card.
Switch ON/OFF Do a long press the Switch on/off key to switch on/off the phone. If inserting the SIM card, the screen will show the notes in the following order when the phone is switched on: Type in PIN— if you have already set the SIM code. SeAKAIh— the handset will be seAKAIhing for proper network connection. Unlock SIM Card To avoid illegal use, the SIM card is enciphered with PIN (Personal Identification Number) as a protection.
0. Skills Introduction 0.1 Finger gesture Tap When you want to type using the keyboard, select items onscreen such as application and settings icons, or press onscreen buttons, simply tap them with your finger. Press and hold To open the available options for an item (e.g. contact or link in a web page), simply press and hold the item. Swipe or slide To swipe or slide means to quickly drag your finger vertically or horizontally across the screen or optical trackball.
0.2 Lock Screen & Home Screen The Lock screen can protect your phone against accidental touch to perform the operation you don’t want. In Lock screen, you can drag the circle ball at the bottom of the phone screen onto the unlock icon to unlock and into Home screen. You can also press the loudspeaker icon and swipe across the screen to make phone silent. Tips: Icons at the bottom of the screen gives you quick access to Phone history and Messages.
0.3 Home Screen Setting 0.3.1 Changing wallpaper To changing your wallpaper, you can follow the information below: i. Press and hold the blank place on one home screen, there will be a selection box. ii. Select wallpaper from Gallery/Live wallpaper/ Wallpapers/Video Wallpaper. iii. If you want to change wallpaper to a photo, tap Gallery to select a photo that you have taken using the camera or copied to your storage card. Crop the photo and then tap Save. iv.
empty area on the Home screen, and then release it. 0.3.4 Adding folders on your Home screen Use folders to group related applications and other shortcuts to keep your Home screen tidy and organized. You can also add information folders that show up‐to‐ date information such as Bluetooth received files, your Facebook phonebook, and more. 0.3.4.1 Creating a new folder and adding items to it i. Press and hold an application icon or a shortcut that you want to move to another icon to create a new folder.
0.5.1 Opening the Notifications panel When new notification icons displays in the status bar, press and hold the status bar, then slide your finger downward to open the Notifications panel. If you have several notifications, you can scroll down the screen to view more notifications. 0.5.2 Closing the Notifications panel Simply move your finger to the bottom of the screen and slide your finger up. 0.
tap call button behind the number you want to call. 1.1.1.4 Making an Emergency Call On the Phone screen, dial the international emergency number for your locale (for example, 911), and then tap Call. If your phone is locked with a passcode, you may still be able to make an emergency call: On the Enter Passcode screen, tap Emergency Call, then enter the emergency number and tap the red button. 1.1.
1.1.3.1 Muting the microphone during a call Tap Mute to switch between turning the microphone on or off. When the microphone is turned off, the Mute icon appears in the status bar. 1.1.3.2 Putting a call on hold Tap Hold to put the call on hold. When you put a call on hold, the hold call icon appears in the status bar. Then tap Unhold to resume the call. 1.1.3.3 Turning the speakerphone on or off When you are on a call, tap Speaker to toggle between turning the speakerphone on or off.
In Contacts, choose a name, tap at the bottom of the screen, then tap to have a video call. 1.3 Using Call Log When you miss a call, the missed call icon appears in the title bar. Use the Call log tab of the Contacts screen to check who the caller was or view all your dialed numbers and received calls. 1.3.1 Using the Call log tab Enter the dial number and slide to the right to the call log. At the Call log tab, you can do one of the following: i. Tap the name or number in the list to have a call. ii.
Call barring Additional call settings Choose barring outing or barring incoming, You need apply this function from your network operators . Enable or disable operator services such as caller ID and call waiting. 1.5 Turning the Phone Function On and Off You can do the follows to enabling or disabling Airplane mode: i. Press HOME> MENU, then tap Settings > Wireless controls, Select the Airplane mode check box to enable or disable Airplane mode.
Delete screen, you can operate Multiple choice, or Mark all. Warning: This operation will delete contact, please be careful. 2.2.4 Display options The function help you to display customize options, including default and Gmail account display option. Tips : After synchronizing contacts with your Google account, add the contact to the phone, you must select “All Other Contacts” item in Gmail account display option, the contacts will displayed in the list. 2.2.
3.1.1 Open Messaging 3.1.2 Creating and sending SMS and MMS messages You can compose text (SMS) messages of up to 160 characters. If you continue to type after the limit is reached, your message will be delivered as one, but count as more than one message. These are called concatenated messages. Multimedia messages, also known as MMS, can contain text and a picture, a recorded voice, an audio or video file, a picture slideshow. 3.1.3 To create and send a text message i.
A. Tips: You can add a subject line by pressing MENU and then tapping Add subject. iii. Tap the text box that contains the text “Type to compose”, and then start composing your message. iv. Press MENU and then tap Attach. v. On the Attach window, select from the following file attachments: Pictures Open the Albums application. Select a picture to attach it to your message. Videos Open the Albums application. Select a video to attach it to your message. Audio Open the Select music track screen.
Notes • To view the details of a particular message, in the message threads, press and hold the message to open the options menu, and then tap View thread. • If a message contains a link to a web page, tap the link to let you open the link in Browser or add the URL as a bookmark. • If a message contains a phone number, tap the message to open Dialer so you can call the number. 3.1.8 To open and view a multimedia message i. On the All threads screen, tap a multimedia message or message thread to open it. ii.
3.2.2 Composing and sending emails 1. On the email account Inbox, tap Compose. 2. Enter the message recipient’s email address in the To field. As you enter information, matching contacts will appear on the screen. Tap the recipient or continue entering the email address. If you are sending the email to several recipients, separate the email addresses with a comma. 3. Enter the subject, and then compose your message. Tap Send. Note: Tap Save as draft to save the message as a draft, tap Discard will not save.
Share: Send a photo or video in an Email, Messaging, Gmail, Bluetooth, Picasa or Facebook. Delete: remove the selected photos. Menu: view Details, set as Contact icon or Wall paper, Crop photo, Print photo, Rotate Left or Right. Tip: Press and hold the screen until the More menu. 4.2 Camera The built‐in camera lets you take both still photos and videos. Phone include a front camera for Face Time and self‐portraits (in addition to the main camera on the back), and an LED flash.
are holding the phone. 4.2.2 Shooting videos When you open Camera, the preview screen orientation will depend on how you are holding the phone. 4.2.3 Closing Camera On the Camera screen, press HOME or BACK. 4.3 Music All songs that you capture on your phone are stored on the storage card. Copying music into the storage card .As follows: i. Set the phone’s storage card as a USB drive. ii. On the computer, navigate to the USB drive and open it. iii.
5 Google apps 5.1 Signing In to Your Google Account Signing in to your Google Account lets you synchronize Gmail/Google Mail, Calendar, and Contacts between your phone and the web. You also need to sign into a Google Account to use Google Apps such as Google Talk™ and Android Market. When you turn on the phone for the first time, you are given the option to sign in to your Google Account. i. In the Setup accounts screen, tap Google account > Yes > Next. ii. Tap Sign in.
picture you want to attach, and then tap OK. iv. After composing your email, tap Send. Note: While composing the message, tap Save as draft or press the BACK button to save it as a draft. To view your draft email messages, in the Inbox, press MENU and then tap View labels > Drafts. 5.2.3.2 To view your sent messages In the Inbox, press MENU and then tap View labels > Sent. 5.
i. While viewing a map in any mode, press MENU and then tap Directions. ii. Enter the starting point in the first text box, then enter your destination in the second text box. By default, your current location is entered in the Starting point box. iii. Choose how you want to get to your destination: Driving, Public transit, or Walking. iv. Tap Go. The directions to your destination appears in a list. Tap a direction instruction on the list to show the map.
and have notifications. 6.1.2 Wi‐Fi Wi‐Fi provides wireless Internet access over distances of up to 100 feet (100 meters). To use Wi‐Fi on your phone, you need access to a wireless access point or “hotspot”. Note: The availability and range of the Wi‐Fi signal depends on the number, infrastructure, and other objects through which the signal passes. 6.1.2.1 Turning Wi‐Fi on and connecting to a wireless network i. Tap Settings > Wireless controls. ii. Select the Wi‐Fi check box to turn Wi‐Fi on.
• On. Bluetooth is turned on. Your phone can detect other Bluetooth‐enabled devices, but not vice versa. • Discoverable. Bluetooth is turned on, and all other Bluetooth‐enabled devices can detect your phone. • Off. Bluetooth is turned off. In this mode, you can neither send nor receive information using Bluetooth. Notes: By default, Bluetooth is turned off. If you turn it on, then turn off your phone, Bluetooth also turns off. When you turn on your phone again, you should turn on Bluetooth again.
You can now use the new Windows XP local area network connection provided by your phone via USB tethering. For more information about configuring networks in Windows XP, see the documentation that comes with Windows. Notes: • Tethering works with Windows Vista, Windows 7, and Linux. • You can’t mount your phone’s SD card on your computer when USB tethered. • For more information, including using USB tethering with other Oss, see http://www.android.com/tether#usb. 6.1.4.
the VPNs section of the VPN settings screen. 6.1.5.4 Connecting to a VPN i. Press HOME > MENU, and then tap Settings > Wireless & networks > VPN settings. ii. In the VPNs section, tap the VPN that you want to connect to. iii. When prompted, enter your log in credentials, and then tap Connect. When you are connected, the VPN connected icon appears in the notification area of the title bar. iv. Open the web browser to access resources such as intranet sites on your corporate network. 6.1.5.
6.4 Display You can select the screen brightness and standby time to their own needs and place is in need if they had to switch screens. 6.5 Storage SD card and the phone which you can view and use the total capacity, and can be inserted on the installation and format the SD card. 6.6 Battery Show your battery capacity and how much remaining and how long it is used. 6.7 Applications Here you can choose to install non‐market applications and view the application procedure and has been downloaded 6.
6.13 Date & time You can change the phone time and date or time zone in this option. 6.14 Schedule power on/off Here you can set anytime you want to power on/off your mobile phone. 6.15 Accessibility Here are some accessibility for you to better use your mobile phone, such as Large text, Power button ends call, Auto‐rotate screen, Speak words. 6.
7.6 iApps You can access the TELCEL Apps service via this menu 7.7 Ideasmusik You can access the TELCEL music service via this menu 7.8 iPromociones You can access the iPromociones service via this menu 7.9 Ideas Sync You can access the Sync app via this menu 7.10 RSS You can access the RSS feeds app via this menu 7.11 Games There are three pre‐installed demo games. You can enjoy the game and buy if you want to play more 7.12 Clock You can use Clock to set alarms. 7.12.
Add alarm or press and hold the alarm, and tap Delete alarm. 7.13 Recorder Voice Memos lets you use Phone as a portable recording device using the built‐in microphone, Phone or Bluetooth headset mic, or supported external microphone. Recordings using the built‐in microphone are mono, but you can record stereo using an external stereo microphone. Note: You need to have a micro SD card installed on your phone to use Voice Recorder. Recording your voice i. ii.
titles, invitees, locations, and notes of events. If you enter birthdays for your contacts, you can view those birthdays in Calendar. Day: To display the day of calendar in days. Week: To display the day of calendar in weeks. Month: To display the day of calendar in months. Daily: Display the calendar in the certain period of time within the region. Today: "Day", "Week", "month", under the circumstances of the agenda click Today, a variety of display format selection box will jump to the "today".
—Reorient or relocate the receiving antenna. —Increase the separation between the equipment and receiver. —Connect the equipment into an outlet on a circuit different from that to which the receiver is connected. —Consult the dealer or an experienced radio/TV technician for help. SAR Information Statement Your mobile phone is a radio transmitter and receiver.