ProTime® Microcoagulation System 0123 For in vitro Diagnostic Use Operator’s Manual TABLE OF CONTENTS INTENDED USE..............................................................................2 SUMMARY AND EXPLANATION....................................................2 SYSTEM FEATURES......................................................................3 IMPORTANT LABELS AND SYMBOLS ..........................................4 PRINCIPLES OF OPERATION ......................................................
INTENDED USE The ProTime Microcoagulation System is a portable, battery-operated instrument with a disposable cuvette for quantitative determination of prothrombin time from fingerstick whole blood or anticoagulant-free venous whole blood. The product is intended for use in the management of patients treated with oral anticoagulants by a healthcare professional and for patient self-testing. Additional information for medical professionals to monitor patients is located at the end of this instruction manual.
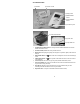
SYSTEM FEATURES 1) Tenderlett 2) ProTime Cuvette 3) Display Panel 4) MENU/SCROLL Button 5) START/SELECT Button 6) Cuvette Entry Port 7) AC/DC Power Module 8) Input DC Port 9) Output Data Port 1. 2. 3. 4. 5. 6. 7. 8. 9. Tenderlett Plus/Tenderlett Plus LV. The finger incision and blood collection device used with ProTime and ProTime cuvettes. ProTime/ProTime3 Cuvette. The cuvette performs the PT test. Display Panel.
IMPORTANT LABELS AND SYMBOLS Before using the ProTime Microcoagulation System, it is essential that the contents of this Operator’s Manual and any instructions accompanying the ProTime cuvettes and Tenderlett Plus incision devices are read and understood by the operator.
PRINCIPLES OF OPERATION The ProTime Microcoagulation System measures the PT using fibrin clot formation and detection. The ProTime cuvette is a self-contained, micro volume reaction cell constructed of precision-molded plastic. There are two user options within the ProTime Microcoagulation System: the standard ProTime cuvette and the ProTime3 cuvette. These cuvettes differ from each other in the amount of blood that needs to be collected and tested.
Operating Precautions • For in vitro Diagnostic Use. • The ProTime instrument is designed for use only with ProTime cuvettes. • The ProTime instrument will not perform a test if the cuvette is past its expiration date or has been improperly stored. • The ProTime instrument is designed to be used for testing in a stationary position. DO NOT perform testing while carrying or holding the instrument.
Reagent Preparation and Storage • Bring the foil-pouched cuvette to room temperature prior to use. • ProTime cuvettes are ready-to-use. No additional preparation is required. • Store the foil-pouched cuvettes in a refrigerator (2°C to 8°C, 36°F to 46°F). • An unopened cuvette pouch is stable when stored at 2°C to 8°C until the date printed on the pouch. Unopened cuvette pouches may be stored at room temperature for 60 days. Once the pouch has been opened, the cuvette must be used within 16 hours.
Rechargeable Battery Facts • Batteries discharge naturally over time (approximately 5% per month). • Battery capacity (the amount of charge the battery will hold) is lower at low temperatures. • Batteries that are charged to their maximum capacity will generate heat if they continue to be charged. • The ProTime instrument uses a rechargeable NiMH (Nickel Metal Hydride) type battery. The maximum capacity of any rechargeable battery will gradually decrease over time.
SPECIMEN COLLECTION Fingerstick whole blood is the recommended specimen. The Tenderlett Plus device is to be used with the ProTime cuvette, and the Tenderlett Plus LV (low volume) device is to be used with the ProTime3 cuvette. The Tenderlett Plus device will collect approximately 65 µL of blood (approximately 3 drops), while the Tenderlett Plus LV device will collect approximately 27 µL of blood (approximately 1 large drop). Samples should be analyzed immediately after collection.
Charging the Battery The battery in the instrument needs to be charged before the first use. 1. Connect the AC/DC power module to an electrical service outlet, using the AC power cord. 2. Connect the DC power cord from the AC/DC power module into the DC port on the back of the instrument. The instrument screen will show CHARGING BATTERY when the AC/DC power module is connected to the AC power cord and the ProTime instrument. The screen will show CHARGE COMPLETE when the battery is fully charged. 3.
3. Prepare for Finger Incision While the cuvette is warming, prepare the finger. Wait for the prompt before incising the finger and collecting blood. It is easier to collect blood if the hands are warm. Follow these steps to ensure a good sample: • Wash the hands in warm water or rub hands together to stimulate blood flow. • Apply firm pressure to the palm and finger. Massage the hand and push blood into the fingertips. • Cleanse middle or ring finger and dry.
5. • Touch the large drop of blood to the collection cup. Keep adding blood until the blood level fills the cup above the line. • For Tenderlett Plus LV, ensure the cup is filled completely. Ensure the blood extends all the way to the bottom of the cup. Add another drop if you are not sure you have enough. Snap Tenderlett Plus to ProTime • Hold the device at an angle and place the front end of the device into the slot in the instrument. • Press down to click the Tenderlett Plus in place.
• It takes only a few seconds for ProTime to draw the blood into the cuvette. Watch the screen for the next prompt. 7. Remove Tenderlett Plus Remove Tenderlett Plus immediately when prompted to do so. CAUTION: Failure to do so will result in an error message. ProTime allows you six seconds. • • Do not press the button after the Tenderlett Plus is removed from the ProTime instrument while you are testing your INR.
8. Read the Result In a few minutes, the result is ready. • • Press the button to turn off. Press the button to go to the MAIN MENU if you want to run another test, review the data in memory, print results, transfer results to a computer, or perform set up functions. Notes: • The result remains displayed for 5 minutes or until the button or the button is pressed.
Troubleshooting Guidelines • Become skilled at obtaining blood with the fingerstick technique. This will help avoid sample errors. • Follow all of the directions on the screen for optimal operation. • Do not try to hasten the test process by performing the fingerstick while the WARMING screen is displayed, as blood may clot before it is drawn into the cuvette and an error may occur. FOLLOW THE INSTRUCTIONS ON THE SCREEN.
Screen Display Source of Error Method of Control Check to make sure cuvettes have not expired. The expiration date is located on the packaging and alongside the barcode on the cuvette. CUVETTE EXPIRED Expired cuvette BARCODE ERROR REMOVE CUVETTE TRY AGAIN Instrument cannot read barcode accurately Visually inspect barcode. If scratched, discard cuvette. If dirty, wipe clean. If barcode is good, review correct procedure and repeat test.
Run Test To run the test, select the RUN TEST menu item. The instrument does a SELF CHECK procedure, which may take up to 60 seconds. The following screen is displayed for this period of time: The test sequence continues as described in the Test Procedure section. When the test completes, the result will appear as one of the following screens, depending on PID/OID selections (see SET UP below). Note: “X” is used for illustrative purposes only in the following examples.
RUN LQC When RUN LQC is selected from the MAIN MENU, the following screen is displayed and the user can select NOR/ABN (NORMAL/ABNORMAL). The instrument performs SELF CHECK procedure which may take up to 60 seconds. The testing proceeds as described above except that no prompt for PID will be shown for a QC test, whether PID is ON or OFF.
SHOW RESULTS Press the button to move the highlight bar to the SHOW RESULTS line on the MAIN MENU. Press the button to view the SHOW RESULTS menu and observe the following screen: DATA HISTORY Press the button to view the most recent result in the DATA HISTORY memory. The instrument memory holds 50 results. Pressing the button will scroll through individual results. The results are stored in memory from the most recent to the oldest. Press the button to return to the MAIN MENU.
LQC RECORDS The result and ID information will be stored in the database as a QC record. QC result will be displayed as follows, depending upon the OID ON/OFF selections and the LQC NOR/ABN selections. For LQC Normal with OID on: For LQC Normal with OID off: For LQC Abnormal with OID on: For LQC Abnormal with OID off: PRINT DATA OR SEND DATA Press the button to move the highlight bar to the SHOW RESULTS line on the MAIN MENU.
The instrument auto send feature allows transmitting of test results directly to a serial printer or to a computer by using the PROCABLE. Contact ITC Customer Service to order the PROCABLE. To use the AUTO SEND feature, press the button on the PRINT DATA or SEND DATA display until AUTO SEND is highlighted. Press the button and, depending on the current settings in the instrument, one of the following displays will appear.
SET UP Go to the MAIN MENU screen and choose the SET UP option by using the button to select SET UP. The following screen appears: button to scroll and the SET LANGUAGE Press the button to select SET LANGUAGE. The following options are displayed when SET LANGUAGE is selected: Highlight a language selection and press the button to set it. Note: English will be highlighted as the default language in a new instrument. After changing the language, the new language becomes the default.
Changing the Hour The time is pre-set to Eastern Standard Time (EST). For example, the time is 1:25 PM. Change the hour by pressing the button until the correct hour appears in the highlight bar. In this example, the correct hour is 10 AM. To change the hour, press the button until 10 AM appears in the highlight bar. The PM changes to AM at midnight. Once the correct hour appears, press the button to set the hour. The procedure will then advance to the MINUTES screen.
SET PID/OID The PID/OID selection is indicated only by the location of the highlight (text on the screen is unchanged). • Use the button to select PID/OID options: • • • • Selecting PID/OID ON enables both a patient ID and operator ID to be entered. Selecting PID ON enables only a patient ID to be entered. Selecting OID ON enables only an operator ID to be entered. Selecting OFF disables both a patient ID and operator ID.
To enter a PID, the first position in the PID field (starting from the left) is indicated by a triangular cursor. • Press the button until the desired digit is displayed. • Press the button briefly to enter the digit in that position of the field. The cursor will automatically move to the next field position. • Repeat these steps until the desired field length is entered. • To save the entered PID value press and hold the button for approximately 2 seconds until the second audio beep is heard.
The CONFIRM PID confirmation screen will follow the ENTER PID screen: After setting of both requested PID and/or OID, the WARMING screen will appear in the center of the display: The test sequence then continues as described in TEST PROCEDURE. SET BEEP If SET BEEP is selected, the following screen appears: To turn the BEEP SOUND ON, press the CHANGE button. The SET BEEP ON screen appears: Then press the button to turn the beep sound ON.
FOR PROFESSIONALS ONLY - PROGRAM MODE Note: The Program Mode feature is only available to professional users. The following information is not contained in the Operator’s Manual for patients performing self-testing. For PROTIMEPRO, to access the Professionals Only section of the training CD, enter the following code when prompted by the software: 54321 (the training CD is not provided with PROTIMEINT).
Once the correct month appears, press the button to set the month. The procedure will then advance to changing the year screen. Change the year by pressing the button until the correct year appears. Once the correct year appears, press the button to set the year. The procedure will then advance to MAIN MENU. SET TR LIMITS To set therapeutic range (TR) limits, select the SET TR LIMITS from PROGRAM MODE menu screen. The following screens appear for selection of the upper and lower TR limits.
SET ISI If SET ISI is selected from the PROGRAM MODE, the following screen is displayed: To change the ISI used in the calculation, access the PROGRAM MODE from the SET UP on MAIN MENU and enter the ISI of the local laboratory reagent Displayed plasma equivalent values are indicative of the results obtained using a laboratory reagent with an ISI of 1.0. If the ISI of the reagent used in the local facility is significantly different from 1.
CHANGE PASSWORD If CHANGE PASSWORD option is selected from the PROGRAM MODE menu, the user must enter the password (up to 6 digits) as a left justified number without any blanks. The rules for entering a numerical PID or OID are also applicable for entering the 6 digit numerical password (see page 24). After password has been entered, the CONFIRMATION OF PASSWORD screen appears: If the button is pressed, the newly entered password is accepted by the instrument.
PERFORMANCE CHARACTERISTICS Reporting ProTime Results The ProTime Microcoagulation System reports a result as International Normalized Ratio (INR) and in PT seconds. The ProTime system calculates the INR directly from whole blood clotting time based on a conversion equation that was established in clinical trials. The result in plasma equivalent seconds is then calculated from the INR result.
Table 2 shows examples of how the calculation of PT seconds is affected by changing the ISI. As the ISI increases, the plasma equivalent PT decreases at any given INR. For example, a patient with INR = 3.00 would have PT seconds = 39.2 if the ISI is the default ISI = 1.0 or PT seconds =21.3 if the ISI is reset to ISI = 2.0. Expected Values ProTime measures both normal and therapeutic prothrombin times in fresh whole blood. Results are displayed in plasma equivalent seconds and INR.
Accuracy INR results generated by the ProTime and ProTime3 cuvettes using venous and fingerstick whole blood samples were compared to INR values obtained using standard laboratory plasma PT methods with samples collected in 3.2% sodium citrate tubes. The following accuracy data was obtained. A. Standard ProTime Cuvette vs. Lab (Plasma) Sample Type Regression Equation r n Fingerstick Venous Y = 0.94x + 0.38 Y = 0.91x + 0.44 0.95 0.94 229 232 B. ProTime3 Cuvette vs.
Additional external control materials may be used to check instrument function, reagent integrity and user technique. Each institution should establish a quality assurance program for prothrombin time testing that complies with existing local, state and federal regulations as applicable. As with all diagnostic tests, the ProTime Microcoagulation System test results should be scrutinized in light of a specific patient’s condition and anticoagulant therapy.
SUGGESTED READING Adcock DM, Kressin DC, Marlar RA. Effect of 3.2% vs 3.8% Sodium Citrate Concentration on Routine Coagulation Testing. Am J Clin Pathol 1997;107:105-10. Brien WF, Baskerville JC, Taberner DA, Crawford L. Calculation vs. Calibration Curve for INR Determination: Results of an Interlaboratory Proficiency Scheme. Am J Clin Pathol 1999;111:193-201. Eckman MH, Levine HJ, Pauker SG. Effect of Laboratory Variation in the Prothrombin-Time Ratio on the Results of Oral Anticoagulant Therapy.
SAFETY STANDARDS The ProTime instrument complies with the following safety standard requirements and directives: CSA C22.2. 601.1.
Guidance and Manufacturer’s Declaration – Electromagnetic Emissions The ProTime® Microcoagulation System is intended for use in the electromagnetic environment specified below. The customer or the user of the ProTime® Microcoagulation System should assure that it is used in such an environment. Emissions Test Compliance Electromagnetic Environment - Guidance RF Emissions Group 1 The ProTime® Microcoagulation System uses RF energy only for its internal function.
Guidance and Manufacturer’s Declaration – Electromagnetic Immunity The ProTime® Microcoagulation System is intended for use in the electromagnetic environment specified below. The customer or the user of the ProTime® Microcoagulation System should assure that it is used in such an environment.
INDEX attention label ...................................................4 battery care........................................................8 battery information ...........................................8 charging .....................................................10 battery replacement ..........................................8 blood coagulation systems ................................2 blood collection...............................................11 data history...................................
IR5246 1/08