ProTime® Microcoagulation System 0123 For in vitro Diagnostic Use Operator’s Manual for Patient Self-Testers TABLE OF CONTENTS INTENDED USE ............................................................................2 SUMMARY AND EXPLANATION..................................................2 SYSTEM FEATURES ....................................................................3 IMPORTANT LABELS AND SYMBOLS ........................................4 PRINCIPLES OF OPERATION ...................................
INTENDED USE The ProTime Microcoagulation System is a portable, battery-operated instrument with a disposable cuvette for quantitative determination of prothrombin time from fingerstick whole blood or anticoagulant-free venous whole blood. The product is intended for use in the management of patients treated with oral anticoagulants by a healthcare professional and for patient self-testing at home.
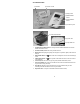
SYSTEM FEATURES 1) Tenderlett 2) ProTime Cuvette 3) Display Panel 4) MENU/SCROLL Button 5) START/SELECT Button 6) Cuvette Entry Port 7) AC/DC Power Module 8) Input DC Port 9) Output Data Port 1. 2. 3. 4. 5. 6. 7. 8. 9. Tenderlett Plus/Tenderlett Plus LV. The finger incision and blood collection device used with ProTime and ProTime cuvettes. ProTime/ProTime3 Cuvette. The cuvette performs the PT test. Display Panel.
IMPORTANT LABELS AND SYMBOLS Before using the ProTime Microcoagulation System, it is essential that the contents of this Operator’s Manual and any Instructions accompanying the ProTime Cuvettes and Tenderlett Plus incision devices are read and understood by the operator.
SAFETY FEATURES AND QUALITY CONTROL Each ProTime and ProTime3 cuvette has two channels for performing the two levels of control which work simultaneous with the channel(s) used for testing the PT assay. The built-in safety features of the instrument and integral reagent controls work together to ensure that the instrument and reagent systems are working properly and that the test procedure was performed correctly. Two levels of quality control are performed with each and every test.
If the calculated INR is: < 0.6 0.6 - 0.79 0.8 - 7.0 7.1 - 9.9 10.0 - 12.0 > 12.0 • • • Then ProTime displays: INR LOW INR < 0.8 Result Result - followed by "*" INR > 9.9 INR HIGH Results may be affected in patients receiving heparin or who have an abnormal response to heparin. Correlation of results reported by the ProTime instrument to laboratory results depends on the precision of the laboratory method and on the ISI value of the laboratory reagent and instrument system.
SERVICE AND MAINTENANCE Routine Maintenance and Cleaning DO NOT immerse the ProTime instrument or allow fluid to enter the cuvette housing. Inspect and clean the outside of the cuvette slot as required. Remove residual dried blood or other foreign matter on the outside of the instrument using gauze dampened with a 10% dilution of household bleach in water or with gauze dampened with isopropyl alcohol or other disinfectant.
Battery Replacement Refer to the instructions provided with the replacement battery. The used battery should be disposed of in accordance with local regulations for NiMH batteries. SPECIMEN COLLECTION Fingerstick whole blood is the recommended specimen. The Tenderlett Plus device is to be used with the ProTime cuvette and the Tenderlett Plus LV (low volume) device is to be used with the ProTime3 cuvette.
Charging the Battery The battery of the instrument needs to be charged before the first use. 1. Connect the AC/DC power module to an electrical service outlet, using the AC power cord. 2. Connect the DC power cord from the AC/DC power module into the DC port on the back of the instrument. The instrument screen will show CHARGING BATTERY when the AC/DC power module is connected to the AC power cord and the ProTime instrument. The screen will show CHARGE COMPLETE when the battery is fully charged. 3.
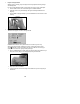
3. Prepare for Finger Incision While the cuvette is warming, prepare the finger. Wait for the prompt before incising the finger and collecting blood. It is easier to collect blood if the hands are warm. Follow these steps to ensure a good sample: • Wash the hands in warm water or rub hands together to stimulate blood flow. • Apply firm pressure to the palm and finger. Massage the hand and push blood into the fingertips. • Cleanse middle or ring finger and dry.
5. • Touch the large drop of blood to the collection cup. Keep adding blood until the blood level fills the cup above the line. • For Tenderlett Plus LV, ensure the cup is filled completely. Ensure the blood extends all the way to the bottom of the cup. Add another drop if you are not sure that you have enough. Snap Tenderlett Plus to ProTime • Hold the device at an angle and place the front end of the device into the slot in the instrument. • Press down to click the Tenderlett Plus in place.
6. Start the Test • Press the button to start the test. This signals ProTime to draw the sample into the cuvette. • 7. It takes only a few seconds for ProTime to draw the blood into the cuvette. Watch the screen for the next prompt. Remove Tenderlett Plus Remove Tenderlett Plus immediately when prompted to do so. CAUTION: Failure to do so will result in an error message. ProTime allows you six seconds.
• 8. The instrument then progresses to the test and displays the TESTING screen. Read the Result In a few minutes, the result is ready. • • Press the button to turn off. Press the button to go to the MAIN MENU if you want to run another test, review the data in memory, print results, transfer results to a computer, or perform set up functions. Notes: • The result remains displayed for 5 minutes or until the button or the button is pressed.
TROUBLESHOOTING Most often, a fault message indicates a problem with blood collection or a mistake in the test procedure. If an error message appears, read the instructions again and repeat the test with a new cuvette. The ProTime Troubleshooting Guide below gives the messages for the most common errors with possible causes and solutions. As with all diagnostic tests, the ProTime Microcoagulation System test results should be scrutinized in light of a specific patient’s condition and anticoagulant therapy.
Screen Display Source of Error Can be caused by small samples, clots, air bubbles, or a seal problem in one or more channels Method of Control SAMPLE TOO LARGE TURN OFF TRY AGAIN Sample oversize Review directions and repeat the test. SAMPLE TOO SMALL TURN OFF TRY AGAIN Sample undersize Repeat test. Exceed the fill line on the cup to ensure sample size.
MAIN MENU OPTIONS The options presented in the MAIN MENU are: Each of these options will lead to sub menus within the selection. The following buttons are used to navigate the menu: • The button is used to move the highlight bar to select the option. • The button is used to select the option that is highlighted. Note: The option to run external QC samples and store the results tagged as QC is accessed through RUN LQC selection. This is not required to use the ProTime system.
SHOW RESULTS Press the Press the button to move the highlight bar to the SHOW RESULTS line in the MAIN MENU. button to view the SHOW RESULTS menu and observe the following screen: DATA HISTORY Press the button to view the most recent result in the DATA HISTORY memory. The instrument memory holds 50 results. Pressing the button will scroll through individual results. The results are stored in memory from the most recent to the oldest. Press the button to return to the MAIN MENU.
Example: Printing Data Press the button to set the feature to ON or OFF and then press the button to save the setting. • Highlight the SHOW RESULTS line in the MAIN MENU. • Press the button to view the SHOW RESULTS menu. • Press the button to move the highlight bar to the PRINT DATA or SEND DATA line. • Press the button to access the PRINT DATA or SEND DATA option and select THIS RESULT or ALL RESULTS option in the PRINT DATA or SEND DATA screen.
SET UP GO to the MAIN MENU screen and choose the SET UP option by using the button to select SET UP. The following screen appears: button to scroll and the SET LANGUAGE Press the button to select SET LANGUAGE. The following options are displayed when SET LANGUAGE is selected: Highlight the language selection and press the button to set it. Note: English will be highlighted as the default language in a new instrument. After changing the language, the new language becomes the default.
Changing the Hour The time is pre-set to Eastern Standard Time (EST). For example, the time is 1:25 PM. Change the hour by pressing the button until the correct hour appears in the highlight bar. In this example, the correct hour is 10 AM. To change the hour, press the button until 10 AM appears in the highlight bar. The PM changes to AM at midnight. Once the correct hour appears, press the button to set the hour. The procedure will then advance to the MINUTES screen.
SET BEEP If SET BEEP is selected, the following screen appears: To turn BEEP SOUND ON press the button. The SET BEEP ON screen appears: Then press button to turn the beep sound ON. Note: Regardless of BEEP setting, the beep will sound under the following conditions: power on, power off, and following a key hold.
PERFORMANCE CHARACTERISTICS The ProTime instrument has been tested extensively by doctors, nurses and patients. Eighty-four people, ages 7 to 81, participated in the first home-use trial. The trial was conducted to see how well ProTime results compare to the lab. Comparisons of this type are described by correlation values and a correlation value near 1.0 means the comparison is good. The home tests compared to tests run at the clinic using ProTime with venous samples (421 samples) had a correlation of 0.
Clinical Performance Comparison A. ProTime3 vs. ProTime Linear regression containing clinical fingerstick results from three sites yielded a regression equation as below: y = 1.02x - 0.14 r = 0.94 n = 229 B. Patient Self-Testing In a trial of patient self-testing (PST) in the home vs. professional testing in the clinical and reference lab, equivalent ProTime results were obtained. ProTime Professional vs. Patient Self-Testing y = .94x + 0.13 r = 0.92 n = 421 ProTime Patient Self-Testing vs.
SUGGESTED READING Adcock DM, Kressin DC, Marlar RA. Effect of 3.2% vs 3.8% Sodium Citrate Concentration on Routine Coagulation Testing. Am J Clin Pathol 1997;107:105-10. Brien WF, Baskerville JC, Taberner DA, Crawford L. Calculation vs. Calibration Curve for INR Determination: Results of an Interlaboratory Proficiency Scheme. Am J Clin Pathol 1999;111:193-201. Eckman MH, Levine HJ, Pauker SG. Effect of Laboratory Variation in the Prothrombin-Time Ratio on the Results of Oral Anticoagulant Therapy.
APPENDIX I – RUN LQC When RUN LQC is selected from the MAIN MENU, the following screen is displayed and the user can select NOR/ABN (NORMAL/ABNORMAL). The instrument performs a SELF CHECK procedure, which may take up to 60 seconds. Refer to the Liquid QC package insert for instructions. The testing proceeds as described above except that no prompt for PID will be shown for a QC test, whether PID is ON or OFF.
LQC RECORDS The LQC record will be displayed as follows, depending upon the OID ON/OFF selections and the LQC NOR/ABN selections.
APPENDIX II – USE OF PID AND OID NUMBERS The PID/OID selection is indicated only by the location of the highlight (text on the screen is unchanged). • Use the button to select PID/OID options: • • • • Selecting PID/OID ON enables both a patient ID and operator ID to be entered. Selecting PID ON enables only a patient ID to be entered. Selecting OID ON enables only an operator ID to be entered. Selecting OFF disables both a patient ID and operator ID.
After the cuvette is inserted, the user has the option to set an operator ID (OID) and/or a patient ID (PID) if the OID and/or PID have been enabled in SET UP section of MAIN MENU. The PID may contain up to twelve digits, the OID can be a value with up to six digits. Note: In the different scenarios related to SET PID/OID ON/OFF settings, some of the following four screens are not presented to the user. For example, none of these four screens will appear, if both PID and OID are set to OFF value.
The CONFIRM PID confirmation screen will follow the ENTER PID screen: After setting of both requested PID and/or OID, the WARMING screen will appear in the center of the display: The test sequence continues as described previously in the Test Procedure section.
Password The password option permits the professional to access portions of the ProTime program that are not accessible to patient self-testers.
SAFETY STANDARDS The ProTime instrument complies with the following safety standard requirements and directives: CSA C22.2. 601.1.
Guidance and Manufacturer’s Declaration – Electromagnetic Emissions The ProTime® Microcoagulation System is intended for use in the electromagnetic environment specified below. The customer or the user of the ProTime® Microcoagulation System should assure that it is used in such an environment. Emissions Test Compliance Electromagnetic Environment - Guidance RF Emissions Group 1 The ProTime® Microcoagulation System uses RF energy only for its internal function.
Guidance and Manufacturer’s Declaration – Electromagnetic Immunity The ProTime® Microcoagulation System is intended for use in the electromagnetic environment specified below. The customer or the user of the ProTime® Microcoagulation System should assure that it is used in such an environment.
This page intentionally left blank.
INDEX attention label ...................................................4 battery care........................................................7 battery information ...........................................7 charging .......................................................7 blood coagulation systems ................................2 blood collection...............................................10 finger incision preparation..............................10 insert a cuvette .................................
IR5245 1/08