Natural Gas Solutions 2.
Identification 2.4GZ OpenWay Gas Module Installation Guide DRAFT PUB-nnnn-nnn Copyright © 2007 Itron, Inc. All rights reserved. Your company has the right to reproduce this contract document, provided that such reproduction shall be subject to the same use and disclosure restrictions contained in the Confidentiality and Non-Disclosure paragraphs in the Sales Contract. Applicable Patents U.S. Patent Numbers: TBD Canadian Patent Numbers: TBD Transportation Classification Itron classifies and ships model 2.
Contents Chapter 1 Getting Started ...........................................................................................1 Specifications ......................................................................................................................................1 Meter Compatibility List .......................................................................................................................2 Chapter 2 American Meter Installation ................................................
Contents iv 2.
CHAPTER 1 Getting Started The 2.4GZ OpenWay Gas Module is Itron's latest module. OpenWay Gas Modules are radio-frequency (RF) devices that transmit meter data. The 2.4GZ can be read by OpenWay CENTRON electric meters and is part of Itron's OpenWay solution for combo gas and electric utilities. This installation guide shows you how to install the 2.4GZ OpenWay Gas Module on meters from a variety of manufacturers. To ensure you have a meter that is compatible with the 2.
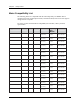
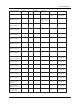
Chapter 1 Getting Started Meter Compatibility List The following meters are compatible with the 2.4GZ OpenWay Gas Module. Due to continuous research, product improvements, and enhancements, Itron reserves the right to change this list at any time. To ensure you have the latest Meter Compatibility list available, contact your Itron representative. 2 Mfgr. Model American/ Canadian Desc. Class Comments OpenWay Gas Module Part No. W75AL Residential Aluminum case Meters Only 2.
Meter Compatibility List American/ Canadian AC-630 Residential Aluminum case meters only American/ Canadian 5B 225 Residential Aluminum case OWG-5000-001 2.4GZ OWG-5000-001 2.4GZ OWG-5000-002 Sensus/Invensys/ Equimeter/ Rockwell R-175 11 Tooth Residential Sensus/Invensys/ Equimeter/ Rockwell R-200 11 Tooth Residential 2.4GZ OWG-5000-002 Sensus/Invensys/ Equimeter/ Rockwell RT-200 11 Tooth Residential 2.
Chapter 1 Getting Started 4 Sensus/Invensys/ Equimeter/ Rockwell R-415 Sensus/Invensys/ Equimeter/ Rockwell RT-360 18 Tooth 18 Tooth Sensus/Invensys/ Equimeter/ Rockwell MR8 (R-275 Metric) 16 Tooth Sensus/Invensys/ Equimeter/ Rockwell MR12 (R-415 Metric) 16 Tooth Residential 2.4GZ OWG-5000-004 2.4GZ OWG-5000-004 2.4GZ OWG-5000-003 2.4GZ OWG-5000-003 Residential Residential Residential 2.
CHAPTER 2 American Meter Installation This chapter shows you how to install a 2.4GZ OpenWay Gas Module on an American meter. Before installing the 2.4GZ OpenWay Gas Module, verify that you have: • A compatible meter shown in the Meter Compatibility List on page 2. • A compatible index. Itron 2.4GZ OpenWay Gas Modules can be used with standard dial and direct read (odometer) indexes on American Meters.
Chapter 2 American Meter Installation Replacement Screws Replacement screws used in this procedure must be slotted, zinc-plated, steel machine screws. Sizing options are shown below. For mounting 2.4GZ OpenWay Gas Module assemblies on meters: • Use 1/4 - 20 x 5/8-inch slotted, Fillister head screws. For mounting indexes on 2.4GZ OpenWay Gas Module backplates: • Use 8 - 32 x 3/16-inch slotted, round head screws. Preinstallation Preparations Before installing the 2.
Installing the 2.4GZ OpenWay Gas Module on an American Meter 2. Detach the index cover from the meter by removing the four screws holding it in place. 3. Examine the index cover screws you just removed. Verify that they are 5/8-inch long and are not corroded. • If the screws are 5/8-inch long, and are not corroded, keep them for later use. • If the screws are an incorrect length or are corroded, dispose of them properly.
Chapter 2 American Meter Installation While removing this screw, pull the index away from the meter to keep its backplate (1) against the back of the screwhead (2). This prevents the screw from falling out prematurely. 1 2 6. Remove the screw from the index once it is completely free of its hole. 7. Set the index aside for the moment. Place it where it will not be damaged; get filled with dirt, rain, or snow; or fall to the ground or floor. The index will be used later in this procedure. 8.
Installing the 2.4GZ OpenWay Gas Module on an American Meter Assemble the OpenWay Gas Module When installing a 2.4GZ OpenWay Gas Module, the next major step is to create the OpenWay Gas Module assembly by combining the module backplate and cover with the meter index. Follow the procedure below to do so. To Assemble the OpenWay Gas Module 1. Obtain a new 2.4GZ OpenWay Gas Module. 2. Separate the module backplate (1) from the cover (2). 3. Set the new OpenWay Gas Module index cover aside for the moment.
Chapter 2 American Meter Installation • Index wrigglers on two-foot meters have drive posts. • An index may have mounting screw holes. • An index may have mounting screw slots. If the index has mounting screw slots, skip steps 4 and 5 below. Continue with step 6. If the index has mounting screw holes, perform steps 4 and 5 below, and then skip steps 6 and 7. 10 2.
Installing the 2.4GZ OpenWay Gas Module on an American Meter 4. If the index has mounting screw holes, place an index mounting screw (1) in the righthand mounting screw hole (2). Use one 8 - 32 3/16-inch screw for this step (you can use an original mounting screw if it was the correct size and not corroded; otherwise, use the correct size replacement screw). 1 2 5.
Chapter 2 American Meter Installation 1 2 7. Place the index mounting screw slot under the screw head. Do not tighten the screw yet. 1 2 8. Attach the wriggler to the index and backplate. • If the index wriggler has a drive slot (1), place the backplate wriggler's drive post (2) in the index wriggler's drive slot. 1 2 12 2.
Installing the 2.4GZ OpenWay Gas Module on an American Meter • If the index wriggler has a drive post (1), place the index wriggler's drive post in the backplate wriggler's drive slot (2). 1 2 9. Install and tighten the left-hand index mounting screw (for indexes with either mounting screw slots or holes). Use one 8 - 32 x 3/16-inch screw for this step (you can use an original mounting screw if it was the correct size and not corroded; otherwise, use the correct size replacement screw). 10.
Chapter 2 American Meter Installation Program the OpenWay Gas Module Once the OpenWay Gas Module has been assembled, the module must be programmed using FieldPro on a laptop with a ZigBee dongle. Refer to FieldPro documentation for programming information. IMPORTANT You must perform the following programming procedure for the OpenWay Gas Module to function properly. When programming the OpenWay Gas Module, you must take note of the drive rate shown on the index of American meters.
Installing the 2.4GZ OpenWay Gas Module on an American Meter To Program the OpenWay Gas Module 1. Using the FC200SR, program the reading of the index that was on the meter into the OpenWay Gas Module assembly. • For initial programming, hold the FC200SR approximately 1 foot away from the OpenWay Gas Module. • For reprogramming (30 days or more past initial programming), hold the FC200SR approximately 4 to 5 feet away from the OpenWay Gas Module.
Chapter 2 American Meter Installation Attach the OpenWay Gas Module to the Meter After the OpenWay Gas Module has been programmed and is reading correctly, follow the steps below to attach the module to the meter. To Attach the OpenWay Gas Module to the Meter 1. For 5B 225 Meters Only: If you are installing the OpenWay Gas Module on a 5B 225 aluminum meter, cut 1/16-inch off each post of the module wriggler to prevent it from rubbing on the face of the nut that holds the wriggler in place.
Installing the 2.4GZ OpenWay Gas Module on an American Meter • For Two-Foot Meters: Align the OpenWay Gas Module assembly wriggler with the meter drive slot (as shown below). It is acceptable for the pin on the module wriggler to be installed inside or outside of the meter drive slot. For ease of assembly, Itron recommends that the pin on the OpenWay Gas Module wriggler be installed outside of the meter drive slot. 3. Gently place the OpenWay Gas Module assembly on the meter.
Chapter 2 American Meter Installation 4. Install and tighten all OpenWay Gas Module assembly mounting screws, working in a diagonal pattern as shown below. Tighten the mounting screws to 15 to 20 inchpounds of torque. Use the 1/4 - 20 x 5/8-inch screws for this step (you can use the original mounting screws if they were the correct size and not corroded; otherwise, use the correct size Replacement Screws on page 6). 3 2 1 4 5. Place a new tamper seal over two of the mounting screws as shown below.
Installing the 2.4GZ OpenWay Gas Module on an American Meter The OpenWay Gas Module is now installed on the meter. 2.
Chapter 2 American Meter Installation 20 2.
CHAPTER 3 Sensus Meter Installation This chapter shows you how to install a 2.4GZ OpenWay Gas Module on a compatible Sensus meter. Sensus meters are also known by the following names: Invensys, Equimeter, and Rockwell. For consistency, all of these meter types will be referred to as Sensus meters for this installation procedure. Installation Prerequisites This section describes the items that are required to install Itron's 2.4GZ OpenWay Gas Module.
Chapter 3 Sensus Meter Installation For mounting 2.4GZ OpenWay Gas Module assemblies on meters: • Use 10 - 24 x5/8-inch slotted, Fillister head screws. For mounting indexes on 2.4GZ OpenWay Gas Module backplates: • Use 6 - 32 x 5/8-inch slotted, round head screws. Preinstallation Preparations Before installing the 2.4GZ OpenWay Gas Module on a meter, verify that: • All OpenWay Gas Modules are type 2.4GZ modules for your brand of gas meters.
Installing the 2.4 GHz OpenWay Gas Module on a Sensus Meter 2. Detach the index cover from the meter by removing the four screws holding it in place. 4 2 1 3 3. Examine the index cover screws you just removed. Verify that they are 5/8-inch long and are not corroded. • If the screws are 5/8-inch long and are not corroded, keep them for later use. • If they are an incorrect length or are corroded, dispose of them properly.
Chapter 3 Sensus Meter Installation • If the screws are 5/8-inch long and are not corroded, keep them for later use. • If the screws are an incorrect length or are corroded, dispose of them properly. Use 6 -32 x 5/8-inch screws as described in Replacement Screws on page 21 instead. 8. Use a putty knife or similar object to completely remove the old index gasket from the meter (if applicable). All traces of the gasket must be removed before the OpenWay Gas Module can be installed.
Installing the 2.4 GHz OpenWay Gas Module on a Sensus Meter Once properly in place, the index drive gear and backplate wriggler cup should look similar to the following example. 4. Attach the right-hand mounting screw to the index and meter, just far enough to hold the index in place. Use one 6 - 32 x 5/8-inch screw for this step (you can use an original mounting screw if it was the correct size and not corroded; otherwise, use the correct size Replacement Screw see "Replacement Screws" on page 21).
Chapter 3 Sensus Meter Installation 7. Slide the OpenWay Gas Module cover over the index and backplate. 8. Verify that the cover is installed correctly. Once combined, the OpenWay Gas Module backplate, meter index, and OpenWay Gas Module cover create an OpenWay Gas Module Assembly. Next, program the OpenWay Gas Module. Program the OpenWay Gas Module Once the OpenWay Gas Module has been assembled, the module must be programmed using FieldPro on a laptop with a ZigBee dongle.
Installing the 2.4 GHz OpenWay Gas Module on a Sensus Meter To Program the OpenWay Gas Module 1. Using the FC200SR, program the reading of the index that was on the meter into the OpenWay Gas Module assembly. • For initial programming, hold the FC200SR approximately 1 foot away from the 2.4 GHz OpenWay Gas Module. • For reprogramming (30 days or more past initial programming), hold the FC200SR approximately 4 to 5 feet away from the OpenWay Gas Module.
Chapter 3 Sensus Meter Installation To Attach the OpenWay Gas Module to the Meter 1. Gently place the OpenWay Gas Module assembly against the front of the meter as shown. Make sure all four mounting screw holes in the 2.4GZ line up with the corresponding holes on the meter. 2. Insert the top-right cover mounting screw. Tighten the screw just enough to hold the 2.4GZ in place.
Installing the 2.4 GHz OpenWay Gas Module on a Sensus Meter 3. Install and tighten the remaining three mounting screws. Tighten the mounting screws to 15 to 20 inch-pounds of torque. 3 1 2 4. Tighten the top-right mounting screw. 5. Place a new tamper seal over two of the mounting screws as shown below. 1 2 2.
Chapter 3 Sensus Meter Installation 6. Press the new tamper seals into place using the 11/32-inch nut driver (or another similar blunt tool). 7. Complete any necessary paperwork. Make sure no excess material is left on the customer premises. The OpenWay Gas Module is now installed on the meter. 30 2.