
Installation Guide
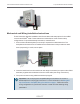
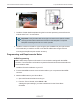
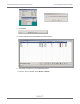
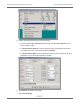

Table Of Contents
- Cellular 500G Module Remote Mount Installation Guide
- Contents
- New in This Document
- 1 Introduction
- 2 Mounting
- 3 Programming
- 4 Specific Meter Manufacturer Installation
- 5 Using Gel-cap Connectors to Complete Wiring Connections
- 6 Optional Sealant Application Instructions
- A Important Safety and Compliance Information
- U.S. and Canadian Patent Numbers
- USA, FCC Part 15 Spectrum Compliance
- Modifications, Repairs, Installation, and Removal
- Canada, ISED Spectrum Compliance
- RF Exposure (FCC/ISED)
- Transportation Classification
- Lithium Battery Safety
- Equipment Repairs
- Intrinsic Safety
- Electrostatic Ignition Hazard
- Module Cleaning
- Do Not Drop

7. Install the Cellular 500G backplate using the four screws previously removed from the
module and a Torx T-10 screwdriver.
Important! Verify that the cable tie and gel connectors are inside the module
housing and the cable extends out of the slot in the backplate. Torque the
backplate mounting screws to 9 to 12 inch-pounds.
8. Install the module on the wall or a pipe using the pipe installation kit (Itron part number
CFG-0005-003) or install the module on the Romet AdEM meter using the Romet
mounting bracket (Romet part number 46-444-2).
Programming and Requirements Notes
AdEM Programming
Note: Meter setup requires confirmation of communication settings with the AdEM
corrector. Communication confirmation requires the RometLink software and the Romet
communication cable.
1. Install the RometLink software on your PC.
2. Connect the AdEM corrector communication cable to your computer and the AdEM
corrector.
3. Add the AdEM meter to your Phone Book.
a. Open the RometLink software and log on.
b. From the Talk to Unit tab, select Check > All.
A dialog box opens asking if you want to add the unit in the Phone Book.
Click Yes.
Cellular 500G Module Remote Mount Installation Guide 4 Specific Meter Manufacturer Installation
October 11, 2021 815-0622-00 REV 000 Itron, Inc. Page 86 of 99
DRAFT