Food Waste Disposer Disposall ® GEAppliances.com Safety Instructions Owner’s Manual & Installation Instructions Connecting Electricity . . . . . 2, 3 Safety Precautions . . . . . . . . . . 2 Installation Instructions Model Line Series GFC320 GFC520 GFC530 GFC720 GFC1020 GFB760 Attaching the Discharge Elbow . . . . . . . . . . . . 6 Components and Installation of Sink Flange . . . . . . . . . . . . . 5 Connecting Disposer to Sink Flange . . . . . . . . . . . . . .7 Dimensions/Typical Installations .
IMPORTANT SAFETY INSTRUCTIONS. READ ALL INSTRUCTIONS BEFORE USING. INSTRUCTIONS PERTAINING TO A RISK OF FIRE, ELECTRIC SHOCK OR INJURY TO PERSONS WARNING! When using electrical appliances, basic safety precautions should be followed, including the following: SAFETY PRECAUTIONS ■ Use this appliance only for its intended purpose as described in this Owner’s Manual. ■ Read all the instructions before using the appliance.
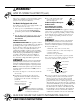
GEAppliances.com WARNING! HOW TO CONNECT ELECTRICITY (cont.) If you are not familiar with electrical power and procedures, call a qualified electrician. The power cord and/or connections must comply with the National Electrical Code, Section 422 and/or local codes and ordinances. C. Use a cable clamp strain relief connector where power cord enters the disposer.
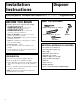
Installation Instructions Disposer If you have questions, call 800.GE.CARES (800.432.2737) or Visit our Website at: GEAppliances.com BEFORE YOU BEGIN WHAT YOU WILL NEED Read these instructions completely and carefully. • IMPORTANT – Save these instructions for local inspector’s use. • • • • • • • IMPORTANT – Observe all governing codes and ordinances. Note to Installer – Be sure to leave these instructions with the Consumer. Note to Consumer – Keep these instructions for future reference.
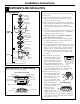
Installation Instructions 1 COMPONENTS AND INSTALLATION COMPONENTS *Stopper *Removable Splash Guard Sink Flange Rubber Sink Flange Gasket Sink Sink Flange Assembly Fiber Gasket Support Ring (Note Arrows Indicating Up) Mount Ring Tightening Ears Cushion Mount Groove Dishwasher Discharge Inlet Elbow Gasket Hopper Screws Disposer End Bell (Electrical Connections) Elbow Flange Discharge Elbow Rating Label in This Area *Not used with batch feed model INSTALLATION OF SINK FLANGE (Read completely before
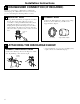
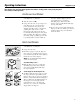
Installation Instructions 2 DISHWASHER CONNECTION (IF REQUIRED) If you are connecting to a dishwasher, complete the following step. If a dishwasher is not to be connected, go on to “Attaching the Discharge Elbow” section. 1 KNOCK OUT PLUG Using a blunt instrument (steel punch or wooden dowel), knock out entire plug. Do not use a screwdriver or sharp instrument. When knockout plug falls into disposer, you may remove it or simply grind it up when the disposer is used.
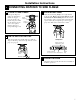
Installation Instructions 4 CONNECTING DISPOSER TO SINK FLANGE 1 ATTACH TO SINK FLANGE Line up the disposer under the sink flange. Mount Guide the hopper Ring Slot projections into the mount ring slots. Turn Hopper Projection the mount ring about 1/4″ to the right so that the disposer is temporarily supported. 3 LOCK MOUNT RING Turn the mount ring slowly to the right until it locks up tight. Hopper projections must be to the extreme left of the mounting slots.
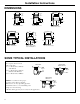
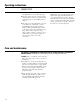
Installation Instructions DIMENSIONS 53/8” 615/16” 6 3/16” 6 3/16” 1211/16” 73/4” 5 3/16” 5 3/16” 1211/16” 41/2” 53/8” 4 1/2” 41/2” 13 / ” 7 16 11/2” 11/2” GFC520 Model Series GFC320 Model Series 8 1/2” 8 1/2” 7 1/4” 5 9/16” GFC720 Model Series 7 1/4” 93/8” 4 1/2” 4 1/2” 11/2” 11/2” GFC530 Model Series 8 1/2” 141/2” 53/8” 4 1/2” 165/8” 16 1/16” 11/2” 5 9/16” GFB760 Model Series Batch Feed Operation 5 9/16” 11/2” GFC1020 Model Series SOME TYPICAL INSTALLATIONS Direct repl
Operating instructions. GEAppliances.com This disposer uses anti-jam swivel impellers that make a clicking sound as they swing into place. This indicates normal operation. Continuous Feed Models A. Remove the sink stopper and turn on a medium flow of cold water. B. Turn the switch to ON. C. Scrape in food waste. To speed up food waste disposal, cut or break up large bones, rinds and cobs. Large bones and fibrous husks require considerable grinding time and are more easily thrown away with other trash.
Operating instructions. Helpful Hints A. Be sure the disposer is empty before using the dishwasher so it can drain properly. B. You may want to leave the stopper in the drain when not in use to prevent utensils and foreign objects from falling into the disposer. C. The disposer is ruggedly built to give you years and years of trouble-free service.
Before you call for service… GEAppliances.com Troubleshooting Tips Save time and money! Review the chart on this page first and you may not need to call for service. SAFETY NOTE: Before investigating, you must disconnect the power supply. WARNING! Before resetting, disconnect the power supply–please see SAFETY NOTE above. The overload control prevents the motor from operating should overloading occur. This feature protects your house wiring and your disposer.
Disposer Warranty. All warranty service provided by our Factory Service Centers, or an authorized Customer Care® technician. To schedule service, on-line, 24 hours a day, visit us at GEAppliances.com, or call 800.GE.CARES (800.432.2737). Staple your receipt here. Proof of the original purchase date is needed to obtain service under the warranty.
de desechos de alimentos Triturador GEAppliances.com Información de seguridad Cómo conectar la corriente eléctrica . . . . . . . 2, 3 Precauciones de seguridad . . . . 2 Instrucciones para la instalación Cómo conectar el codo de descarga . . . . . . . . . . . . . . . . 6 Cómo conectar el triturador a la brida del lavaplatos . . . . . . .7 Componentes e instalación para la brida del lavaplatos . . . .5 Conexión hacia la lavadora de platos . . . . . . . . . . . . . . . . . .
IMPORTANTE INSTRUCCIONES DE SEGURIDAD. LEA TODAS LAS INSTRUCCIONES ANTES DEL USO. INSTRUCCIONES RELACIONADAS CON EL RIESGO DE INCENDIOS, DESCARGAS ELÉCTRICAS O LESIONES A PERSONAS ¡ADVERTENCIA! Al usar aparatos eléctricos, se deberán seguir precauciones básicas de seguridad, incluyendo las siguientes: PRECAUCIONES DE SEGURIDAD ■ Use este aparato sólo para el propósito establecido como se describe en este Manual del propietario. ■ Lea todas las instrucciones antes de utilizar el aparato.
GEAppliances.com ¡ADVERTENCIA! CÓMO CONECTAR LA CORRIENTE ELÉCTRICA (Continuación) Si no está familiarizado con la parte eléctrica y sus procedimientos, llame a un electricista calificado. El cable eléctrico y/o las conexiones deben cumplir con el código National Electric, Sección 422 y/o códigos locales y ordenanzas. Para modelos no equipados con un cable: Si su triturador no viene equipado con un cable, usted puede conectarlo de dos maneras: 1.
Instrucciones para la instalación Triturador Si tiene preguntas, llame al 800.GE.CARES (800.432.2737) o Visite nuestra página en la red: GEAppliances.com ANTES DE EMPEZAR QUÉ NECESITA Lea estas instrucciones completa y cuidadosamente. • IMPORTANTE – Guarde estas instrucciones para uso del inspector local. • IMPORTANTE – Observe todos los • Destornillador de estrella y con hoja plana códigos y órdenes de ley.
Instrucciones para la instalación 1 COMPONENTES E INSTALACIÓN COMPONENTES *Tapón *Protector removible contra salpicaduras Brida del lavaplatos Empaque de caucho de la brida del lavaplatos Lavaplatos Empaque de fibra Ensambladura de la brida del lavaplatos Observe las flechas que señalan hacia arriba Aro de montaje Orejas para apretar Montaje de cojín Entrada de descarga de la máquina lavaplatos Empaque del codo Ranura Tolva Campana final (Conexiones eléctricas) Triturador Tornillos Brida del codo Codo
Instrucciones para la instalación 2 CONEXIÓN HACIA LA LAVADORA DE PLATOS (SI SE REQUIERE) Si usted está conectando una lavadora de platos, complete el siguiente paso. Si por el contrario, usted no va a conectar una lavadora de platos, pase a la sección “Sujetando el codo de descarga.” 1 TAPÓN DE VACIADO Con un instrumento sin punta (punzón de acero o clavija de madera), retire el tapón completamente. No use un destornillador o instrumento afilado.
Instrucciones para la instalación 4 COMO CONECTAR EL TRITURADOR A LA BRIDA DEL LAVAPLATOS 1 CONECTE A LA BRIDA DEL LAVAPLATOS Alinee el triturador debajo la brida del lavaplatos. Guíe las Ranura del aro de montaje proyecciones de la tolva hacia las Proyección de ranuras en el aro embudo de montaje. Dele vuelta al aro de montaje unos 1/4″ hacia la derecha, de manera que el triturador quede temporalmente apoyado.
Instrucciones para la instalación DIMENSIONES 5 3/16” 5 3/16” 73/4” 1211/16” 53/8” 1211/16” 41/2” 13 / ” 7 16 11/2” 8 1/2” Modelo de serie GFC720 Modelo de serie GFC530 93/8” 4 1/2” 5 9/16” 11/2” 8 1/2” 7 1/4” 11/2” 53/8” Modelo de serie GFC520 Modelo de serie GFC320 141/2” 4 1/2” 41/2” 53/8” 11/2” 8 1/2” 615/16” 6 3/16” 6 3/16” 4 1/2” 165/8” 5 / ” 9 16 7 1/4” 4 1/2” 16 / ” 1 16 11/2” Modelo de serie GFB760 Operación de alimentación por lote 5 9/16” 11/2” Modelo de serie G
Instrucciones de operación. GEAppliances.com Este triturador utiliza propulsores giratorios que impiden los atascamientos y producen un sonido ligero cuando se mueven hacia su lugar. Esto indica una operación normal. Modelos de alimentación continua A. Remueva el tapón del lavaplatos y conecte a un flujo medio de agua fría. B. Coloque el interruptor en ON (Encendido). C. Vierta los desechos de comida.
Instrucciones de operación. Consejos útiles A. Cerciórese de que el triturador esté vacío antes de usar la lavadora de platos para que pueda drenar apropiadamente. B. Quizás desee dejar el tapón en el desagüe cuando no esté en uso para impedir que utensilios y objetos extraños caigan dentro del triturador. C. El triturador está firmemente fabricado para brindarle años de servicio sin problemas.
Antes de llamar para solicitar servicio... GEAppliances.com Consejos para la solución de averías ¡Ahorre tiempo y dinero! Revise las tablas en las siguientes páginas primero y quizás no necesite llamar a solicitar el servicio. NOTA DE SEGURIDAD: Antes de investigar, debe desconectar el suministro de energía. ¡ADVERTENCIA! Antes de presionar el botón de reposición, desconecte el suministro de corriente eléctrica, y por favor lea la NOTA DE SEGURIDAD anterior.
Garantía del Triturador Doméstico de Desechos de Alimentos. Todos los servicios de garantía son brindados por nuestros centros de servicio de fábrica, o un técnico autorizado de Customer Care. ® Para programar el servicio en línea 24 horas al día, visítenos al GEAppliances.com, o llame al 800.GE.CARES (800.432.2737). Grape su recibo aquí. Usted necesitará una prueba de la fecha original de su compra para obtener servicio bajo la garantía.