
Instructions / Assembly


3
2. TOOLS AND SUPPLIES
The following may or may not be required depending on the complexity of your installation:
• UL approved safety goggles, steel-toe shoes and earplugs.
• Table saw, miter saw and jig saw.
• Drill and bits, compressor, pin nailer and nails.
• Clamps, levels, squares, straight edge and line levels.
• Extension cord, lighting and ladders.
• Stud nder, handle jig and circuit tester.
• Tape measure, screwdrivers, hammer pencil and masking tape.
• Installation wood screws (1 1/8" and 2 1/2") and screw caps (for wood stud construction).
• Carpenter glue.
3. INSTALLATION PROCESS
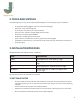
UNDERSTANDING OUR CABINET CODES - EXAMPLES:
CODE DESCRIPTION
W1830 Wall cabinet 18" wide and 30" high
WA2440 Wall angle corner cabinet 24" wide and 40"
high
B30 Base cabinet, 30" wide and 34 1/2" high
T302484.5 Pantry cabinet, 30" wide, 24" depth and
84 1/2" high
All measurements will be referred to in imperial.
3.1 GETTING STARTED
• Check to make sure the cabinets and accessories that you have received are what you
ordered. If anything is not on site, then do not start your project until you have everything
required.
• Double-check that you have all the required tools.
• Appliances should be moved to another room for easier maneuvering in the work area.
• Walls should be nished with the rst coat of paint applied.