
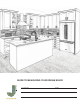
Measurement Guide


MEASURING TIPS
Here are helpful tips on how to properly
measure your space and record the correct
window, door and utility information for your
oor plan and wall elevation drawings.
Always double-check your measurements!
Locate widows and doors
Measure from the wall to the outside
edge of the trim on all your doors
and windows.
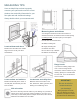
Measuring doors and widows
Your designer needs to know the exact location of
windows and doors, as well as the size of each opening
{including the trim} in order to plan your new space.
Record all of the measurements:
A. Width, including trim
B. Height, including trim
C. Distance from oor
D. From oor to top of window
E. Width of the window sill
Range hoods
If you have an existing range hood
vent or over the range will be
microwave, note the location on your
drawing. Specify if it exhausts back
into the room, or if it has ducts that
went to outside.
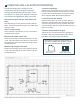
Locate outlets and switches
Measure horizontally to the center of
the wall plate, and vertically from the
oor as shown.
220 volt outlets
Be sure to show any 220 volt outlets on your drawing. Do you have an
electric stove? Then you’ll have a 220 volt outlet for your stove. Your
outlet may not look exactly like the example shown here, but it will look
different from standard 110 volt outlets.
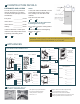
Locate water and utility lines
Mark the center line location of the
sink, water lines, drains, gas lines, and
heating / air conditioning vents.
IMPORTANT!
Be sure to write the
measurements on
your drawings!
Most grid paper is to scale,
but your designer won’t know
what size your space is unless
you write down the dimensions.