
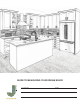
Measurement Guide


2
CREATING WALL ELEVATION DRAWINGS
Elevation drawings are a straight on view
of each wall, with all the features measured
vertically and horizontally, placing them on the
wall space. This helps your designer locate your
new cabinets and appliances along your walls.
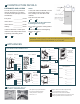
Start with the sink wall, go clockwise from
there
Start Measuring your room with the sink wall. Label this
Wall A. Then go clockwise around your room, labeling the
walls B,C, and D.
Draw a rough sketch
Start by drawing a rough sketch (or two!) of each wall on
a separate sheet of paper.
Measure the width of the wall
Measure the full width of each wall, beginning in the left
corner. Check the width at two locations, 6 inches above
the nished oor and 6 inches below the ceiling. Use the
smallest dimension.
Measure the height of the wall
Measure the full height of each wall, beginning in the left
corner. Check the height at two other locations. Use the
smallest dimension.
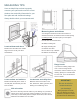
Locate the openings
Measure to the outside edge of the trim. Then measure
from the outside trim edge to the next opening, or to the
far wall. Follow the measuring tips on page 2 to capture
all the important details about windows and doors.
Locate xtures and utilities
Measure horizontally to the center of outlets, switches,
water lines and other utilities. Also measure the distance
of the items from the oor. If there are HVAC wall vents,
mark their location and size. Follow the measuring tips on
page 3 for accuracy.
Transfer measurements to grid
Transfer all of your measurements to the grid pages in
this guide. Label your drawings Wall A, Wall B, Wall C
and Wall D. Then begin the oor plan drawing.
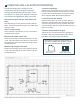
If your space is L-shaped or has a bump out area, you
can still draw an elevation view straight on. Just use a
vertical line to show where the wall comes forward.
If your oor plan looks
like this drawing...
...your elevation view
will look like this drawing.
Always double-check your measurements! The total of your wall segments should equal your overall length.