BLUEBEE - Wireless Internet Sharing Wizard 1. Introduction 1.1. What is BLUEBEE? BLUEBEE is a Bluetooth USB adapter which provides a wireless network and Internet connection between PCs without access point and any connection cables. With BLUEBEE, you don’t need to worry any more about setting up a LAN cable or changing complex network configurations to access Internet with your laptop computer in the office or at home. PLEASE READ THROUGH THIS MANUAL BEFORE YOU USE BLUEBEE. 1.1.1.
BLUEBEE - Wireless Internet Sharing Wizard 1.2. Supplied Items § Two Bluetooth USB Adapters § Extension cable § Program CD § User Manual 1.3. System Requirements § CPU § Memory : 64MB or higher is recommended. § Interface § : Pentium lll or higher is recommended.
BLUEBEE - Wireless Internet Sharing Wizard 2. Installing Software In Chapter 2, a step-by-step installing guide will be given for software installation. Install PAN on both a Sever and Clients, but EasyGate on the Server only! [SERVER] 2.1. Installing PAN First, install PAN on the Server. Assuming D:\ is a CD-ROM Drive, do as follows: § Double click on the Setup.exe icon at D:\ Pan\ Setup.exe.
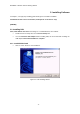
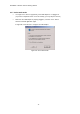
BLUEBEE - Wireless Internet Sharing Wizard 2.1.2. Software license agreement § Click “Yes” to continue the installation if you agree to all the terms in the license agreement. Figure 2-2: Software License Agreement 2.1.3. Choose destination location § The default location is C:\ Program Files\ IVTCorporation\ MiniBluelet\ Pan. § Click “Next” button to install program to this folder. (Click “Browse” to select different destination folder.
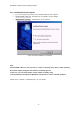
BLUEBEE - Wireless Internet Sharing Wizard 2.1.4. Windows2000 or WindowsXP configuration 2.1.4.1. Digital signature [Windows 2000 only] § If you are using Windows 2000, it might prompt “Digital Signature Not Found” form as follows. In this case, click “Yes” to continue the installation. Figure 2-4: Digital Signature Prompt [Windows 2000] 2.1.4.2.
BLUEBEE - Wireless Internet Sharing Wizard 2.1.5. InstallShield wizard complete § If you see as [Figure 2-6], PAN is successfully installed on your computer. § [Windows98SE / ME] User : Restarting PC is required to accept changes. § [Windows2000 / XP] User : Restarting PC is not required. Figure 2-6: PAN Installation is Completed Note: Windows98SE / ME Users may experience a failure of locating device drivers while installing BT network adapter during the PAN software installation process.
BLUEBEE - Wireless Internet Sharing Wizard 2.1.6. PAN first run configuration Plug in USB Adapter to any empty USB port. [Windows98SE / ME ] User: After restarting PC, PAN First Run Configuration window will pop up automatically. [Windows2000 / XP] User : Double click on the PAN icon from the Desktop. § Type user name for ‘Device Name’. (Example: BT Server, BT Client) This name will appear on the BlueNetwork list [Refer to Figure 3-1]. § Type passkey in, and retype the passkey to confirm.
BLUEBEE - Wireless Internet Sharing Wizard 2.1.7. Select work mode § You might see a notice as [Figure2-8], if the USB Adapter is not plugged in. (If you have completed section 2.1.6 successfully, you may skip this section.) § Make sure the USB adapter is properly plugged in, and click “Exit” button. And then run PAN application again. It might take a few minutes to configure the USB Adapter.
BLUEBEE - Wireless Internet Sharing Wizard 2.2. Installing EasyGate After completing PAN installation, install EasyGate on the Server. EasyGate is an Internet sharing program, which enables the Clients to share the Internet connection through the Server. If your Internet connection is LAN, ADSL, or Cable Modem, then refer to section 2.2.1 to install EasyGate. If your Internet connection is a dial-up modem, refer to section 2.2.2 to install EasyGate. 2.2.1.
BLUEBEE - Wireless Internet Sharing Wizard 2.2.1.2. Confirmation of software installation After rebooting your computer, PAN and EasyGate will run together at the same time. § A notice window will pop up for PAN information. Figure 2-11: PAN Information § You can also find ‘Blue Star’ icon and the ‘EasyGate network’ icon on the right corner of the window taskbar.
BLUEBEE - Wireless Internet Sharing Wizard 2.2.2. If you have Dial-up Modem (if you have high speed Internet, refer to 2.2.1) Before installing EasyGate, run PAN by double clicking PAN icon on the Desktop. The PC on which you are installing EasyGate needs to be connected to Internet before you install EasyGate. Therefore connect to Internet using ‘Dial-Up Networking’ before you install EasyGate. (If you are using customized dial-up Internet program, you may not be able to use EasyGate.
BLUEBEE - Wireless Internet Sharing Wizard § After rebooting, you have lost dial-up Internet connection and as a result, you will see following message pop up. Click on “Ok” button. Figure 2-15: Network Connection Confirm Message § When ‘EasyDial’ window appears, enter ‘User name’ and ‘Password’, choose ‘Network name’, then click ‘Dial’ button. Figure 2-16: EasyDial window [CLIENTs] 2.3. Installing PAN Install PAN application on Clients. The installation procedure is same as one’s on the Server.
BLUEBEE - Wireless Internet Sharing Wizard 3. Network Configuration In Chapter 3, a detailed explanation of network configuration between the Server and the Clients will be given. ‘Computer name’ and “Workgroup’ of Server and Clients are set as indicated in the following table. Computer name Workgroup Server Bluebee Server Bluebee Client Bluebee Client Bluebee You can check your computer name and it’s workgroup as follows.
BLUEBEE - Wireless Internet Sharing Wizard 3.1.2. Joining BlueNetwork § Select a desired Server from the BlueNetwork List, and click ‘Join’ button. Or you can simply double click on the Server name to join BlueNetwork. § Enter the passkey as you have set on [Figure 2-7]. Figure 3-2: Enter Passkey to Join BlueNetwork § When you have successfully joined BlueNetwork, acquired IP address will be noticed and the ‘Blue Star’ icon on the taskbar will start spinning.
BLUEBEE - Wireless Internet Sharing Wizard 4. Software Manual In chapter 4, you will find more detailed user manual and explanation about PAN and EasyGate program. [PAN] 4.1. PAN menu § Right click on the Blue Star icon to see the PAN menu. Figure 4-1: PAN Menu 4.2. About PAN § It displays software version as well as other device information such as Device Name, Manufacturer, and Device Address. Device Name is the name that appears on the BlueNetwork List when other devices search on BlueNetwork.
BLUEBEE - Wireless Internet Sharing Wizard 4.3. Joining BlueNetwork § By selecting a desired Server from the BlueNetwork List, it configures wireless network with the Server and allows for Clients to share the Internet through the Sever. § From the PAN menu, Click ‘Join BlueNetwork’. Or simply double click on the ‘Blue Star’ icon on the taskbar. § Click ‘Search’ button to search more Bluetooth devices around. Device names in blue color are available devices for wireless network connection.
BLUEBEE - Wireless Internet Sharing Wizard 4.4. Connection Status (User Management) § When the wireless network is established, ‘Connection Status’ will appear on Client’s PAN menu and ‘User Management’ will appear on Server’s PAN menu. § ‘RSSI(Receiver Signal Strength Indicator)’ on Connection Status window indicates the strength of receiver signal. As the level goes down, the connection status becomes better.
BLUEBEE - Wireless Internet Sharing Wizard 4.5. Option settings § The sub sections include Access Passkey, Advanced Settings, NAP settings, and Automatic start option. 4.5.1. Change access passkey Setting Access Passkey prevents any unauthorized access to the Server. The default Passkey is ‘root’, and you can change Passkey by entering a new Passkey into ‘Passkey’ and ‘Confirm’ boxes. NAP is an acronym of Network Access Point and can be used as an option to configure a server.
BLUEBEE - Wireless Internet Sharing Wizard 4.5.2. Advanced settings § Advanced Settings are about the Bluetooth options and is recommended to use provided default values. 4.5.2.1. Security § This tab includes ‘Security Mode’ and ‘Miscellaneous’ subsections. Set the Security Mode on ‘No security’, then ‘Password window’ doesn’t appear when you access the device. Figure 4-9: Security 4.5.2.2. Optimization § This tab has subsections including ‘Search mode’, ‘Device Shortcut’, and ‘Automatic Join’.
BLUEBEE - Wireless Internet Sharing Wizard 4.5.2.3. Bluetooth device § You can check Device Name and Device Address. Figure 4-11: Bluetooth Device 4.6. Exit § Exit PAN first before you turn off or reboot you PC.
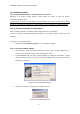
BLUEBEE - Wireless Internet Sharing Wizard [EasyGate] 4.7. EasyGate menu § Right click on the ‘EasyGate Network’ icon to see the EasyGate menu. Figure 4-13: EasyGate Menu 4.8. Open § You can configure Network Adapter information and options. ‘Adapter to the Internet’ will select the actual LAN card. Uncheck mark on ‘Use DHCP’, then click ‘DHCP Config…’ button to assign IP address manually to Client. Figure 4-14: EasyGate Configuration 4.9.
BLUEBEE - Wireless Internet Sharing Wizard 5. Uninstalling Software In chapter 5, you will find out how to uninstall program successfully. Important! For Server, uninstall EasyGate first, before you uninstall PAN. [PAN] 5.1. Uninstalling PAN Exit PAN first, from the PAN menu and remove Bluetooth adapter prior to uninstalling PAN software. ★ If this computer is a Server, then make sure you have already uninstalled EasyGate before you continue uninstalling PAN. Refer section 5.2 to uninstall EasyGate. 5.
BLUEBEE - Wireless Internet Sharing Wizard § Press ‘OK’ to continue PAN uninstallation process. Figure 5-2: Confirm Uninstallation § PAN Uninstall Wizard will be executed. Figure 5-3: PAN Uninstall Wizard § Uninstallation Complete [Windows98SE / ME] User : Reboot you PC to complete uninstallation. [Windows2000 / XP ] User : Rebooting is not required. Figure 5-4: PAN Uninstallation Complete 5.1.2.
BLUEBEE - Wireless Internet Sharing Wizard [EasyGate] 5.2. Uninstalling EasyGate Exit EasyGate first, from the EasyGate Network icon in window task bar. Then run EasyGate uninstall program. 5.2.1. Run ‘EasyGate Uninstall’ § Click on ‘Start’ -> ‘Programs’ -> ‘MiniBluelet_Pan’ -> ‘EasyGate Uninstall’. Figure 5-5: Uninstalling EasyGate § Click ‘Uninstall’ button. Uninstallation does not require rebooting.
BLUEBEE - Wireless Internet Sharing Wizard 6. Troubleshooting Here are the general tips and troubleshooting to the most common problems you might encounter. 6.1. USB Adapter Initial Installation Error If you plug in USB Adapter to an empty USB port after you have installed PAN, then Windows will automatically install its driver. But, if you see an error message saying “Cannot find Btusb.sys”, click on ‘Browse’ to locate the file from ‘C:\ Program Files\ IVT Corporation\ MiniBluelet\ Pan\ Driver\ USB\ BTus
BLUEBEE - Wireless Internet Sharing Wizard card in the same manner and enable BT Network Adapter. 6.5. ‘Select User Mode’ window prompt while running PAN If ‘Select User Mode’ window prompts while running PAN, it might be the case where the system cannot recognize the USB adapter. Please verify if the USB adapter is properly plugged in. If you are still encountering the same message, check ‘Device Manager’ from ‘My Computer’ and see if USB is properly installed.
BLUEBEE - Wireless Internet Sharing Wizard 6.8. Confirmation of hardware installation Once you have installed PAN, hardware installation is done automatically (plug-and-play) by plugging the USB adapter into computer. § [Windows98SE / ME] User: Check hardware installation of these three items. Right click on ‘My Computer’ -> ‘Properties’ -> ‘Device Manager’ tab.
BLUEBEE - Wireless Internet Sharing Wizard § [Windows2000 / XP] User: Check hardware installation of these three items. Right click on ‘My Computer’ -> ‘Properties’ -> ‘Hardware’ Tab -> ‘Device Manager’.
BLUEBEE - Wireless Internet Sharing Wizard 6.9. Dial-Up Networking § [Windows98SE / ME] User : ‘Start’ button -> ‘Settings’ -> click ‘Dial-Up Networking’. Or ‘Start’ button -> ‘Programs’ -> ‘Accessories’ -> ‘Communication’ -> ‘Dial-Up Networking’ [Windows2000 / XP] User : right click ‘My Network Places’ -> ‘Properties’ -> ‘Make New Connection’ Figure 6-5: Dial-Up Networking § Double click on ‘Make New Connection’ Figure 6-6: Make New Connection § Type a name for the computer you are connecting to.
BLUEBEE - Wireless Internet Sharing Wizard § Type the phone number of the Internet Service Provider, and click ‘Next’. Figure 6-8: Enter ISP’s dial-up phone number § You have completed creating a dial-up networking connection. Click ‘Finish’ button. Figure 6-9: Finish creating a dial-up connection § From ‘Dial-Up Networking’ window, you can find ‘My Connection’ icon has been generated. Double click on ‘My Connection’ icon.
BLUEBEE - Wireless Internet Sharing Wizard § Enter ‘User name’ and ‘Password’, then click ‘Connection’ button. Figure 6-11: Connecting to ISP § After you see ‘Internet connection established’ message pop up, you can surf the Internet using Internet browser such as Internet Explorer, Netscape.
BLUEBEE - Wireless Internet Sharing Wizard * Notice1 : The changes or modifications not expressly approved by the party responsible for compliance could void the user’s authority to operate the equipment. * IMPORTANT NOTE : To comply with the FCC RF exposure compliance requirements, no change to the antenna or the device is permitted. Any change to the antenna or the device could result in the device exceeding the RF exposure requirements and void user’s authority to operate the device.
BLUEBEE - Wireless Internet Sharing Wizard Product Specifications Key Features Bluetooth Specification V 1.1 compliant / class1 USB Specification V 1.1 compliant Radio output power 1 to 10 dBm (100 m range) Connection speed 1 Mbps across air Internet Connection up to 7 clients without Access Point simultaneously Support O/S Windows 98SE / ME / 2000 / XP Internet connection sharing router - One click S/W Software and firmware are upgradable Specifications Operation frequency 2.402 ~ 2.
BLUEBEE - Wireless Internet Sharing Wizard Warranty Certificate Thank you for choosing our product. The warranty period starts on the day you purchase our product. Therefore we recommend you to keep this certificate with the proof of purchase, and receive full coverage of warranty. Warranty Details 1. Warranty period is 1 year from the day of purchase. (Only for defects in materials and workmanship.) 2.