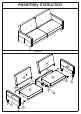
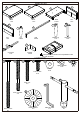
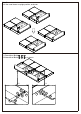
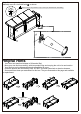
Assembly Instruction PARTS C E F G C B K I J G A H D F K F F
PARTS LIST B A Seat 1 PC D C Seat 1 PC Back 2 PCS E Arm 1 PC H G F Arm 1 PC I Rail 2 PCS Leg 4 PCS Rear Leg 1 PC Middle Leg 1 PC K J A Bracket 2 PCS Connector 1 PC B Some parts will be found in the compartment under the seat, as shown.
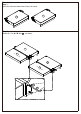
Place all parts on a clean, smooth surface. Step 1 : Open the Velcros at both sides of seat, as shown. B A Step 2: Attach C x 2 to A & B with 4 , as shown.
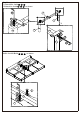
Step 3: 3.1 Stick the Velcros at both sides of seat. 3.2 Close the zipper between A, B and C, as shown. C B C A 3.1 C B C A 3.2 Step 4: Attach K x 2 to A & B with 4 , 5 , 6 , as shown.
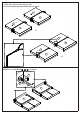
Step 5: Turn the metal brace to upright position, as shown. A B A B Step 6: 6.1 Attach A to B with 1 , 5 , 6 . 6.2 Attach A to B with 5 , 6 , 7 , as shown. B A 6.2 6.
Step 7: 7.1 Attach H to J with 3 , 5 , 6 . 7.2 Attach I to J with 3 , 5 , 6 , as shown. 9 J 3 J 6 I 7.1 7.2 5 H H J 5 3 I Step 8: Attach J to A & B with 3 , 5 , 6 , as shown.
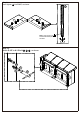
Step 9: Hand tighten 2 into D & E, as shown. 2 E D Note: Only screw in the shortest threaded part of the Stud. Step 10: Attach D & E to A & B with 5 , 6 , 7 , as shown.
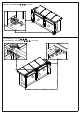
Step 11: Attach K x 2 to D & E with 4 , 5 , 6 , as shown. E 6 B 4 5 9 K A D Step 12: 12.1 Attach G x 2 to I with 4 , 5 , 6 . 12.2 Attach G x 2 to D & E with 4 , 5 , 6 , as shown. G G 6 5 4 6 G I 9 9 D 4 5 12.2 12.
Step 13: Manually screw F x 4 to D & E with 8 , as shown. Please remove the protective cap on the tip of thread before assembling. F D E 8 F Helpful Hints ● Your futon can transform between a Sofa and a Bed. ● Move your new furniture carefully, with two people lifting and carrying the unit to its new location. ● Your furniture can be disassembled and reassembled to move. ● Clean the product with a soft damp cloth. DO NOT use harsh chemicals or abrasive cleaners.