Website: www.jtechdigital.com Toll Free: 1-888-610-2818[US] Email: Support@jtechdigital.
Table of Contents 1. Features........................................................................................................................ 3 2. Package Contents ........................................................................................................ 3 3. Hardware Description ................................................................................................... 4 4. Typical Application..............................................................................
Dear Customer Thank you for purchasing the JTECH-ENCH4. For optimum performance and safety, please read these instructions carefully before connecting, operating or adjusting this product. Please keep this manual for future reference. 1. FEATURES ➢ Supports H.264 encoding. ➢ Supports UDP, HTTP, RTSP, RTMP, ONVIF protocol. ➢ Supports MPEG1 Audio Layer 2. ➢ CBR/VBR rate: 16Kbps~16Mbps. ➢ 1000M network interface uses full duplex mode. ➢ Supports up to 1080p@60HZ HD video input.
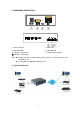
3. HARDWARE DESCRIPTION ① Power input port ③ Reset button ⑤ Indicator of power input ⑦ Indicator of HDMI input Note: ② HDMI input ④ LAN output ⑥ Indicator of LAN output . Reset to the factory default setting: press “Reset” for 10 seconds till all three indicators go out. . LAN: default IP is 192.168.1.168 for the unit. 4.
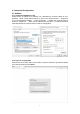
. Connection Configuration 5.1 Software 5.1.1 Change the IP Address of PC Assign the PC (or laptop) an IP address. On a Windows PC: Press the +R on your keyboard →Enter “control netconnections” in the run box and press enter → Right click on your wired ethernet adapter → Select “Properties → Double click “Internet Protocol Version 4 (TCP/IPv4)” → Enter the IP address with 192.168.1.11 (0-255) and Subnet mask 255.255.255.0. Press OK twice to save the configuration. 5.1.
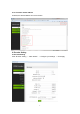
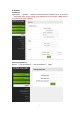
5.1.3 Check the stream address As below, the stream address is in the red frame. 6. Encoder Setting 6.
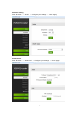
6.2 Audio setting Click “Encoder” → “Audio” → Configure your settings → Click “Apply” 6.3 Advanced Click “Encoder” → “Advanced” → Configure your settings → Click “Apply”.
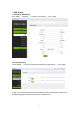
7. OSD Setting 7.1 Streaming OSD Setting Click “OSD” → “Network” → Configure your settings → Click “Apply” 7.2 LOGO uploading “LOGO upload” → Choose a bmp file that matches the requirements → Click “Apply” ※Note: The screenshots might have some difference with actual operation interface due to software upgrade, all the screenshots are for reference only.
8. System 8.1 Network Click system → Network → Modify the network settings to match those of your network → Click apply. Note: Please change your DNS server to use Google’s DNS servers. (Provided in the picture below.) 8.
8.3 Reset System → Reset → Reset Note: This will set your device to the factory defaults. 8.
9. Application 9.1 User Application Example 9.1.1 Web Video Preview Status → Main stream → Preview Note: For Internet Explorer, you can get preview window directly. For Chrome, you must install an extension called "Native HLS Playback" to get the preview window.
9.1.2 VLC Play Connect a HDMI source to the HD encoder. Open VLC media player (Download link: http://www.videolan.org/),Click “Media”, then click “Open Network Stream”. Enter the Stream URL from the page of “Main stream”, click “Play”. Note: Please make sure that the stream type you choose, is enabled in the encoder.
VLC Example: 9.2 Multi Local User Application Multicast Way If more than one local user needs to stream the video, of the same HD encoder, at the same time. You may enable multicast IP, then reboot the HD encoder. After the reboot, copy the multicast IP address from the Status page, and paste the IP address into the VLC Player.
9.3 Local Surveillance System Application NVR Connection 1. Confirm if your NVR supports the H.264 codec. Since we’re using ONVIF, you will need to enable the "RTSP" function as pictured below. 2.
Note: If you've enabled the ONVIF setting and still can't open the video, we suggest you download the ONVIF TEST tool. 9.4 Remote Multi User: RTMP Connection To stream over the web, to multiple locations, you may use RTMP. This encoder supports multiple platforms, including: YouTube Live, Facebook Live, DaCast, Red5, etc. 9.4.
1. To stream to YouTube: access your YouTube Live settings (below) and combine your “Server URL” and “Stream name/key” (separated by a forward slash). Full RTMP URL Example: rtmp://a.rtmp.youtube.com/live2/zc3e-yw22-bbdw-baeg 2.Enter the full RTMP URL into the “RTMP PUBLISH URL” setting of your J-Tech Digital Encoder; apply and reboot. Note: For best results, check that “TS muxer” is set to “Compatible with FFMPEG” 3.
MAINTENANCE Clean this unit with a soft, dry cloth. Never use alcohol, paint thinner of benzine to clean. PRODUCT SERVICE 1) Damage requiring service: The unit should be serviced by qualified service personnel if: (a)The DC power supply cord or AC adaptor has been damaged; (b)Objects or liquids have gotten into the unit; (c)The unit has been exposed to rain; (d)The unit does not operate normally or exhibits a marked change in performance; (e)The unit has been dropped or the cabinet damaged.