USB 3.
USB 3.
USB 3.0 MULTI-ADAPTER USER MANUAL Table of Contents INTRODUCTIONS ................................................................................................................................... 3 System Requirements ................................................................................................................................... 3 Specifications .............................................................................................................................................
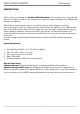
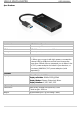
USB 3.0 MULTI-ADAPTER USER MANUAL INTRODUCTIONS Thank you for purchasing the j5create USB Multi-Adapter! This adapter acts as an external graphics card for your MAC or PC. It allows you to add an additional display and 3 USB 3.0 ports through your USB port. With j5create multi-adapters, there is no need to open up your computer to add an expensive graphics card, you simply load the drivers, plug in the adapter to the USB port, then plug in the VGA monitor cable into the adapter and you are ready.
USB 3.0 MULTI-ADAPTER USER MANUAL Specifications Interface Host Interface USB 3.0 Male Type-A connector Video Interface VGA-DB 15 pin Female connector USB Port USB 3.0 Female connector x 3 Ports Power Jack DC 5V (3.5mm) Power Power Mode Bus-powered or Self-Powered *** When you connect with high power-consumption external HDD or USB devices that need bus power more than 150mA. We recommend you to attach the AC/DC power adapter included in your devices, or purchase JUH410 AC/DC power adapter.
USB 3.
USB 3.
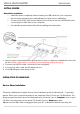
USB 3.0 MULTI-ADAPTER USER MANUAL GETTING STARTED Notes Before Installation Install the driver completely before inserting the USB cable into your computer Run the setup program as an administrator to avoid errors in installation Connect the VGA Cable for the display to the VGA port on the JUH410 first before connecting the USB cable to the computer Un-install the previous driver first before installing the latest driver 1.
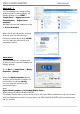
USB 3.0 MULTI-ADAPTER USER MANUAL installation program. 1. The installation page will be launched. To start click on Install the Latest Driver. Please make sure you are connected to the internet or press Install Driver to start the installation. 2. After pressing the installation option, the InstallShield Wizard will launch, click Next to continue. 3. Read the license agreement, check I accept the terms of the license agreement, click Next > 4.
USB 3.0 MULTI-ADAPTER USER MANUAL Windows 8、7: You can modify the corresponding position of each extend display via display settings. Go to START → Control Panel → Appearance and Personalization → Adjust screen resolution ※or Right click on the desktop and go to Screen Resolution When the Screen Resolution window pops up, you can identify each monitor’s number by clicking Identify. You can drag the monitor to your preferred location.
USB 3.0 MULTI-ADAPTER USER MANUAL Verify Device Driver Installation Follow the steps below to verify the driver installation status of the USB 3.
USB 3.0 MULTI-ADAPTER USER MANUAL Uninstalling the Device Driver *Unplug the USB Cable of the USB 3.0 MULTI-ADAPTER before uninstalling the driver 1. Click Start→ Control Panel → Programs and Features→ Uninstall or change a program Select j5 USB 3.0 MULTIADAPTER... Click Uninstall 2. A message will appear confirming that you want to un-install the application. Click ‘ok’ to continue. 3. When the driver is completely uninstalled, select “Yes, I want to restart my computer now.” Click Finishto restart.
USB 3.0 MULTI-ADAPTER USER MANUAL INSTALLATION FOR MAC Device Driver Installation Installing the device driver enables your computer’s operating system to recognize the USB3.0 Multi-Adapter. Be sure that you are referring to the appropriate installation procedure before you begin installing. ※Make sure the USB cable is unplugged from your Mac Desktop or Mac Notebook before executing the setup program. This section illustrates the device driver installation procedure for a computer running Snow Leopard.
USB 3.0 MULTI-ADAPTER 6. Installation is processing…This will take a few moments USER MANUAL 7. Click Restart to complete the software installation Verify Device Driver Installation Follow the steps below to verify the driver installation status of the USB 3.0 Display Adapter 1. GO , select About This Mac and 2. The picture shows the installation process for the USB 3.
USB 3.0 MULTI-ADAPTER USER MANUAL Uninstalling the Device Driver 1. Unplug the USB Cable of USB 3.0 MULTI-ADAPTER from the USB port 2. To un-installation, please press the Uninstall Driver icon 3. Click Open to proceed 4. Click Uninstall and restart to proceed 5. Type in your password to allow uninstallation and click OK to proceed 6. Restart your system.
USB 3.0 MULTI-ADAPTER USER MANUAL FUNCTIONS INSTRUCTIONS: WINDOWS 8、7 Display Resolution Fast access to Display Resolution settings The resolution list will show when you move the cursor over Display Resolution. Select your desired resolution. Default resolution: 1024 x 768 x 32 bit Display Orientation The Orientation allows you to turn the display on the device that is connected to the USB 3.
USB 3.0 MULTI-ADAPTER USER MANUAL Extended mode (Default) This feature allows the display device attached to the USB 3.0 MULTI-ADAPTER to work as an “extended” display of the on-board screen. You can adjust the position by clicking the number of the display first and then select Extend these displays and click Apply Mirror mode-Duplicate This feature allows the same contents of the on-board screen to be displayed on the screen connected to the USB 3.
USB 3.0 MULTI-ADAPTER USER MANUAL Off mode You can turn one display on while the other is off Select Show desktop only on 1 and the 2nd display will be off Select Show desktop only on 2 and the 1st display will be off Super Utility A super utility provides more options. You can find the icon on the lower right side of the task bar. Identify Monitors When Identify Monitors is selected, a serial number will be shown in the upper right corner of the display device.
USB 3.0 MULTI-ADAPTER USER MANUAL Multi-Display Control Panel This unique feature allows a faster and simpler working experience using a multi-display device. A series of Hotkey settings will help you move quickly from the active window or cursor to the desired display. ※Using Hotkeys Default setting is Ctrl + Display No.
USB 3.0 MULTI-ADAPTER USER MANUAL FUNCTIONS: WINDOWS XP You can choose all the functions quickly and easily by clicking on this icon( lower right side of the toolbar. ) seen on the Display ID Smart Display Device ID Detection The USB 3.0 MULTI-ADAPTER supports VESA defined DDC/EDID. The utility will show the display device ID whenever it is attached to the USB 3.0 MULTI-ADAPTER If there is no display device attached to the USB 3.0 MULTI-ADAPTER it will show up as Unknown Monitor.
USB 3.0 MULTI-ADAPTER USER MANUAL Default Resolution: 1024 x 768x 32 bit The resolution list will show up when you move the cursor over Display Resolution. Select your desired resolution. Display Rotation The Display Rotation option allows you to rotate your display. There are 4 options available: 0 degrees/ 90 degrees/180 degrees/ 270 degrees under the Extended or Primary display mode. Display Mode Extended (Default Mode) This default display mode allows the attached USB 3.
USB 3.0 MULTI-ADAPTER USER MANUAL Mirror Mode When Mirror is selected, the screen of the display device will be the same as the main display and Display Rotation will be automatically disabled. You can select either Horizontal Flip, or Vertical Flip.
USB 3.0 MULTI-ADAPTER Primary Mode When Primary is selected, the display device will become the main display. The display of the internal graphics card will automatically switch to be the extended display and act as an extension. USER MANUAL Off When Off is selected it will disable the display connected to the USB 3.0 MULTIADAPTER. Identify Monitors When Identify Monitors is selected, a serial number will be shown at the upper right corner of the attached display devices.
USB 3.0 MULTI-ADAPTER USER MANUAL Multi-Display Control Panel When Multi-Display Control Panel is selected, the Multi-Display Control Panel window will pop-up to allow you to modify the Hotkeys. ※Using Hotkeys Default setting is Ctrl + Display No. Click the window you want to move on task bar to activate it and then press the Hotkey.
USB 3.0 MULTI-ADAPTER USER MANUAL FUNCTIONS: MAC Display Resolution Go to , and then System Preferences From System Preferences click on the Display tab. You should see the screen below. On this screen, you can adjust the resolution, display mode and color range. Display Mode Click on the Arrangement tab and uncheck Mirror Displays to turn the Mirror display option off. Another window will automatically appear on the screen that represents the USB Display device.
USB 3.0 MULTI-ADAPTER USER MANUAL TIP: For quick access to the USB Display Device click Show Display in Menu Bar. You will see the display icon appear and you can double-click it for quick access at any time. Windows Arrangement You can arrange the windows on your display by selecting Exposé & Spaces Go to , and then System Preferences From System Preferences click on Exposé & Spaces. You should see the screen below. Space Click Show Spaces in Menu Bar.
USB 3.0 MULTI-ADAPTER USER MANUAL Exposé View different windows with a single keystroke. F9 : view all open windows F10: view windows of the current application only F11: show desktop *For more windows arrangement functions, please see Apple’s computer user manual. TROUBLE SHOOTING If you have any questions about the use of the JUH410/450 USB3.0 Multi-Adapter, please follow the instructions below. If any further assistance is needed, please visit our website or call j5create’s support hotline.
USB 3.0 MULTI-ADAPTER USER MANUAL performance while watching DVDs or certain video formats on the attached USB graphics display, it is recommended that you use the following license free software: Media Player Classic: http://sourceforge.net/projects/guliverkli/ Others - Some graphic cards, i.e. Intel, prevent other secondary graphics chipsets from being set as the primary card. As the result of this, primary mode might not work or the display maybe disabled.
USB 3.0 MULTI-ADAPTER USER MANUAL TECHNICAL SUPPORT If you have any issues using this product please follow the instructions below before returning this product to the store. 1. The User Manual It contains detailed instructions and a troubleshooting section. Many common issues can be easily resolved by reading the user manual. 2. Online Support Please visit the j5create website (www.j5create.com) to find the latest software for your device.
USB 3.0 MULTI-ADAPTER USER MANUAL intended uses described by j5create ; (g) damage caused by service (including upgrades and expansions) performed by anyone who is not a representative of j5create or a j5create Authorized Service Provider; (h) a product or part that has been modified to alter functionality or capability without the written permission of j5create; or (i) if any j5create serial number on the product has been removed or defaced.
USB 3.
USB3.0 MULTI-ADAPTER Manuel de l'utilisateur Table of Contents Introductions ......................................................................................................................... 3 Environnements requis................................................................................................. 3 Caractéristiques physiques .......................................................................................... 4 Contenu de l'emballage ............................................
USB3.0 MULTI-ADAPTER Manuel de l'utilisateur Introductions Merci d'avoir acheté l'Adaptateur d'affichage j5create! Cet adaptateur agit comme une carte vidéo externe pour votre MAC ou PC. Il vous permet d'ajouter un moniteur/affichage et périphérique informatique USB supplémentaire via votre port USB 3.0.
USB3.0 MULTI-ADAPTER Manuel de l'utilisateur Caractéristiques physiques Interface Interface hôte Connecteur USB 3.0 Type A (connecteur femelle) Interface Vidéo Interface Vidéo Port en aval Connecteur femelle USB 3.0 Type-A x 3 Prise d'alimentation DC 5V Alimentation Mode d'alimentation Alimenté par bus ou Auto-alimenté *** Lorsque vous vous connectez avec des dispositifs de HDD ou USB externes haute puissanceconsommation qui ont besoin de puissance de bus de plus de 150mA.
USB3.
USB3.0 MULTI-ADAPTER Manuel de l'utilisateur MISE EN ROUTE Remarques avant l'installation Installez entièrement le pilote avant d'insérer le câble USB dans votre ordinateur Exécutez le programme d'installation en tant qu'administrateur pour éviter des erreurs d'installation Connectez d'abord le câble VGA du dispositif d'affichage au port VGA de la USB3.0 Multi-Adapter avant de connecter le câble USB à l'ordinateur Désinstallez le pilote précédent avant d'installer le dernier pilote 1.
USB 3.0 MULTI-ADAPTER USER MANUAL d'installation. Double-cliquez sur « Setup.exe » pour démarrer. ※ Assurez-vous que le câble USB est débranché de votre PC ou de l'ordinateur portable avant d'exécuter le programme d'installation. 1. La page d'installation sera lancée. Pour commencer installation, cliquez sur “ Installer le dernier pilote”. Assurezvous que le réseau est disponible appuyez sur “Installer le pilote” pour démarrer l'installation 2.
Windows 8,7: Vous pouvez modifier la position correspondante de chaque extension d'affichage via les paramètres d'affichage. Allez à « DEMARRER » → « Panneau de configuration » → « Apparence et personnalisation » → « Modifier la résolution de l'écran » ※ ou faites un clic droit sur le bureau et allez à « Résolution de l'écran » Lorsque la fenêtre Résolution de l'écran apparaît, vous pouvez identifier le numéro de chaque moniteur en cliquant sur « Identifier.
USB 3.0 MULTI-ADAPTER USER MANUAL Vérification de l'installation du pilote La procédure suivante sert à vérifier l'état de l'installation du pilote de la USB3.
Désinstallation du pilote ※ Débranchez le câble USB de la USB3.0 MULTI-ADAPTER avant de désinstaller le pilote Cliquez sur « Démarrer » Panneau de Un message apparaîtra confirmant que vous configuration Programmes et souhaitez désinstaller l'application. Cliquez sur fonctionnalités Désinstaller ou modifier « OK » pour continuer. un programme Sélectionnez j5 NEWPORT STATION... Cliquez sur Désinstaller 1.
USB 3.0 MULTI-ADAPTER USER MANUAL INSTALLATION POUR MAC Installation du pilote L'installation du pilote permet au système d'exploitation de votre ordinateur de reconnaître la Newport Station. Assurez-vous que vous utilisez la procédure d'installation appropriée avant de commencer l'installation. ※ Assurez-vous que le câble USB est débranché de votre ordinateur de bureau Mac ou votre ordinateur portable Mac avant d'exécuter le programme d'installation.
6. Installation en cours… Cela va prendre quelques instants 7. Cliquez sur « Redémarrer » pour terminer l'installation du logiciel Vérification de l'installation du pilote La procédure suivante vous permet de vérifier l'état de l'installation du pilote de l'USB3.0 Multi-Adapter ci-dessous montre le processus Aller à , sélectionnez «À propos L'image de ce Mac» et sélectionnez «Plus d'installation pour un USB3.0 Multi-Adapter d'infos ...
USB 3.0 MULTI-ADAPTER USER MANUAL Désinstallation du pilote Débranchez le câble USB de la USB3.0 MULTI-ADAPTER du port USB Pour la désinstallation, appuyez sur l'icône "Désinstaller le pilote" Cliquez sur «Ouvrir» pour continuer Cliquez sur «Désinstaller et redémarrer» pour continuer Tapez votre mot de passe afin de 6. Redémarrez votre système permettre la désinstallation et cliquez sur «OK» pour continuer.
INSTRUCTIONS SUR LES FONCTIONS: WINDOWS 8,7 ID de l'affichage Détection intelligente de l'ID du dispositif d'affichage Résolution d'affichage Accès rapide au paramétrage de Résolution d'affichage La liste des résolutions s'affichera lorsque vous déplacez le curseur sur Résolution d'affichage. Sélectionnez la résolution souhaitée pour l' USB3.0 MULTI-ADAPTER.
USB 3.0 MULTI-ADAPTER USER MANUAL affichages» et cliquez sur «Appliquer» Mode miroir-Dupliquer Cette fonctionnalité permet d'afficher le contenu de l'écran de bord sur l'écran de l'USB3.
Super Utilitaire Un super utilitaire offre davantage d'options, l'icône se trouve sur la barre des tâches en bas à droite Identifier les Moniteurs Lorsque «Identifier les moniteurs» est sélectionné, un numéro de série s'affiche dans le coin supérieur droit des dispositifs d'affichage. Vous pouvez voir le numéro de série de chaque affichage lorsque vous utilisez la fonction de raccourci clavier.
USB 3.0 MULTI-ADAPTER USER MANUAL Paramétrage de l'affichage Accès rapide au système «Paramètres d'affichage» Position fixe Cette fonction vous aide à organiser les positions de tous les emplacements d'affichage que vous avez définis dans Affichage > Résolution de l'écran Après «Paramétrage de l'emplacement de l'affichage», Cochez dans cette fonction. Tous les emplacements d'affichage seront fixés. C'est l'idéal pour l'utilisateur de multiaffichages.
S'il n'y a pas de périphérique d'affichage connecté à l' USB3.0 MULTI-ADAPTER, l'ID s'affichera comme «Moniteur inconnu.» Si le dispositif d'affichage ne prend pas en charge EDID, l'ID sera également définie en tant que «Moniteur inconnu». Display Resolution Résolution par défaut: 1024 x 768 @ 32 bits La liste des résolutions apparaîtra lorsque vous déplacez le curseur sur Résolution d'affichage. Sélectionnez la résolution souhaitée.
USB 3.0 MULTI-ADAPTER USER MANUAL degrés sous le mode d'affichage Etendu ou Principal. Mode d'affichage Etendu (Mode par défaut) Le mode d'affichage par défaut permet au dispositif d'affichage connecté de l' USB3.0 MULTI-ADAPTER de fonctionner en tant qu'affichage «Etendu» de l'écran de bord. Cette fonctionnalité d'espace de travail étendu améliore l'efficacité de travail. Mode Miroir Lorsque Miroir est sélectionné, l'écran du dispositif d'affichage, qui est connecté à l'USB3.
Mode Principal Lorsque Principal est sélectionné, le dispositif d'affichage, qui est connecté à l'Adaptateur d’affichage USB3.0, deviendra l'affichage principal, l'affichage de la carte graphique interne passera automatiquement à l'affichage étendu et agira comme un bureau d'extension. Désactivé Lorsque Désactivé est sélectionné, cela désactive l'affichage de l’ USB3.0 MULTIADAPTER.
USB 3.0 MULTI-ADAPTER USER MANUAL Panneau de contrôle multi-affichages Lorsque Panneau de contrôle multiaffichages est sélectionné, la fenêtre du panneau de contrôle multi-affichages apparaît afin de permettre la modification des raccourcis clavier. ※Utilisation des raccourcis clavier Le réglage par défaut est Ctrl + N° d'affichage. Cliquez sur la fenêtre que vous souhaitez déplacer sur la barre des tâches pour la rendre active et appuyez sur Raccourci clavier.
INSTRUCTIONS SUR LES FONCTIONS: MAC Résolution d'affichage Aller à , puis «Préférences système» Dans «Préférences Système», cliquez sur l'onglet «Affichage». Vous devriez voir cet écran. Sur cet écran, vous pouvez régler la résolution, le mode d'affichage et la gamme des couleurs. Mode d'affichage Cliquez sur l'onglet «organisation», et décochez «Affichage miroir» pour désactiver la mise en miroir de l'écran. Vous verrez automatiquement une autre fenêtre apparaître à l'écran qui représente l'USB3.
USB 3.0 MULTI-ADAPTER USER MANUAL ASTUCE: Pour simplifier l'utilisation de l'USB3.0 MULTI-ADAPTER, cliquez sur «Faire apparaître l'affichage dans la barre de menu.» Vous verrez l'icône d'affichage sur laquelle vous pouvez doublecliquer à tout moment. Organisation des fenêtres Vous pouvez organiser les fenêtres sur l'écran par «Exposé et Spaces» Aller à , puis «Préférences système» Dans Préférences système cliquez sur «Exposé et Spaces.» Vous devriez voir cet écran.
Exposé Afficher différentes fenêtres avec une seule touche. F9: afficher toutes les fenêtres ouvertes F10: afficher les fenêtres de l'application en cours seulement F11: afficher le bureau *Pour plus de fonctions d'organisation des fenêtres, veuillez consulter le manuel de l'utilisateur d’Apple. DEPANNAGE Si vous avez des questions concernant l'utilisation de la JUH410 USB3.0 Multi-Adapter, veuillez suivre les instructions ci-dessous.
USB 3.0 MULTI-ADAPTER - - - USER MANUAL d'affichage, la position ou l'emplacement de la fenêtre du lecteur vidéo (tels que de glisser la fenêtre du lecteur vidéo entre l'écran principal et l'affichage connecté). Cela peut entraîner le lecteur vidéo d'arrêter la lecture. Nous vous proposons d'arrêter la lecture vidéo, déplacer la fenêtre sur l'affichage du dispositif graphique USB connecté, puis de sélectionner le clip vidéo pour commencer la lecture.
SUPPORT TECHNIQUE Si vous rencontrez des problèmes lors de l'utilisation de ce produit, suivez les instructions cidessous avant de retourner ce produit au magasin. 1. Le Manuel de l'utilisateur Il contient les instructions détaillées et la section de dépannage; de nombreux problèmes courants peuvent être facilement résolus en lisant le manuel de l'utilisateur. 2. Support en ligne Visitez le site Web de j5 create (www.j5create.com) pour trouver la dernière version du logiciel pour votre appareil.
USB 3.0 MULTI-ADAPTER USER MANUAL (iv) un numéro d'autorisation de retour du matériel (v) Nom, adresse et numéro de téléphone du client j5 create ne garantit pas que le fonctionnement du produit sera ininterrompu ou sans erreur. j5 create n'est pas responsable des dommages résultant du non-respect des instructions d'utilisation du produit.
USB 3.
USB3.0 MULTI ADAPTER Table of Contents Benutzerhandbuch Einleitung ............................................................................................................................... 3 Systemvoraussetzungen ............................................................................................... 3 Physikalische Spezifikationen ...................................................................................... 4 Packungsinhalt ...........................................................
USB3.0 MULTI ADAPTER Benutzerhandbuch Einleitung Danke, dass Sie sich für den j5 create USB 3.0 Multi Adapter entschieden haben! Dieser Adapter wird als externe Grafikkarte Ihres MAC oder PC verwende, können Sie über den USBAnschluss zusätzlich ein USB-Computer-Peripheriegerät, oder ein einen VGA-Monitor.
USB3.0 MULTI ADAPTER Benutzerhandbuch Physikalische Spezifikationen Schnittstelle Host-Schnittstelle USB 3.0 Typ-A-Anschluss Video Schnittstelle VGA -Buchse DB 15-polige Buchse USB Port USB 3.0-Anschluss x 3 (Typ-A, Buchse) Power-Jack DC 5V(3.5mm) Strom Stromversorgung Über den USB-Bus versorgt versorgt *** Wenn Sie mit hohem Stromverbrauch externe Festplatte oder USB-Geräte, die Bus-Power mehr als 150mA brauchen verbinden.
USB3.
USB3.0 MULTI ADAPTER ERSTE SCHRITTE Benutzerhandbuch Hinweise vor der Installation Installieren Sie den Treiber vollständig, bevor Sie das USB-Kabel an den Computer anschließen. Starten Sie das Setup-Programm als Administrator, um Fehler bei der Installation zu vermeiden Schließen Sie zuerst das VGA-Kabel an den VGA-Anschluss des Anzeigegeräts und den der USB3.0 Multi Adapter und dann das USB-Kabel an den Computer an. Deinstallieren Sie den alten Treiber, bevor Sie den neuesten Treiber installieren. 1.
USB3.0 MULTI ADAPTER Benutzerhandbuch ※ Stellen Sie sicher, dass das USB-Kabel noch nicht am PC oder Notebook angeschlossen ist, während das Installationsprogramm ausgeführt wird. Die Installationsseite wird gestartet. Um die Jetzt wird der InstallShield Wizard Installation zu starten, klicken Sie auf “ Den (Installationsassistent) gestartet. Klicken Sie neuesten Treiber installieren”. Stellen Sie sicher, zum Fortfahren auf Next> (Weiter).
USB3.0 MULTI ADAPTER Benutzerhandbuch Computers aktiviert. Möglicherweise wird jetzt das Spiegelbild des Hauptmonitors auf dem Anzeigegerät angezeigt. Windnows 8, 7: Sie können die jeweilige Position jedes Anzeigegeräts über die Anzeigeeinstellungen ändern.
USB3.0 MULTI ADAPTER Benutzerhandbuch Wenn die interne Grafikkarte zwei Monitore unterstützt….. Wenn Sie eine Newport Station verwenden Das Anzeigegerät, das an den zweiten VGA-Anschluss angeschlossen ist, wird als 3. Monitor bezeichnet. Das Anzeigegerät, das an die Newport Station angeschlossen ist, ist der 2. Monitor. Prüfen der Gerätetreiberinstallation So prüfen Sie den Status der Treiberinstallation der USB3.
USB3.0 MULTI ADAPTER Benutzerhandbuch Deinstallieren des Gerätetreibers ※ Trennen Sie das USB-Kabel der USB3.0 MULTI ADAPTER ab, bevor Sie den Treiber deinstallieren. Klicken Sie auf “Start” → Systemsteuerung Eine Meldung erscheint, mit der Sie aufgefordert → Programme und Funktionen → werden, die Deinstallation des Programms zu Programm deinstallieren oder ändern bestätigen. Klicken Sie zum Fortfahren auf ‘OK’. Wählen Sie j5 NEWPORT STATION... Klicken Sie auf Deinstallieren.
USB3.0 MULTI ADAPTER Benutzerhandbuch INSTALLIEREN BEI MAC Installieren des Gerätetreibers Durch die Installation des Gerätetreibers kann das Betriebssystem des Computers die USB3.0 Multi Adapter erkennen. Achten Sie darauf, dass Sie die Beschreibung für das von Ihnen verwendete Betriebssystem befolgen. ※ Stellen Sie sicher, dass das USB-Kabel nicht an Ihrem Mac Desktop oder Mac Notebook angeschlossen ist, bevor Sie das Setup-Programm ausführen.
USB3.0 MULTI ADAPTER 6. Die Software wird installiert… Das kann einen Moment dauern. Benutzerhandbuch 7. Klicken Sie auf “Neustart”, um die Softwareinstallation abzuschließen. Prüfen der Gerätetreiberinstallation Führen Sie die folgenden Schritte aus, um den Installationsstatus des Treibers für den USB3.0 MULTI ADAPTER zu prüfen. Gehen Sie zu , wählen Sie Die Abbildung unten zeigt die Installation eines “About This Mac” und dann “ More the USB3.0 Multi Adapter Info…”.
USB3.0 MULTI ADAPTER Benutzerhandbuch Deinstallieren des Gerätetreibers Trennen Sie das USB-Kabel der USB3.0 MULTI ADAPTER vom USB-Anschluss ab. Um den Treiber zu deinstallieren, klicken Sie auf das Symbol “ Treiber deinstallieren” Klicken Sie zum Fortfahren auf “Öffnen” Klicken Sie auf “Deinstallieren und neu starten” Geben Sie Ihr Passwort ein, um die 6. Starten Sie das System neu.
USB3.0 MULTI ADAPTER INSTRUCTIONS SUR LES FONCTIONS: WINDNOWS 8, 7 Résolution d'affichage Accès rapide au paramétrage de Résolution d'affichage La liste des résolutions s'affichera lorsque vous déplacez le curseur sur Résolution d'affichage. Sélectionnez la résolution souhaitée pour l' USB3.0 MULTI ADAPTER. Résolution par défaut: 1024 x 768 x 32 bits Orientation de l'affichage L'Orientation vous permet d'activer le dispositif d'affichage, qui est connecté à l'USB3.
USB3.0 MULTI ADAPTER Benutzerhandbuch Mode miroir-Dupliquer Cette fonctionnalité permet d'afficher le contenu de l'écran de bord sur l'écran de l' USB3.0 MULTI ADAPTER Vous pouvez sélectionner «Dupliquer ces écrans» et cliquez sur «Appliquer» Remarque pour le système Windnows 8, 7 (en mode Miroir): d’exploitation La résolution des affichages secondaire et principal doit être la même lorsque vous utilisez le mode Miroir (Celle-ci peut être inférieure à la résolution préférée pour l'affichage).
USB3.0 MULTI ADAPTER Benutzerhandbuch Super Utilitaire Un super utilitaire offre davantage d'options, l'icône se trouve sur la barre des tâches en bas à droite Identifier les Moniteurs Lorsque «Identifier les moniteurs» est sélectionné, un numéro de série s'affiche dans le coin supérieur droit des dispositifs d'affichage. Vous pouvez voir le numéro de série de chaque affichage lorsque vous utilisez la fonction de raccourci clavier.
USB3.0 MULTI ADAPTER Benutzerhandbuch Paramétrage de l'affichage Accès rapide au système «Paramètres d'affichage» Position fixe Cette fonction vous aide à organiser les positions de tous les emplacements d'affichage que vous avez définis dans Affichage > Résolution de l'écran Après «Paramétrage de l'emplacement de l'affichage», Cochez dans cette fonction. Tous les emplacements d'affichage seront fixés. C'est l'idéal pour l'utilisateur de multi-affichages.
USB3.0 MULTI ADAPTER Benutzerhandbuch S'il n'y a pas de périphérique d'affichage connecté à l'Adaptateur d’affichage USB3.0, l'ID s'affichera comme «Moniteur inconnu.» Si le dispositif d'affichage ne prend pas en charge EDID, l'ID sera également définie en tant que «Moniteur inconnu». Résolution d'affichage Résolution par défaut: 1024 x 768 x 32 bits La liste des résolutions apparaîtra lorsque vous déplacez le curseur sur Résolution d'affichage. Sélectionnez la résolution souhaitée.
USB3.0 MULTI ADAPTER Benutzerhandbuch Mode d'affichage Etendu (Mode par défaut) Le mode d'affichage par défaut permet au dispositif d'affichage connecté de l'Adaptateur d’affichage USB3.0 de fonctionner en tant qu'affichage «Etendu» de l'écran de bord. Cette fonctionnalité d'espace de travail étendu améliore l'efficacité de travail. Mode Miroir Lorsque Miroir est sélectionné, l'écran du dispositif d'affichage, qui est connecté à l'Adaptateur d’affichage USB3.
USB3.0 MULTI ADAPTER Benutzerhandbuch Quand Identifier les moniteurs est sélectionné, un numéro de série s'affiche dans le coin supérieur droit du dispositif d'affichage connecté. Vous pouvez utiliser la fonction de Raccourci clavier pour trouver le numéro de série de chaque affichage. Panneau de contrôle multi-affichages Lorsque Panneau de contrôle multiaffichages est sélectionné, la fenêtre du panneau de contrôle multiaffichages apparaît afin de permettre la modification des raccourcis clavier. ※USB3.
USB3.0 MULTI ADAPTER Benutzerhandbuch rendre active et appuyez sur Raccourci clavier. ※Paramétrer les raccourcis clavier Par exemple: Déplacez la fenêtre sur Affichage03, et agrandissez-la automatiquement en plein écran. Choisissez «Déplacez la fenêtre active sur Affichage03», cochez «Déplacer la fenêtre et plein écran», et cliquez sur Appliquer pour la rendre active.
USB3.0 MULTI ADAPTER Benutzerhandbuch Mode d'affichage Cliquez sur l'onglet «organisation», et décochez «Affichage miroir» pour désactiver la mise en miroir de l'écran. Vous verrez automatiquement une autre fenêtre apparaître à l'écran qui représente l' USB3.0 MULTI ADAPTER Vous pouvez déplacer la barre de menu sur n'importe quel affichage pour attribuer n'importe quel affichage au Principal.
USB3.0 MULTI ADAPTER Benutzerhandbuch F8: vous pourrez voir la Disposition des espaces avec une seule touche. Vous pouvez déplacer n'importe quelle fenêtre sur un autre espace. Exposé Afficher différentes fenêtres avec une seule touche. F9: afficher toutes les fenêtres ouvertes F10: afficher les fenêtres de l'application en cours seulement F11: afficher le bureau *Pour plus de fonctions d'organisation des fenêtres, veuillez consulter le manuel de l'utilisateur d’Apple.
USB3.0 MULTI ADAPTER Benutzerhandbuch Medienwiedergabe Wechseln Sie unabhängig von der Plattform während der Videowiedergabe niemals den Anzeigemodus oder die Position oder die Anordnung des Videoplayer-Fensters (z. B. darf das Videoplayerfenster nicht zwischen die Hauptanzeige und das angeschlossene Anzeigegerät verschoben werden). Anderenfalls kann der Videoplayer dadurch gestoppt werden.
USB3.0 MULTI ADAPTER Benutzerhandbuch Das Benutzerhandbuch Das Benutzerhandbuch enthält ausführliche Anleitungen und Vorschläge zur Problembehebung. Viele Probleme können ganz einfach gelöst werden, wenn Sie sich zunächst sorgfältig das Benutzerhandbuch durchlesen. Online-Hilfe Auf der Website von j5 create (www.j5create.com) finden Sie die neueste Software für Ihr Gerät. Wenn das Problem weiterhin bestehen bleibt, können Sie eine E-Mail an service@j5create.com senden, in der Sie Ihr Problem beschreiben.
USB3.
USB 3.
USB3.0 MULTI ADAPTER Manual del usuario Table of Contents Instrucciones .........................................................................................................................3 REQUISITOS DEL ENTORNO .............................................................................................3 Physical Specifications ..................................................................................................4 Contenido del paquete ..................................................
USB3.0 MULTI ADAPTER Manual del usuario Instrucciones Gracias por comprar el j5create USB Multi-Adapter! Este adaptador actúa como tarjeta de vídeo externa para su PC oportá til compatible con MAC o Windows. Le permite añadir un monitor o pantalla y 3 puertos USB 3.0 adicional atravé s de cualquier puerto USB 3.0 disponible. Con los multiadaptadores j5create, no es necesario que abra su PC para agregar tarjetas gráficas caras.
USB3.0 MULTI ADAPTER Manual del usuario Physical Specifications Interfaz Interfaz host Interfaz de vídeo y audio Puerto de bajada Conector USB 3.0 tipo A Conector hembra VGA -DB de 15 contactos USB 3.0 (conector hembra Type-A) x 3 Potencia Jack DC 5V (3.
USB3.
USB3.0 MULTI ADAPTER Manual del usuario PRIMEROS PASOS Notas antes de la instalación 1. 2. 3. 4.
USB3.0 MULTI ADAPTER Manual del usuario arranque el CD de instalación manualmente. Haga doble clic en “Setup.exe” para arrancar. ※ Asegúrese de que el cable USB esté desenchufado del PC o portátil antes de ejecutar el programa de instalación. 1. La página de instalación se abrirá. 2. Tras presionar la opción de instalación, Para iniciar la instalación haga clic en el Asistente InstallShield se abrirá, haga “Instalar el último controlador”.
USB3.0 MULTI ADAPTER Manual del usuario Windows 8, 7: Puede modificar la posición de cada pantalla extendida en la configuración de pantalla. Vaya a “INICIO” → “Panel de control” → “Apariencia y personalización” → “Ajustar la resolución de pantalla” ※ o haga clic con el botón derecho en el escritorio y vaya a “Resolución de la pantalla” Cuando aparezca la ventana Resolución de la pantalla, podrá identificar cada número de monitor haciendo clic en “Identificar”.
USB3.0 MULTI ADAPTER Manual del usuario Verificar la instalación del controlador del dispositivo El procedimiento siguiente sirve para verificar el estado de la instalación del controlador de la USB3.
USB3.0 MULTI ADAPTER Manual del usuario Desinstalación del controlador de dispositivo ※ Desenchufe el cable USB de la USB3.0 Multi Adapter antes de desinstalar el controlador Haga clic en “Inicio” → Panel de control Aparecerá un mensaje confirmando que → Programas y características → desea desinstalar la aplicación. Haga clic en Desinstalar o cambiar un programa ‘ok’ para continuar. Seleccione j5 USB3.0 MULTI ADAPTER...
USB3.0 MULTI ADAPTER Manual del usuario INSTALACIÓN PARA MAC Instalación del controlador del dispositivo Si instala el controlador del dispositivo, el sistema operativo podrá reconocer la USB3.0 Multi Adapter. Asegúrese de consultar la instalación apropiada antes de comenzar la instalación. ※ Asegúrese de que el cable USB esté desenchufado de su Mac de sobremesa o Mac portátil antes de ejecutar el programa de instalación.
USB3.0 MULTI ADAPTER 6. La instalación está procesándose… Tardará unos momentos Manual del usuario 7. Haga clic en “Reiniciar” para completar la instalación del software Verificar la instalación del controlador del dispositivo El procedimiento siguiente le ayudará a verificar el estado de la instalación del controlador del USB Display Adapter VAYA A , seleccione “Acerca La imagen siguiente mostrará el proceso de de este Mac” y seleccione “Más instalación para un USB3.
USB3.0 MULTI ADAPTER Manual del usuario Desinstalación del controlador de dispositivo 1. Desenchufe el cable USB de la USB3.0 Multi Adapter antes de desinstalar el controlador 2. Para desinstalar, presione el icono “Desinstalar controlador” 3. Haga clic en “Abrir” para continuar 4. Haga clic en “Desinstalar y reiniciar” para proceder 5. Escriba la contraseña para permitir 6. Reinicie el sistema la desinstalación y haga clic en “Aceptar” para continuar.
USB3.0 MULTI ADAPTER Manual del usuario INSTRUCCIONES DE LAS FUNCIONES: WINDOWS 8, 7 Resolución de la pantalla Acceso rápido a la configuración de Resolución de la pantalla La lista de resoluciones aparecerá cuando mueva el cursor en Resolución de Seleccione la resolución la pantalla. deseada para el USB3.0 MULTI ADAPTER. Resolución predeterminada: 1024 x 768 x 32 bit Orientación de pantalla La Orientación le permite girar el dispositivo de pantalla, conectado al USB3.
USB3.0 MULTI ADAPTER Manual del usuario Modo de pantalla Modo Extendido (Predeterminado) Esta característica permite al dispositivo de pantalla conectado al USB3.0 Multi Adapter funcionar como pantalla en modo “extendido” de la pantalla incorporada.
USB3.
USB3.0 MULTI ADAPTER Manual del usuario Control Panel con multi-pantalla Esta característica única ofrece una experiencia de trabajo más simple para entornos multipantalla. Una serie de teclados de acceso directo ayuda a moverse rápidamente entre los dispositivos deseados. ※Usar teclado de acceso directo La configuración predeterminada es Ctrl + Nº de pantalla. Haga clic en la ventana que desee mover en la barra de tareas para que se active y luego presione Teclado de acceso directo.
USB3.0 MULTI ADAPTER Manual del usuario INSTRUCCIONES DE LAS FUNCIONES: WINDOWS XP Puede elegir todas las funciones simplemente y directamente sólo haciendo clic en este icono ( ) de la barra de tareas en la esquina inferior derecha. ID de pantalla Detección del ID del dispositivo de pantalla inteligente El USB3.0 MULTI ADAPTER soporta DDC/EDID definido por VESA. La utilidad debería mostrar el ID de dispositivo de pantalla cuando se conecte al USB3.
USB3.0 MULTI ADAPTER Manual del usuario Rotación de pantalla La Rotación de pantalla le permite girar el dispositivo de pantalla, conectado al USB Display Adapter. Es una función útil para algunos dispositivos de pantalla con función de giro. Hay 4 opciones disponibles: 0 grados/ 90 grados/ 180 grados/ 270 grados bajo el modo de pantalla Extendido o Primario. Modo de pantalla Extendido (modo predeterminado) Un modo de pantalla predeterminado permite que el dispositivo de pantalla activado en el USB3.
USB3.0 MULTI ADAPTER Manual del usuario ADAPTER, se convertirá en la pantalla Adapter.. principal, la pantalla de la tarjeta gráfica interna cambiará automáticamente para ser la pantalla extendida y actuar como escritorio extendido. Identificar monitor Cuando seleccione Identificar monitor, aparecerá un número de serie en la esquina superior derecha del dispositivo de pantalla conectado. Puede usar la función de Teclado de acceso directo para averiguar el número de cada pantalla.
USB3.0 MULTI ADAPTER Manual del usuario ※ Usar teclado de acceso directo La configuración predeterminada es Ctrl + Nº de pantalla. Haga clic en la ventana que desee mover en la barra de tareas para que se active y luego presione Teclado de acceso directo. ※ Configuración de los teclados de acceso directo Por ejemplo: Mover la ventana para mostrar03, y ampliarla automáticamente a pantalla completa.
USB3.0 MULTI ADAPTER Manual del usuario INSTRUCCIONES DE LAS FUNCIONES: MAC Resolución de la pantalla Vaya a y luego “Preferencias del sistema a En “Preferencias del sistema” haga clic en la ficha “Pantalla”. Debería ver esta pantalla. En esta pantalla puede ajustar la resolución, el modo de pantalla y el rango del color. Modo de pantalla Haga clic en la ficha “organización” y quite la marca a “pantalla mirror" para quitar el modo mirror de la pantalla.
USB3.0 MULTI ADAPTER Manual del usuario CONSEJO: Para simplificar el uso del USB3.0 Multi Adapter haga clic en “mostrar pantalla en la barra de menús. Verá el icono de la pantalla y podrá hacer doble clic en él en cualquier momento. Organización de Windows Espacio Puede organizar las ventanas en la pantalla Haga clic en “Mostrar Spaces en la con “Exposé & Spaces” Vaya a y luego a “Preferencias del barra de menús”.
USB3.0 MULTI ADAPTER Manual del usuario Exposé Ver diferentes ventanas con sólo pulsar una tecla. F9 : ver todas las ventanas abiertas F10: ver sólo las ventanas de la aplicación actual F11: mostrar escritorio *Para más funciones de organización, consulte el manual del usuario del ordenador Apple.
USB3.0 MULTI ADAPTER Manual del usuario SOLUCIÓN DE PROBLEMAS Si tiene preguntas sobre el uso de la JUH410 USB3.0 Multi Adapter, siga las instrucciones siguientes. Si necesita más ayuda, visite nuestra página web o llame a la línea directa de soporte de j5 create. Problemas conocidos Direct 3D no es soportado en XP. Sería soportado en modo Win 7 Aero. Recomendaciones generales Existen incompatibilidades al usar otros dispositivos Video over USB en un mismo sistema.
USB3.0 MULTI ADAPTER Manual del usuario Media Player Classic: http://sourceforge.net/projects/guliverkli/ Otros Algunas tarjetas gráficas, como Intel, no permiten que chipset de gráficos secundarios sean ajustados como tarjetas primarias. Como resultado, el modo primario podría no funcionar o la pantalla quedar deshabilitada. Si experimenta problemas durante el proceso de arranque, inicie su ordenador en Modo Seguro y desinstale el controlador.
USB3.0 MULTI ADAPTER Manual del usuario GARANTÍA DE j5 create j5 create ofrece una garantía limitada de 1 años. Los daños por desgaste y roturas no están incluidos. El usuario deberá llamar o enviar un correo electrónico al servicio al cliente de j5 create con información sobre el defecto del producto y obtendrá un número de autorización de devolución. Los usuarios se hacen responsables del coste de la devolución y nosotros nos ocuparemos del envío posterior.
USB3.0 MULTI ADAPTER Manual del usuario La información de este documento está sujeta a cambios sin previo aviso. El fabricante no hace representaciones o garantías (implícitas o no) en lo concerniente a la precisión e integridad de este documento y en ningún caso se hará responsable por la pérdida de beneficios o cualquier daño comercial, incluyendo, pero no limitándose a, daños especiales, incidentales, consecuentes u otros.
USB 3.0 MULTI-ADAPTER VGA & 3-Port HUB JUH410 ユーザー マニュアル JUH410 V1.
Table of Contents はじめに ............................................................................................................................................ 3 必須環境 .................................................................................................................................... 3 物理的仕様 ................................................................................................................................ 4 パッケージ内容..............................................................
USB 3.0 Multi Adapter ユーザー マニュアル はじめに このたびは j5 create USB 3.0 Multi Adapter をお買い上げくださいまして、まことにありがとうござい ます。このアダプターは、お使いの Mac または Windows パソコン用の外部ビデオカード及び USB 3.0 ハブとして機能します。 j5create マルチアダプターを使用すれば、コンピューターの箱を開けて高価なグラフィックカードを 追加する必要はありません。ドライバーをロードし、アダプターを USB ポートに接続し、次に VGA モニターケーブルをアダプター接続するだけで準備完了です。これは基本、拡張、ミラーモードと いう 3 つの表示モードをサポートしています。「プラグ&プレイ」機能を使用して、2 台目のモニタ ーやプロジェクターとコンピューターを接続して、すぐに新しい表示環境を作成することができま す。 j5create のエレガントなマルチアダプターシリーズは高速かつ持ち運びできるもう 1 つのソリューシ ョンを提供します。 必須環境 Microsoft Windows 8.
物理的仕様 インターフェイス ホスト インターフェイス USB 3.0 コネクター (A タイプ) VGA ポート VGA-DB 15 ピン コネクター (メス) USB ダウンストリーム ポート USB 3.0 コネクター (A タイプ メス) 電源アダプター出力 DC 5V (3.5mm) 電源 パワー モード 電源付き USB バス又は電源内蔵式 ***150mA 以上消費電流の外付け装置ご使用の際に、添付 AC/DC アダプタ ーご 使用く ださ い、 また 、JUH4xx 専 用 AC/DC アダプター(別売)ご使用ください。 機能 対応モード ビデオプレイバックは: 1080P 解像度: 2048 x 1152 @ 32bit 拡張表示: モード、ミラー モード、プライマリー モードに よる表示 画面回転: 0°, 90°, 180°, 270° 物理的仕様 寸法 本体: 42.9(W)x 87(H)x14.2(D) mm ケーブル長: 14.
USB 3.0 Multi Adapter ユーザー マニュアル 重量 約 61.
使用方法 インストール前のご注意 ドライバーのインストールが完了してから USB ケーブルをコンピューターのポートに挿入して ください。 インストールでのエラーを回避するため、管理者としてセットアップ プログラムを実行してく ださい。 コンピューターに USB ケーブルを接続する前に、まず表示装置の VGA または ケーブルを USB3.0 Multi Adapter の VGA あるいは ポートに接続してください。 最新のドライバーをインストールする前に、それより前のドライバーをアンインストールして ください。 1. 1. デバイス ドライバーのインストールを開始します (次のセクションで、お使いの PC の OS の 箇所をご参照ください) * 注意: 以下の手順に進む前に、ドライバーのインストールを完了してください。 2. USB 3.0 ケーブルのを、A タイプ コネクターをホストのノート PC に接続します。 3. 表示装置の VGA ケーブルをに接続します。 4.
USB 3.0 Multi Adapter ユーザー マニュアル Windows のインストール デバイス ドライバーのインストール このセクションでは Windows OS 向けに、デバイス ドライバーのインストール方法をわかりやすく 説明しています。 インストールの準備が整ったら、コンピューターの CD-ROM ドライブにドライバ ー CD を挿入します。 セットアップ プログラムが自動的に起動するはずです。もし自動的に起動し ない場合は、“マイ コンピューター” を開き、その中にある光学式ドライブの上をクリックして手 動でセットアップ CD を実行してください。 “Setup.exe” をダブルクリックして、セットアップを開 始してください。 ※ インストール プログラムを実行する前に、必ず USB ケーブルがデスクトップ PC やノート PC から抜いてあることをご確認ください。 1. インストール ページが開きます。 インストール 2.
起動します。 コンピュー ターを再 起動さ せた後、USB3.0 Multi Adapter の USB ケーブルをデスクトップ PC またはノ ート PC に接続します。 “デバイス ドライバー ソフ トウェアをインストールしています” というメッセ ージがポップアップします。 Windows 8, 7: ドライバー ソフトウェアが正常にインストールし 終わると、以下のメッセージがコンピューター上に 表示されます。 Windows XP : アイコン ( ) が右下ツールバーに現れます。以 下のメッセージが表示されれば、ドライバー ソフ トウェアは正常にインストールされています。 コンピューターの再起動後、USB3.
USB 3.0 Multi Adapter ユーザー マニュアル Windows XP: 画面の設定により、それぞれの拡 張ディスプレイの画面の状態を変更することが できます。 “スタート” → “コントロール パネル” → “デスク トップの表示とテーマ” → “画面” → “設定”の順 に進みます。 ‘画面のプロパティ’ のウィンドウが表示された ら、“識別” をクリックし、各モニターを番号で 識別することができます。 モニターをお好きな位置へドラッグさ ることも できます。 注意: お使いの PC の内部に取り付けてあるグラフィック カードのポートがデュアル ディスプレイ ポート である場合…… USB3.0 Multi Adapter を 1 台使用しているとき 2 つ目の VGA ポートに接続されている表示装置は番号 が 3 にふられたモニターであり、USB3.0 Multi Adapter に接続されている表示装置は番号が 2 の モニ ターとなります。 デバイス ドライバーのインストール点検 次の手順により、USB3.
Windows 8, 7: “マイ コンピューター” を右クリック “管 理” “デバイス マネージャー” 次の 3 項 目の “+” をクリックして状態を確認: “ネッ トワーク アダプター”、“サウンド、ビデオ、 およびゲーム コントローラー”、“ユニバーサ ル シリアル バス コントローラー” Windows XP: “マイ コンピュータ” を右クリック、“管理” → “デバイス マネージャ”、次の 4 項目の “+” をクリックし て状態を確認: “ディスプレイ アダプタ”、“ネットワーク アダプタ”、“サウンド、ビデオ、およびゲ ーム コントローラ”、“ユニバーサル シリアル バス コントローラ” デバイス ドライバーのアンインストール ※ドライバーをアンインストールする前に、USB USB3.
USB 3.0 Multi Adapter ユーザー マニュアル → プログラムの追加と削除 → プログラムの変 ルするか、確認を求めるメッセージが 表 示されま 更と削除 j5 USB3.0 Multi Adapter を選択しま す。 ‘ok’ をクリックして続行します。 す ...
MAC のインストール デバイス ドライバーのインストール デバイス ドライバーをインストールすることで、お使いのコンピューターのオペレーティング シ ステムが USB3.0 Multi Adapter を認識できるようになります。インストールを開始する前に、必ず 正しいインストール手順をご参照ください。 ※ セットアップ プログラムを実行する前に、必ず USB ケーブルがお使いの Mac のデスクトッ プ PC やノート PC から抜いてあることをご確認ください。 このセクションでは Snow Leopard を実行しているコンピューター向けに、デバイス ドライバーの インストール手順を説明しています。 1. CD-ROM ドライブにドライバー CD を 挿入し、.dmg ファイルを実行してド ライバーを “the mac_install” フォルダ ーに読み込みます 2. インストール ページが開きます。 イ ンストールを開始するときは[最新 のドライバーをインストール]をク リックします。 , ネットワークが利用 可能かどうか確認するか、または ” ” を押してインストール を開始します 3.
USB 3.0 Multi Adapter ユーザー マニュアル 4. ご自分のパスワードを入力して “OK” をクリック 5. “インストールを続行” をクリックします。 します。 6. インストールが進行中です… しばらくお待ちく ださい。 7. “再起動” をクリックして、このソフトウェ アのインストールを完了します。 デバイス _ドライバーのインストール点検 次の手順により、USB Ultra Stationのドライバーの インストール状態を確認することができます。 _ 1. から _“この _Mac について” _を選択し、“詳しい 13 2.
情報…” _をクリックします。 _ デバイス ドライバーのアンインストール USB3.0 Multi Adapter の USB ケーブルを USB ポートから抜きます。 アンインストールするときは、[ドライバー のアンインストール]アイコンを押してくだ さい “開く” をクリックして先へ進んでください。 “アンインストールして再起動” をクリックして先へ進ん でください。 ご自分のパスワードを入力してアンインスト 6.
USB 3.0 Multi Adapter ユーザー マニュアル 機能説明: Windows 8, 7 解像度 解像度設定へすばやくアクセス カーソルを解像度の上に移動すると、画面解像 度 の リ ス ト が 表 示 さ れ ま す 。 USB3.0 Multi Adapter に使用したい解像度を選択します。 初期設定の解像度: 1024 x 768 x 32 ビット 画面の向き 向きから、USB3.0 Multi Adapter に接続している 表示装置の画面の表示の向きを回転して変える ことができます。 表示モード 拡張表示モード (初期設定) この機能により、USB3.
ミラー モード-画面の複製 こ の 機 能 に よ り 、メ イン PC の 画面 と同 じ内容を USB3.
USB 3.
“アクティブ ウィンドウをディスプレイ 03 へ移動” を選択し、“ウィンドウを移動して全画面表示す る” にチェックを入れて 適用 をクリックします。 画面の設定 システムの “画面の設定” へすばやくアク セス 位置の固定 この機能により、ディスプレイ > 画面の解像度により設定されているすべてのディスプレイの位置 を調整することができます。“ディスプレイ位置の設定” を選択し、 (位 置を固定する) に “チェック” を入れます。これによって、すべてのディスプレイの位置が固定され ます。マルチディスプレイを活用する場合に最適の機能です。 機能説明:Windows XP どの機能も、画面右下のツールバーにあるアイコン ( ) をクリックするだけで簡単・ダイレクト に選択ができます。 画面 ID 表示装置 ID の検出 USB USB3.0 MULTI ADAPTER は VESA DDC (EDID) をサポートしています。このサポートにより、USB USB3.
USB 3.0 Multi Adapter ユーザー マニュアル ディスプレイが 1 つも USB USB3.
画面回転 画面回転により、USB Display Adapter に接続 している表示装置の画面の表示方向を変える ことができます。画面表示の回転が可能な表 示装置をお使いの場合に、非常に便利な機能 です。 次の 4 つのオプションが用意されています。 調整可能な回転度: 拡張表示モードまたはプライマリー モード下 で、0 度 / 90 度 / 180 度 / 270 度に回転可能 表示モード 拡張表示モード (初期設定) 初期設定の拡張表示モードで、USB3.0 Multi Adapter に接続している有効なディスプレイ を、メイン PC 画面 (メイン ディスプレイ) の “拡張” ディスプレイとして使用することがで きます。作業用の画面を大きくして、効率的 に仕事をすることができます。 ミラー モード ミラー モードを選択すると、USB USB3.
USB 3.0 Multi Adapter ユーザー マニュアル プライマリー モード オフ モード プライマリー モードを選択すると、USB USB3.0 オフ モード を選択すると、USB USB3.
マルチディスプレイ コントロール パネル マルチディスプレイ コントロール パネルを 選択すると、マルチディスプレイ コントロ ール パネルのウィンドウがポップアップ表 示されます。このウィンドウからホットキ ーの変更を行うことが可能です。 ホットキーを使う 初期設定は、 Ctrl + Display No.
USB 3.
表示モード “調整” タブをクリックし、“ディスプレイ を ミ ラ ー リ ン グ ” のチェックをはずす と 、 画 面の ミラ ーリングが解除されま す。画面上にもう 1 つのウィンドウが自 動的に現れ、そこに USB USB3.
USB 3.
トラブルシューティング JUH410 のご使用に関してなんらかの問題が生じました場合は、次の手順に従ってください。 そのほかにもご質問など ございましたら、j5 create ウェブサイトへアクセスしてくださるか、またはサポート ホットラインへお電話くださいま すようお願い申し上げます。 すでに知られている問題 - Direct 3D は XP ではサポートされていません。 これは Windows 8, 7 の Aero モード以上でサポートされています。 一般的な推奨事項 - 単一のシステム上で USB デバイスを介して他のビデオ機器を使用する場合、互換性の問題が常に存在します。 j5 create のインストールを続行する前に、必ず USB デバイス接続の他のビデオ機器がすべてアンインストールされ ていることをご確認ください。 - また、デバイスがホスト システムに正しく接続されているかチェックしてください。 - お使いの USB ポートが USB3.
USB 3.0 Multi Adapter ユーザー マニュアル を開くという方法も試してみてください。 お使いの PC に、特定のビデオ フォーマットの再生をサポートするメディア コーデックが不足している可能性も - あります。 ライセンス フリーのメディア コーデックをインストールする場合は、以下のリンクをご利用くださ い。K- Lite: http://www.free-codecs.com/download/K_Lite_Codec_Pack.htm ビデオ/メディア プレイヤーは、さまざまな表示モードの下で各種の復号化機能を備えています。 メイン PC に - 接続された USB グラフィック ディスプレイ上で、各種 DVD や特定のビデオ フォーマットをよりよいパフォーマ ンスで再生できるよう、次のライセンス フリー ソフトウェアを使用されることを推奨いたします。 Media Player Classic: http://sourceforge.
テクニカル サポート 本製品のご使用にあたりなんらかの支障が生じた場合は、お買い求めの販売店に返 品する前に、まずは次の手順に従ってご確認くださいますようお願いいたします。 1. ユーザー マニュアル 本製品に関する詳細な説明とトラブルシューティングが記載されており、一般 的問題の多くは、ユーザー マニュアルをお読みいただくことで容易に解決でき ます。 2. オンライン サポート j5create のウェブサイト (www.j5create.com/jpn/) にアクセスしてください。本製 品用の最新ソフトウェアをご提供しております。以上の方法をお試しになって も問題が解決されない場合は、j5_support@kagaht.co.jp までトラブルの内容を お寄せください。j5create テクニカル サポート チームが 24 営業時間以内にお 返事いたします。 3.
USB 3.
本文書の内容は、予告なしに変更されることがあります。 この製造業者は、この文書の正確性と完全性について、なんらかの表明または保証を (明 示または黙示を問わず) 行うことはなく、またいかなる場合にも、特別の、または偶発的な、または間接的な損害を含むがこれらに限定されない、 あらゆる利益の損失や商業上の損害に対して責任を負うものではありません。 本文書のいかなる部分も、この製造業者の書面による明確な許可なし に、複写、記録、情報記録検索システムの使用を含むあらゆる電子的もしくは機械的な手段により、複製または伝送することはできません Copyright© 2011 j5 create.
USB 3.
USB3.0 MULTI ADAPTER 使用手冊 目錄 產品介紹 ........................................................................................................................................................................ 3 電腦環境需求 ................................................................................................................... 3 產品規格........................................................................................................................... 4 解析度以及色澤 .........................................
USB3.0 MULTI ADAPTER 使用手冊 產品介紹 感謝您購買j5create USB 3.0多功能外接卡! 本產品能讓 MAC 或 Windows 電腦輕易的連接、 增加顯示 設備來延伸桌面的工作空間,以及增加更多USB 3.0接口。 平板或筆電埠不夠時要怎麼辦?是否要另外購買外接顯示卡或HUB呢? J5create 的USB3.0多功能外接卡 完全滿足您的需求。只要透過一條USB 3.0接到您的MAC 或Windows電腦,即可輕易的擴充第二顯示 設備來延伸桌面的工作空間,簡易的操作介面,可切換4種顯示模式(延伸/同步/主螢幕切換/旋轉),大大提升 工作效率,亦可同時擴充三個USB3.0接口給USB周邊設備,輕便又快速! USB 3.0 外接顯示卡特色: USB 3.0介面最高可達5 Gb/s 支援 Windows & Mac OS 顯卡最高支援解析度2048 x 1152 @ 32bit 顯示模式:延伸/同步/主螢幕切換/旋轉 支援1080P 影片播放 台灣製造 電腦環境需求 支援 Microsoft Windows 8.
USB3.0 MULTI ADAPTER 使用手冊 產品規格 型號: 介面 上端介面 USB 3.0 Type-A公接頭 影像裝置介面 VGA DB-15 pin母接頭 USB埠 USB 3.0 母接頭 x 3 電源埠 DC 5V (3.
USB3.0 MULTI ADAPTER 使用手冊 Hub 集線器 Downstream埠 USB 3.0 Type-A 母頭 x 3 機構規格 尺寸 主體: 87(寬)x 42.9(高)x14.2(深) mm 線體長度: 14.8 cm 重量 約 61.
USB3.0 MULTI ADAPTER 使用手冊 包裝內容 USB3.
USB3.0 MULTI ADAPTER 使用手冊 GETTING STARTED – 安裝前注意事項 為避免發生錯誤,請以管理者權限進行安裝 驅動程式安裝完成之前,請勿將 USB外接顯示卡接到電腦USB埠上 更新驅動程式之前,請完全移除舊版驅動程式 安裝驅動程式完成後,先連接顯示器的VGA線 ,再將USB線接上電腦的USB埠 建議直接連接在電腦主機的 USB埠使用 在安裝過程當中及安裝完成後,每次開機的時候,螢幕會有全黑或閃爍的情形,此為顯示裝置 安裝偵測過程。 1. 開始安裝軟體驅動程式(請參考下單元OS的安裝步驟) *Note: 請完成軟體驅動程式安裝,再依下列程序進行安裝 2. 連接USB 3.0線Type-A 端至電腦 3. 連接螢幕VGA線 4.
USB3.0 MULTI ADAPTER 使用手冊 WINDOWS 安裝 安裝流程 這單元指引在Windows下的安裝過程。將驅動程式光碟放入光碟機中,安裝精靈會自動開始執行。 如果 自動安裝沒有執行,可手動啟動安裝,請至 “電腦”下點選 “磁碟機”,並雙擊“Setup.exe”即可。 ※驅動程式尚未安裝完成前,請勿將 USB 線接到電腦 USB 埠上 1. 將會出現軟體安裝介面,將可以進行安裝, 請按 2. 點選“安裝驅動程式”後,安裝精靈開始進行 “安裝最新驅動程式”. 請注意需要開啟網際網路進 安裝, 按 下一步> 繼續 行下載,或是點選“安裝驅動程式” 進行安裝光碟 驅動程式。 3. 詳閱授權合約並點選“我接受授權合約的條 4. 驅動程式成功安裝完畢,請點選 “是,立即重 款”,再按 下一步 > 開始安裝驅動程式 新啟動電腦”,並按 完成 立即重新開機 5. 重新開機後,請先將 外接顯示裝置(螢幕/投影 機)的VGA連接線連接至 USB3.0 Multi Adapter 的VGA端上。 6. Windows 8, 7: 如果裝製成功安裝,將會提示…..
USB3.
USB3.0 MULTI ADAPTER 使用手冊 中的延伸桌面位置,以符合實際的螢幕擺 設位置 註明:若您使用的電腦原先是獨立顯示卡有雙埠輸出….. 連接在USB3.0 Multi Adapter的螢幕編號,會變成第一及最後,所以連接USB3.0 Multi Adapter的螢 幕顯示器會是2號編號 確認安裝狀態 請依照下列流程進行確認USB3.
USB3.0 MULTI ADAPTER 使用手冊 移除流程 ※移除 USB3.0 Multi Adapter 的驅動程式前,請先將 USB 線 從 USB 埠上拔除後,再繼續下列動作: 1. 從 “開始” → “控制台” → “程式集”→ 2. 再次確定是否移除?如果是,請按 確定 繼續 “程式和功能”→ “解除安裝程式”點選 j5 USB3.0 MULTI ADAPTER... 按 解除安裝 繼續 3.
USB3.0 MULTI ADAPTER 使用手冊 MAC 安裝流程 安裝流程 安裝驅動程式讓系統可以正確辨認USB3.0 Multi Adapter。這單元指導在MAC 雪豹下的安裝過程 ※驅動程式尚未安裝完成前,請勿將USB Newport Station USB線接到電腦USB 埠上 這單元指導在MAC 雪豹下的安裝過程。 1. 請將驅動程式光碟片放入光碟機中,選擇 mac_install 檔案夾並點開.dmg 檔案 2. 將會出現軟體安裝介面,將可以進行安 裝, 請按 “GetLastestDroveronline.webloc(連至官網下載最新驅動程 式)”. 請注意需開啟網際網路進行下載, 或是點選你所需版本“安裝驅動程式” 進 行安裝光碟驅動程式。 3.
USB3.0 MULTI ADAPTER 4. 輸入您的名稱與密碼,並按“好” 使用手冊 5. 按“繼續安裝” 6. 正在進行安裝軟體…安裝過程將會需要幾分 7. 當驅動程式已成功安裝,請按 “重新啟動 鐘進行 確認安裝狀態 以下步驟將會確認 USB3.0 Multi Adapter 的安裝狀況 1. 至 訊” “關於這台Mac”, 選擇 “更多資 2.
USB3.0 MULTI ADAPTER 使用手冊 移除流程 1. 移除 USB Newport Station 的驅動程式 前,請先將 USB 線從 USB 埠上拔除 後,再繼續下列動作: 2. 選擇 “uninstaller”進行移除驅動程式 3. 選擇“Uninstall and restart”進行移除 4. 選擇 “uninstaller”進行移除驅動程式 安裝 5. 輸入名稱與密碼 6.
USB3.0 MULTI ADAPTER 使用手冊 功能操作: WINDOWS 8, 7 由於 Window 8, 7 會自動偵測顯示裝置辨識的功 能,只要顯示裝置內建有EDID資訊並連接在USB 外接顯示卡系列產品,EDID資訊(如廠牌、型號 等…)會被讀取並顯示在功能表選單上,可協助您 辨識透過USB 外接顯示卡系列產品所連接的螢幕 螢幕解析度設定 快速設定解析度選項 連接USB3.0 Multi Adapter的螢幕,可以針對所 需解析度做解析度的設定 預設解析度: 1024 x 768 x 32 bit 螢幕旋轉顯示設定 選定旋轉角度後,USB3.
USB3.0 MULTI ADAPTER 使用手冊 螢幕模式設定 延伸桌面模式(預設值) 選擇Extended(延伸桌面模式)時,USB3.0 Multi Adapter 連接的顯示設備 (如螢幕或投 影機)畫面會成為延伸桌面 先選擇 “顯示器”號碼,再 “多部顯示器 (M):”下拉選單選擇 “延伸這些顯示器” , 然後按 “套用”。 複製螢幕 這個功能讓USB3.0 Multi Adapter連接的顯 示設備(如螢幕貨投影機)畫面會仿製主螢 幕顯示畫面,兩個顯示設備的畫面會完全相 同,並且同步顯示 選擇 “這些顯示器上同步顯示”並按 “套 用” 注意:當使用同步顯示功能時,主螢幕以及第二螢幕 的解析度需設定一樣,解析度將會自動調整為兩台其 中較低的解析度。 在Windows 8, 7系統下的限制, 只有兩個螢幕可以同時設定為同步顯示。 主螢幕切換 選擇主螢幕切換時,USB3.
USB3.
USB3.0 MULTI ADAPTER 使用手冊 多重畫面控制介面 這特殊的控制介面讓使用者輕鬆瞭解螢幕位 置並可以設定快速鍵, 當選擇 “多重畫面控 制介面”時,會出現如下圖的多螢幕控制介 面設定視窗。使用者可自行定義 “快速鍵”, 將指定的應用程式視窗,直接移動至指定的 螢幕上顯示 ※快速鍵使用 預設值為 Ctrl + 顯示器號碼 在工具列點選欲移動的視窗,再按下快捷鍵即可。 .
USB3.0 MULTI ADAPTER 使用手冊 功能操作: WINDOWS XP 在 XP 系統下,工具列右下角會出現( )圖示,透過此圖示將可以輕鬆設定所有功能。 自動偵測辨識功能 USB 外接顯示卡支援國際視訊標準 (VESA) 定義之DDC/EDID 功能,只要顯示裝置內建有EDID資訊並連 接在USB 外接顯示卡系列產品,EDID資訊(如廠牌、型號等…)會被讀取並顯示在功能表選單上,可協助您 辨識透過USB3.0 MULTI ADAPTER 所連接的螢幕 當USB3.
USB3.0 MULTI ADAPTER 使用手冊 螢幕解析度設定: 預設值解析度: 1024 x 768x 32 bit 快速設定解析度選項:游標移到解析度時,會 出現解析度列表選單,請將游標移到所需解 析度之後,便會直接切換 USB3.
USB3.0 MULTI ADAPTER 使用手冊 螢幕顯示設定 延伸螢幕(預設值) 選擇 Extended(延伸桌面模式)時,USB3.0 Multi Adapter 連接的顯示設備 (如螢幕或 投影機)畫面會成為延伸桌面 複製螢幕 Mirror 選擇Mirror (複製螢幕模式)時, USB3.0 Multi Adapter連接的顯示設備 (如螢幕或投 影機)畫面會仿製(clone)主螢幕顯示畫面,即 兩個顯示設備的畫面會完全一樣,並且同步 顯示 複製螢幕模式啟動時,USB3.0 Multi Adapter連接的顯示設備解析度會自動調整 成和主螢幕一致可以選擇 “水平複製” 或 “垂直複製” 主螢幕切換 Primary 關閉螢幕 Off 選擇Primary(主螢幕切換模式)時,USB3.0 Multi Adapter所連接的顯示設備 (如螢幕或投影機)畫面 選擇關閉模式時,USB3.
USB3.
USB3.
USB3.0 MULTI ADAPTER 使用手冊 操作功能: MAC 螢幕解析度 調整解析度,請至右上角 , 並選擇“偏好設 “偏好設定” 視窗開啟後,選擇 “顯示 器”,將可以調整解析度 定 螢幕模式設定 點選 “顯示器”下的 “排列方式”, 視窗開啟後, 取消 “同步影像顯示器”, 視窗將會出現連接 USB3.
USB3.0 MULTI ADAPTER 使用手冊 調整視窗 Space 使用者可以使用 “Expose 與 Spaces”來調整 勾選 “啟用Spaces”,將會看到space號碼, 所需視窗擺放處 並可以把設定應用程式在任何space號碼下執 行。 選取右上角 , 並選擇 “系統偏好設定”-> “Exposé 與 Spaces.” 將可看到以下畫面..
USB3.0 MULTI ADAPTER 使用手冊 簡易疑難排除與安裝提醒 有任何使用產品的問題,可以先參考以下內容說明。如以下無法解決您的疑問,需更多支援,請至 j5 create 官網 搜尋或是請電洽 j5 create 客戶支援服務專線。 已知問題 - 在XP系統下無法支援Direct 3D。 在Windows 8, 7下Aero 模式下可支援。 一般問題排除 - 安裝不同品牌USB 顯示技術的產品也許會產生相容性的問題,如需要安裝j 5 create USB3.0 Multi Adapter, 請確認移除其他安裝的USB 外接顯示產品的驅動程式。 - 確定所有的連接線都已經並穩固與電腦妥善連接,並檢查所有顯示設備電源是否已經打開。 - 確定USB3.0 Multi Adapter相連接所連接的電腦USB 埠是USB 2.0的規格。 - 如有第二的螢幕沒有偵測到,試著拔除USB 外接顯示卡並重新插入USB 埠或是插入不同USB埠。 - 要確認連接的螢幕是否已開啟電源。 - 請確定安裝完驅動程式後, 需要重新啟動電腦。 - 可以試著拔除除了USB3.
USB3.0 MULTI ADAPTER 使用手冊 其他: - 有些主機內建式顯卡, i.e. Intel, 不支援第二個顯示晶片在主螢幕互換模式的功能,所以 主螢幕切換的功能會 無法使用。 - 有些小筆電使用Windows 8, 7 star的版本,電腦本身版本沒有支援延伸功能,所以延伸的功能也將無法使用。 - 安裝驅動程式後若無法順利開機到Windows桌面,請重新啟動電腦並以安全模式開機,移除先前安裝的驅 動程式後重新安裝一次驅動程式 - 確認目前安裝的驅動程式版本,請至“控制台” → “解除安裝或變更程式”,選擇 程式名稱: USB Display Adapter 9.xx.xxxx.0159 (版本號碼). - 技術支援 如果在使用 j5 create 產品時,若有任何疑問或使用上之問題。請依循下列所示流程,將可解決您的問題 1. 參閱使用手冊 The User Manual 使用手冊包含完整的安裝流程以及問題解答單元,可以快速解決一般消費者使用習慣上的問題。 2. 網站技術支援 Online Support 請至 j5 create 官網(www.j5create.
USB3.0 MULTI ADAPTER 使用手冊 j5 create 產品保固 j5 create 提供一年產品保固。不包含產品正常的磨損跟老化或自行拆卸或進行改裝。若您的產品有安裝或維修上的問題時, 可先致電或 email 至 j5 create 客戶服務中心,如須寄回,客服人員將會提供您一組追蹤號碼。 使用者將需要負擔寄回 j5 create 客戶服務中心的運費。 維修流程 步驟 1. 請詳細敘述產品型號及故障狀況 步驟 2. 與本公司客戶服務部門聯絡: (1) 電話詢問 美國技術服務專線:+1-888-988-4088 台灣技術服務專線 : +886-2-2269-5533 # 19 (2) 線上聯絡 www.j5create.com ->Contact 客戶聯絡 步驟 3. 如須寄回維修 請詳細準備以下資料 (i) 購買證明發票副本 (ii) 註名產品序號&產品型號 (iii) 詳細紀錄故障狀況 (iv) 附上個人聯絡方式(姓名、 電話、 地址) 步驟 4.
USB3.0 MULTI ADAPTER 使用手冊 REGULATORY COMPLIANCE FCC This equipment has been tested and found to comply with FCC Part 15 Subpart B § 15.109/15.107 Class B. Operation is subject to the following two conditions: • This device may not cause harmful interference • This device must accept any interference, including interference that may cause undesired operation of the device.