Operating Manual
POWER JUICER ELITE
POWER JUICER ELITE Contents 4 5 6 7 10 11 13 14 Important Safety Information Helpful Hints Parts/Main Unit Assembly/Main Unit Assembly/E-Z Loader Attachment Disassembly/Main Unit Cleaning Your Power Juicer Troubleshooting Contents 3
POWER JUICER ELITE Important Safety Information READ THESE SAFEGUARDS CAREFULLY BEFORE USING THIS PRODUCT! When using electrical appliances, basic safety precautions should always be followed including the following: • Always remove power cord from electrical outlet before assembly or disassembly. • NOT FOR USE BY CHILDREN! Keep out of the reach of children to avoid injury. This appliance is not a toy. • Consult your physician before giving fresh juice to children, especially infants.
POWER JUICER ELITE Helpful Hints Follow these helpful hints to obtain the best results from your Power Juicer Elite. • Do not put any fruit or vegetables in your machine until power is turned on and the motor is spinning. • Allow unit to run for at least 10 seconds before juicing. • Do not force food into the juicer. Allow food to pass through slowly and steadily using the pusher. You do not need to apply pressure unless the juicer starts to vibrate.
POWER JUICER ELITE Parts Main Unit MAIN UNIT (Fully Assembled) Pusher Filter Blade Chute Lid with Pulp Guard Pulp Collector Crescent Tool (for tightening and removing blade) Receptacle Juice Spout Pegs (Pegs fit into blade.
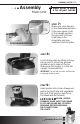
POWER JUICER ELITE Note: Refer to page 6 for all part names. Assembly Main Unit STEP 1: WARNING: NEVER PLUG THE POWER CORD INTO AN ELECTRICAL OUTLET BEFORE UNIT IS FULLY ASSEMBLED. Place base on a dry flat surface with locking bar in down position on the spout side in front of the machine (as shown). STEP 2: Place receptacle on the base, with juicer spout facing the same direction as locking bar. Settle receptacle into alignment.
POWER JUICER ELITE POWER JUICER ELITE Assembly Note: Refer to page 6 for all part names. Main Unit STEP 4: Place blade inside filter, centered over screw peg. Using orange crescent tool, place its pegs into the holes on the blade. Turn clockwise while holding the filter and receptacle in place until tight (as shown). Filter IMPORTANT: There are MIN/MAX arrow markings on the orange rim of the filter. These markings prevent you from overtightening or undertightening the blade.
POWER JUICER ELITE Assembly Note: Refer to page 6 for all part names. Main Unit UPRIGHT POSITION DOWNWARD POSITION STEP STEP 7: Make sure juice spout is in the downward position. If the juice spout is left in the upright position the juice will not flow. It will stay in the receptacle and may overflow from the sides. 8: Lock lid into place by lifting locking bar up until it clicks into grooves located on both sides of the lid. Make sure locking bar is in the full upright, locked position.
POWER JUICER ELITE Assembly E-Z Loader Attachment Important Safety Information READ THESE SAFEGUARDS CAREFULLY BEFORE USING YOUR E-Z LOADER ATTACHMENT! • TO AVOID PERSONAL INJURY: Never look inside the chute while the machine is running. Especially when using fruits or vegetables that contain pits. Shut down the machine and wait for the blade to stop spinning. Remove power cords from electrical outlet before removing the pits from the chute.
POWER JUICER ELITE Disassembly Main Unit STEP Note: Refer to page 6 for all part names. 1: WARNING: Before disassembling the unit make sure the power is OFF and remove power cord from the electrical outlet. Place unit on a dry, flat stable surface Remove pusher from chute. STEP 2: Lower the locking bar (silver) into position as shown until it rests on flat surface. STEP 3: Remove lid with pulp guard. STEP 4: Remove pulp collector.
POWER JUICER ELITE Disassembly Main Unit Note: Refer to page 6 for all part names. STEP 5: Use the crescent tool to remove the blade. Place the two pegs at either end of the crescent tool into the two holes on the blade. Press down and turn counterclockwise while holding filter and receptacle to unlock the blade. Remove blade carefully. STEP 6: Remove filter. Pusher STEP 7: Make sure spout is in the upright position to avoid leakage. Remove receptacle from base. STEP 8: Wipe down with damp sponge.
POWER JUICER ELITE Cleaning Your Power Juicer To Clean Main Unit: • Turn off the power switch and wait until the motor completely stops. • With dry hands, unplug the power cord from electrical outlet. • Disassemble the machine. (See disassembly instructions.) • Clean all other parts in warm, soapy water. A mild detergent is recommended. Rinse well and dry thoroughly. All components are dishwasher safe with the exception of the base. Do not use in European Import or a Commercial dishwasher.
POWER JUICER ELITE Troubleshooting Problem The motor does not run after being switched on. Possible Reasons and Solution • Check to see if unit is plugged in. • Locking bar is not locked in place properly. • Check if all parts are assembled properly. • Check if there is any residue left between blade and receptacle. • Press reset switch located on the underside of main base. The motor is running with loud noise and shaking. • Check that all parts are assembled properly and in the correct position.
Exciting Offers from Power Juicer Elite Accessory Kit & Cookbook Jack LaLanne’s Recipes for Healthy Living Cookbook Measuring Cup Overflow Platform Filter Brush Call 1.800.314.1235 9:0 0 AM – 7:0 0 PM YES! Please Send Me the following Items: n One Accessory Kit & Cookbook for only $19.99 plus $3.99 s&h. Total $23.98. n “Recipes for Healthy Living” Cookbook for only $9.99 plus $1.99 s&h. Total $11.98. n Replacement Parts Kit #1 for only $9.99 plus1.99 s&h. Total $11.98.
We are very proud of the design and quality of our Power Juicer Elite. This product has been manufactured to the highest standards. Should you have any problem our friendly customer service staff is here to help you if you have a question. We are available at: 1-800-314-1235 9:00 AM – 7:00 PM EST Monday – Friday 9:00 AM – 5:00 PM EST Saturday © 2006 Tristar Products, Inc. All rights reserved. Distributed By: Tristar Products, Inc.