
User guide

JACLO.COM
|
PG 2 CHROMATHERAPY
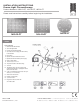
Water line: arrange your shower box with
the water supply line and coupling for the
showerhead. The coupling must be above the
ceiling. (Fig. 1).
20 litres of water per minute is enough for the
Dream Light showerhead to work. In fact, the
showerhead, which is installed parallel to the
floor, supplies a “free falling” stream of water
like soft rain. Make sure that the faucet supplies
at least 25 liters of water per minute. Naturally,
the higher the flow rate of the faucet, the better
the showerhead will work. Also make sure that
the hot water heater supplies enough hot water
for proper functioning.
Power connection: arrange your shower
box with the electrical connection for the
showerhead LED lights, placing it above the
false ceiling (Fig. 1).
Power source must be externally switched
GFCI circuit and must be installed in
accordance with local and national codes.
The transformer: 9VDC / 110VAC / 60Hz must
be installed outside the shower box in a safe
place (Fig. 1). Accordance with the national and
local laws/codes in force.
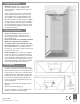
Control keypad: fix a 3 module recessed box
to the wall. The box may be positioned either
inside or outside your shower box. Fit this with
a corrugated tube 20mm in diameter to connect
the recessed box to the upper part of the falst
ceiling (Fig.2). Warning: the keypad is supplied
with a connecting cable that is 3m long.
Once the electrical and hydraulic systems are
hooked up, install the false ceiling with suitable
reinforcement and make sure it is perfectly level.
Keep a distance of at least 12 cm between the
ceiling and the false ceiling (Fig.1). Position the
template, mark with a pencil the 4 attachment
holes and the central break-through that will
house the electrical and hydraulic parts of the
showerhead (Fig.2).
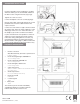
Make the 4 attachment holes having a 10 mm
diameter.
Make the break-through (Fig.3).
Insert the 4 expansion screws and make sure
that they are placed accurately (Fig.4).
PLUMBING EQUIPMENT
ELECTRICAL EQUIPMENT
FALSE CEILING